In this article, I will introduce you to 4 free Twitch desktop clients for Windows, including the official one. These desktop clients will let you browse games, channels, and the best of all chat with other Twitch users and friends while watching the live Twitch streams at the same time. The official Twitch desktop client even lets you broadcast game videos as live Twitch streams, but others don’t support this feature. So, if you are a Twitch streamer, then the official one will best suit your needs. If you just need a Twitch desktop client to stream videos and chat with other users, then these 3rd party software are worth a shot as they are lightweight as compared to the official one.
If you are looking for a Twitch video downloader, then you can check out TwitchDown and Twitch Leecher.

Twitch (Official):
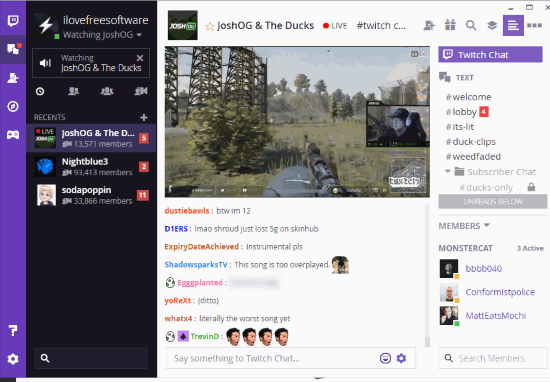
Twitch is the official desktop client for Twitch. With the official desktop client, you can join servers of other players, create public and private servers of your own, and make a video or voice calls to friends on Twitch. If you mainly use Twitch to just stream your favorite game live shows then you can join a server created by other pro gamers and watch their live game stream and chat with other live viewers of his channel.
There are options to stream games to Twitch but I couldn’t test it as my system specifications simply doesn’t allow me to do it. It lets you integrate your Twitch channel to a server and then share your gameplays to your audience. I am sorry for the inconvenience caused but I am giving you the task of exploring this option at your end, you can find options related to streaming in the Streamer mode within its Settings.
Except for that, users who just wants to stream gameplays and interact with the Twitch community don’t have to do anything tricky. You have to just install it from the link provided above and then login with your Twitch or Curse account to use. After login, you can see its main interface which is pretty smooth and responsive. All the options are available on the left sidebar i.e. Discover, Friends Requests & Suggestions, Chat, Game Library, and Settings.
To join a server, go to Discover and then click on the Join button against a server that you want to join. Once you join a server, it appears on the left sidebar in the “Recents” section. You can access and switch between different Twitch servers from there. When you enter a server, you can chat with the channel members and other live viewers of their channel. Best of all, the live game streaming automatically starts when you enter a channel, as you can see in the screenshot above. You can adjust the quality and choose to play the live game video in full-screen mode too. In fact, the interface is divided into 2 sections; on the top section you can watch the live stream and the bottom one is to chat with other viewers.
If you create a server on your own, then you can share the invitation link with friends and others to let them join it. You can toggle the privacy of server from settings from private to public. The public servers appear in the Discover queue and others can instantly join it. In addition to this, you can also assign roles to other server members as you are its admin.
Orion:
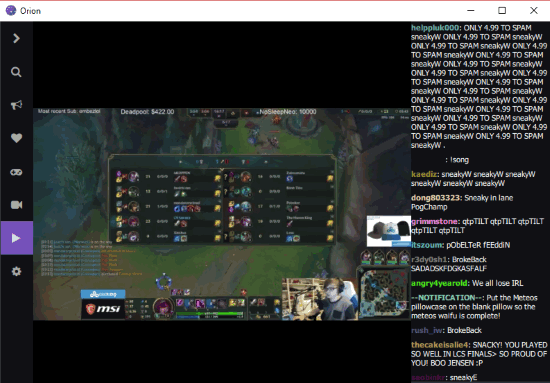
Orion is a 3rd party Twitch desktop client for Windows. It is completely open source and also available for Mac. You can check out its GitHub repository here. If I compare it with the official Twitch client, then it seems quite limited as you can’t create servers and broadcast the live stream of your gaming sessions. It is totally designed to browse Games and Channels and to enjoy their live gaming videos. The option to chat with other viewers is also there. The only area where it is ahead of the official Twitch client is that it is lightweight and pretty easy to use as well. Just install it and login with your Twitch account and start browsing your favorite games and watch their live gaming sessions from different channels, as shown in the screenshot above. You can also choose the visual quality of live stream video as per your bandwidth quota and play it in full screen. The chat window is available right next to it which enables you to share comments and chat with other online viewer watching the same game. So, I will recommend it over the official one if you just want to watch gaming videos and don’t want to stream them on Twitch.
During my testing, I met with a little problem in running this Twitch desktop client as it showed “VSRUNTIME140.dll” file missing error. If you run into a similar problem then you can follow these steps:
Step 1: Download the required DLL file from the internet. You can find most of these on DLL-Files.
Step 2: Now, paste the downloaded DLL file in the System 32 folder which you can find in “C:\Windows” location and then try to run the program. If the problem still persists, then paste the same DLL file in the folder where you choose to install it. If you didn’t change the default location, then you can paste the DLL file in “C:\Program Files (x86)\Orion\bin” folder. Now, again run Orion and it just might work, if not, then a system restart will do the job.
Twitch Desktop Client (Unofficial):
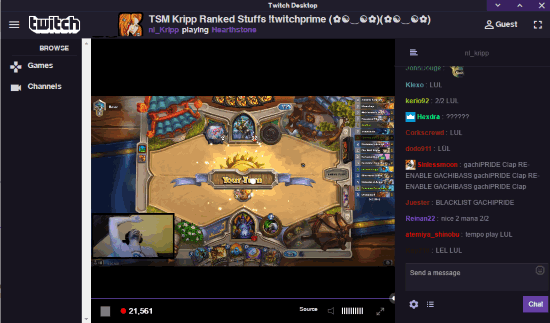 Twitch Desktop Client is another desktop client for Twitch which shares similar options and interface with Orion. You can use it to browse games, channels, watch their live videos, and chat with other Twitch users. If you are a Twitch streamer instead, then this it not meant for you as it doesn’t support live streaming options. You should check out the first one on my list for this feature. For other Twitch users, it will work just fine and they can use this Twitch client to stream their favorite game videos and chat with others who share the same interest. The left sidebar will give you the access to browse the Games and Channels. When you access Twitch channel, it automatically plays the live streaming video, as you can see in the screenshot above. Just like other Twitch desktop clients on my list, it lets you adjust the live stream quality, adjust its volume, and play it in full-screen mode.
Chatty:
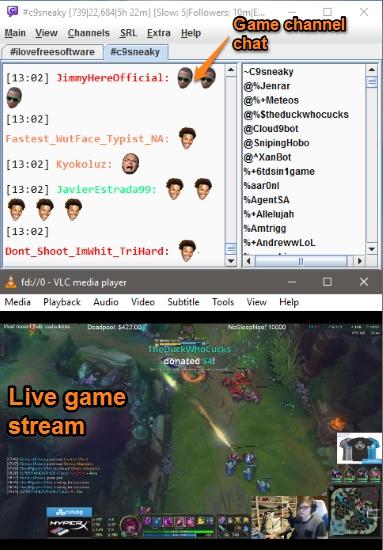 Chatty is another Twitch client for Windows with the primary focus on chat rather than streaming videos. Yes, of course, you can stream videos using Chatty, but not within its interface; you can either play it in a browser or in one of your favorite media players like VLC. But for this, you will have to download and install livestream which is a command line utility to pipe videos streams to media players from different services including Twitch. After installing it, you can pipe live video stream of any Twitch channel to one of the media player installed in your PC, but that requires a number of steps which I will tell you right now but let’s first see how you can get started with it. First, download it from the link provided above and then extract the downloaded ZIP file anywhere in the PC. Do note that as it is a JAVA application, you need JAVA installed on your PC in order to run it. Once you have taken care of that, go ahead and launch the JAR file which you can find in the extracted folder. This will show you the main interface of Chatty and a small dialog box on its top, which prompts you to verify your login via Twitch. You just have to copy the URL displayed in the text area of the dialog box and paste it in any browser of your choice. This step is required by Chatty to access the authorization token from Twitch to access your profile and other details. Once you have done this, you will then need to specify the name of the Twitch channel which you want to join for the chat, as shown in the screenshot below. At last, click on the Connect button and then it connects you to the specified Twitch channel.
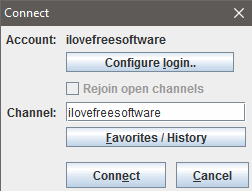 You can then chat with other Twitch viewers of that channel. It also supports emoticons just as in Twitch web version. It also lets you connect with multiple Twitch channels, hit “the Control + J” hotkey or go to “Channels>>Join Channel” option. After that, specify the Channel name and click on the Join Channel button. This will instantly add a new tab in the main interface of Chatty from which you can start chatting. In addition to this, if you quickly want to view just live streams for the moment, then there is an option for it too. Just hit the “Control + L” hotkey which will pop up a dialog box displaying all the live streams. You can then choose to play them in your default browser.
But if you want to watch the live stream in VLC media player then follow these steps.
How to Watch Twitch Live Stream in VLC:
Step 1: Before proceeding, make sure that you have installed Livestreamer, the download link is provided above. Now, Select “Livestreamer” option from the “Extra” menu on the top of its interface.

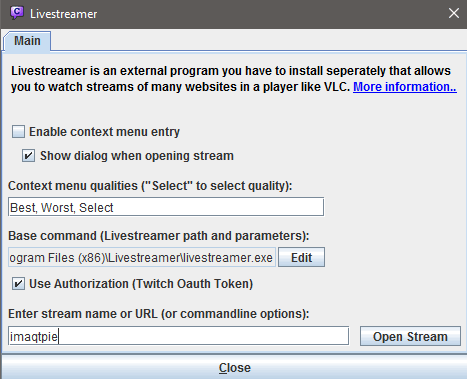
Step 2: After that, you will see a Livestreamer dialog box as shown in the screenshot below. You need to specify the folder path where live streamer is installed in your PC, along with the EXE file name. The default path is “C:\Program Files (x86)\Livestreamer\livestreamer.exe”. The next option you need to enable is “Use Authorization (Twitch OAuth Token)”. At last, specify the Twitch stream name or URL and click on the Open Stream button.
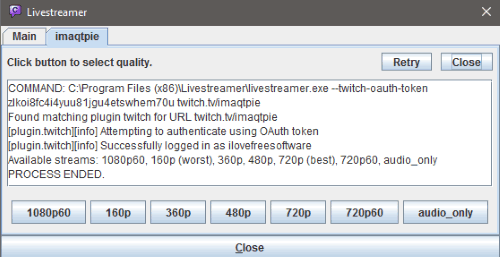
Step 3: This will start the processing and after a few seconds you will be prompted to select the graphics quality for live streaming, as shown in the screenshot below.
Step 4: As soon as you select a visual quality, the specified Twitch stream is played right in the VLC media player, as you can see in the screenshot below.
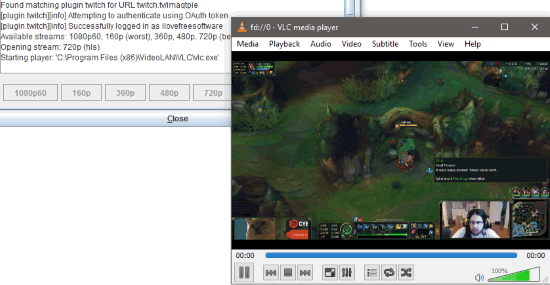 So, in this way you can easily play Twitch Live videos in VLC.
You can also play the Twitch videos in other media players. For that, you will be prompted for a different set of options. I know this include some extra steps but it was quite an amazing experience to watch a live Twitch stream right in VLC media player and chatting with other Twitch users via Chatty.
Verdict:
If you are a prominent Twitch user, then you will find these Twitch desktop clients very exciting as you can watch the live stream shows and chat with other Twitch users at the same time. Well, if you are looking for a desktop client to broadcast game videos then go for the official one as it is most advanced as compared to others. But if you are looking for a lightweight alternative to the official desktop client, then other Twitch desktop clients mentioned in this article can be used. Orion and Twitch Desktop Client are almost the same. You can use them to browse games, channels and chat with your Twitch friends without any issue. Out of all of them, I liked Chatty the most as it gave me the option to play the live Twitch videos in one of my favorite media players i.e. VLC.