This tutorial explains how to set video as account picture in Windows 10 sign in screen. You can select any video (MP4 or some other format) and use that in place of user account picture in sign in screen. After that, whenever you will access login or sign in screen of Windows 10, that video will start playing automatically. While there is no direct way in Windows 10 to replace account picture with video, this tutorial will show you how it can be done. You have to use Settings app, change some system permissions, and use a free software. I have covered all steps to help you show a video in sign in screen of Windows 10 with ease.
Although Windows 10 comes with native option to change user account picture in Windows 10 as well as record a video using webcam to set it as profile picture in sign in screen, but there is no straightforward option to add a video file in Windows 10 sign in screen. So the steps covered in this tutorial will help you with both.
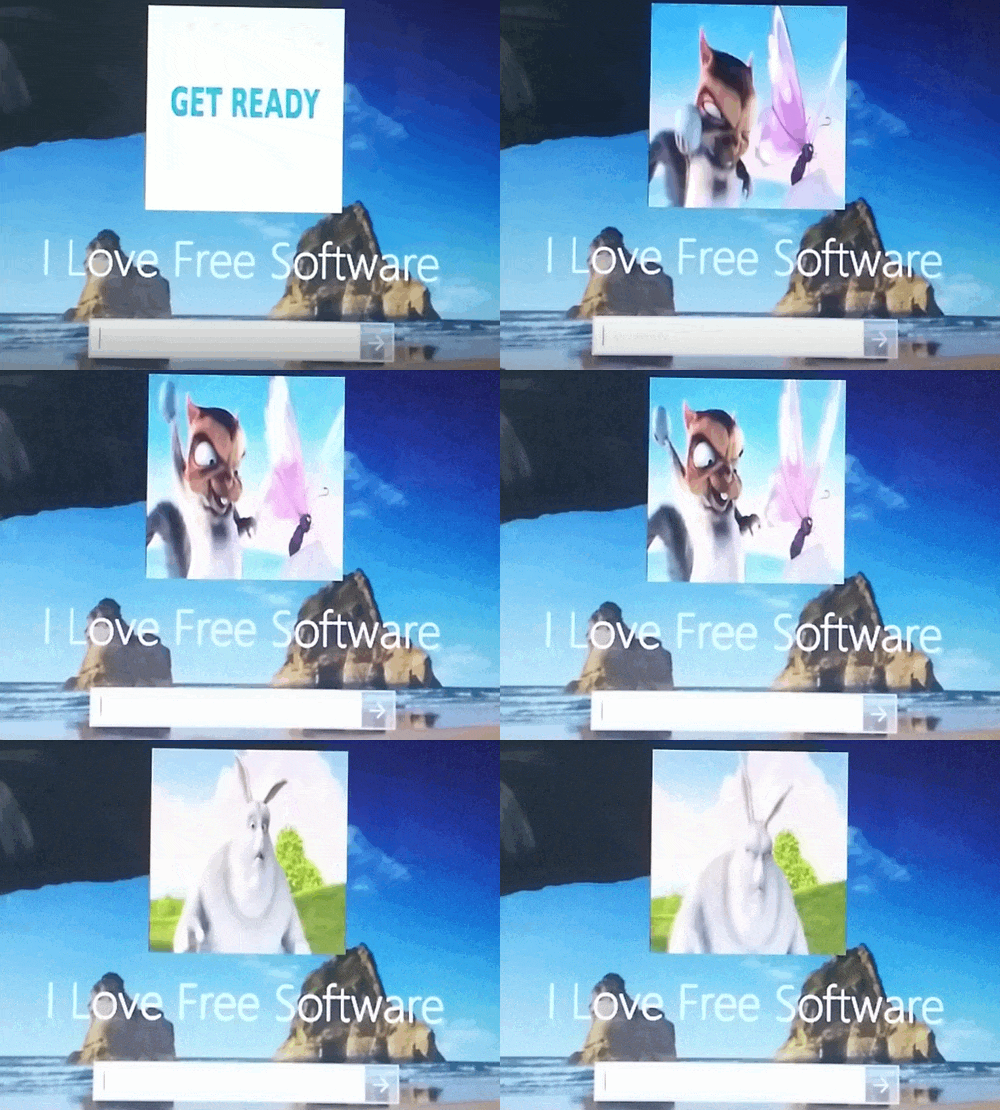
In the recording above, you can see Windows 10 sign in screen is visible and a video is playing in profile picture section. Do note that the sound of video will not play.
How to Record Video with Webcam as Set as User Account Picture in Windows 10
If you want to record video with your webcam and then set that as profile pic, then that is pretty easy to do. See the steps below.
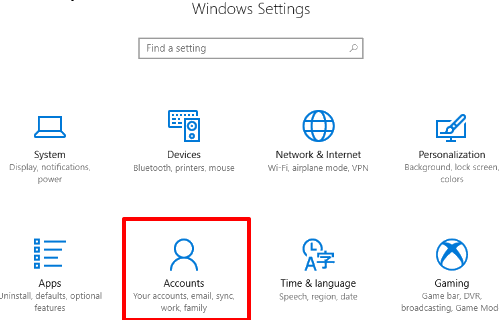
Step 1: Use Win+I hotkey and it will open Settings app. In Settings, click Accounts menu.
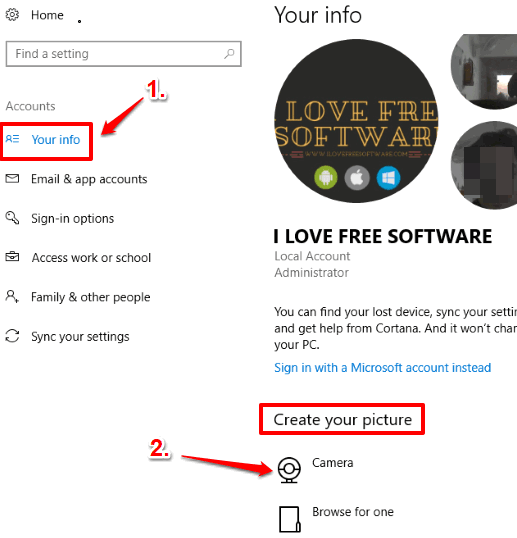
Step 2: Accounts menu will open with Your Info section. Under that section, you will see Create your picture. It has two options which are used to set account picture:
- Browse for one: This option helps to select a photo from PC and apply it as account picture.
- Camera option: This helps to take photo using webcam and apply it as user account picture. This option also lets you record video using webcam and set it as video in profile picture section. We need to use this option. So click Camera option.
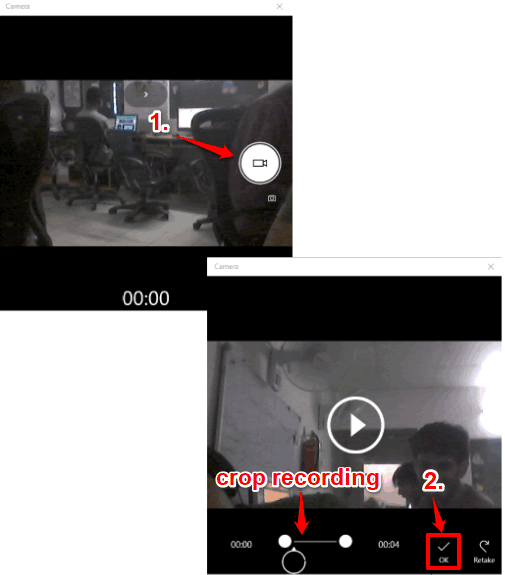
Step 3: Now a new Camera window will open. That window contains photo and record icons. Use Record icon so that you can start recording with your webcam. When the recording is completed, you can preview it, crop it (by selecting start and end points), and then press OK button. When you do this, the video will be set as Account Picture and you can see that in Sign in screen in Windows 10.
If that is all you wanted to do, then this is it. However, if you want to use some other video as account picture, then you need to follow some more steps. For that, keep reading.
How to Set Any Video as User Account Picture in Windows 10:
To set a custom video file in profile picture section to show in Windows 10 sign in screen, you need to first follow the 3 steps that I mentioned above. Once done, continue with the steps below.
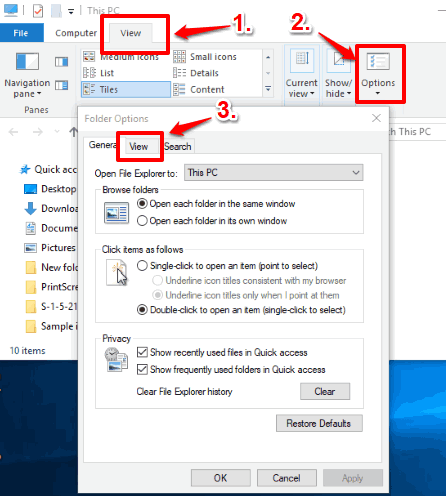
Step 4: Open File Explorer (Win+R). After that, click View tab. There you will see Options. Click that button. A Folder Options window will open as visible in screenshot below. In that window, access View tab.
Step 5: In View tab, some Advanced settings are available. You have to:
- Select “Show hidden files, folders, and drives” option, and
- Uncheck “Hide protected operating system files (Recommended)” option.
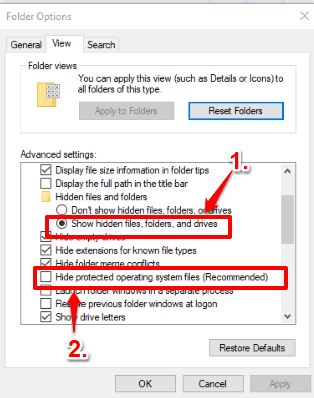
Save new settings.
Step 6: Now copy and paste the following path in the address bar of File Explorer:
C:\Users\Public\AccountPictures\S-1-5-21-1552742968-253896417-2016179475-1001.
This “S-1-5-21-1552742968-253896417-2016179475-1001” folder won’t visible unless you have enabled showing hidden files and recorded some video using webcam and set that video in profile picture section. That’s why we recorded the video in step 3. Under this folder, you will see some images and 3 video files related to the video recorded using the webcam. The three videos files have names something like:
- {0E607505-CFFA-4BD9-B4EE-F426133B438F}-Video192.
- {0E607505-CFFA-4BD9-B4EE-F426133B438F}-Video240.
- {0E607505-CFFA-4BD9-B4EE-F426133B438F}-Video448.
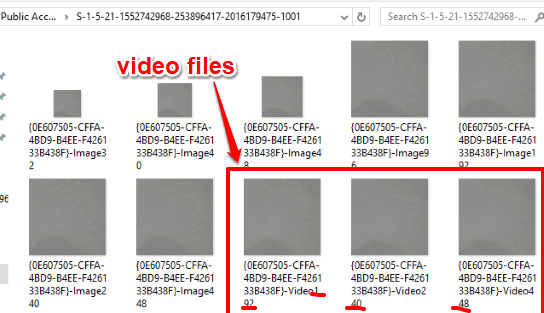
The names of these videos files will be different on your PC, but suffixes (video 192, video 240, and video 448) will remain the same.
Step 7: This is a very important step. Now you have to resize the custom video file that you want to set in Profile picture section. By resizing the video, I mean you have to resize frames (width n height) of that particular video. Also, you have to create three different videos of the same video with different height and width. You have to create three videos with:
- 192*192 width n height.
- 240*240 width n height.
- 448*448 width n height.
As you have seen in step 6, the suffixes of the names of three videos also contain 192, 240, and 448 numbers. If the size of resized videos don’t match the above size, then you won’t be able to set your custom video as profile picture in Windows 10 sign in screen. There are many software available to resize videos, but the one that I used for this tutorial is Free Resize Video. This software is simple and lets you set height n width for the input video easily. Make sure the output is selected as MP4 or some other supported video format.
Create three videos with different height n width (as mentioned) and save them in a folder.
Step 8: In this step, you have to change permissions of “S-1-5-21-1552742968-253896417-2016179475-1001” folder. This is mandatory so that you can paste the three different sizes of your custom video (that you created in step 7) in this folder. To change its permissions, right-click on the empty area and access Properties.
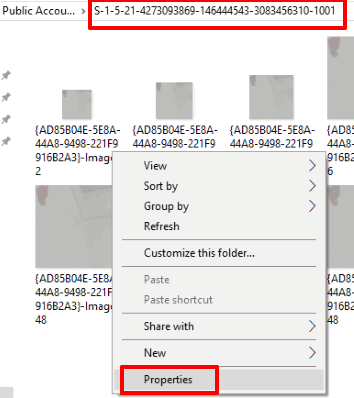
Step 9: In Properties box, click on Security tab. Under this tab, you will see “Everyone” username. That particular user has only read permissions. You need to change its permissions to full control (write, modify, etc.). So for this, select Everyone and then click Advanced button.
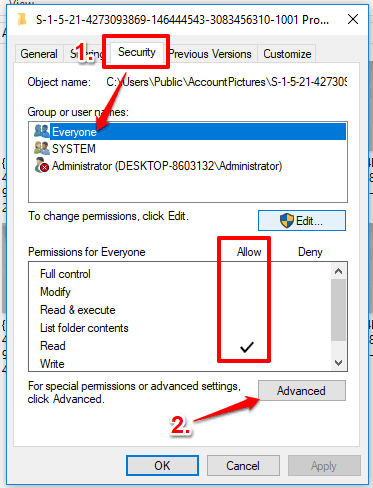
Step 10: Now Advanced Security Settings window will open. In that window, you have to change permissions (owner) for “Everyone” user. Currently it is set to SYSTEM as owner; you have to change it to Administrators. So first select “Everyone” and then click “Change” option. You can see the screenshot below to do that easily. Clicking the Change option will open a small “Select User or Group” window. In that window, you will see Advanced button. Click that button.
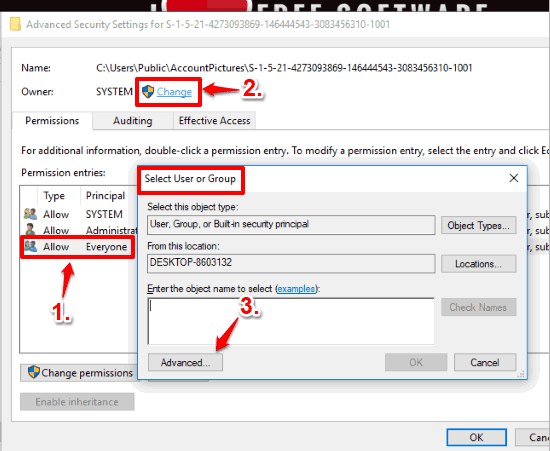
Step 11: Clicking the Advanced button will further expand Select User or Group window to provide you some more options. Now click “Find Now” button. This will begin search for all the available users. In search results, you will see all the users. In that list, select “Administrators” and then click OK button.
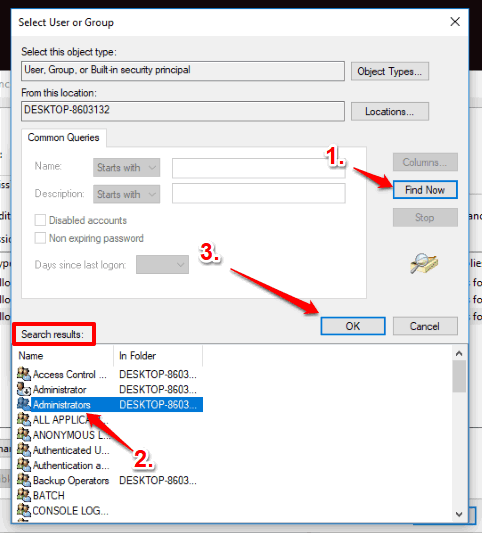
Step 12: Again select OK button to close Select User or Group window. Now you will come back to the “Advanced Security Settings” window. There you will see Owner of Everyone user is changed to Administrators. Press Apply and OK buttons and close Advanced Security Settings.
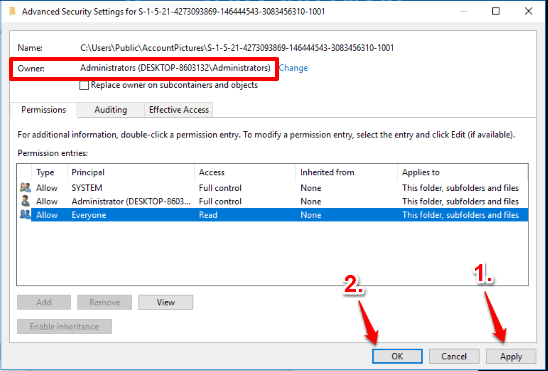
Step 13: Now you will come back to Security tab again. Finally, you will be able to change permissions of Everyone user to full control. For doing this, select Everyone and this time click on Edit button. A separate box will open. In that box, again select Everyone and now you can check all the Allow boxes. When all Allow boxes are selected, save the changes.
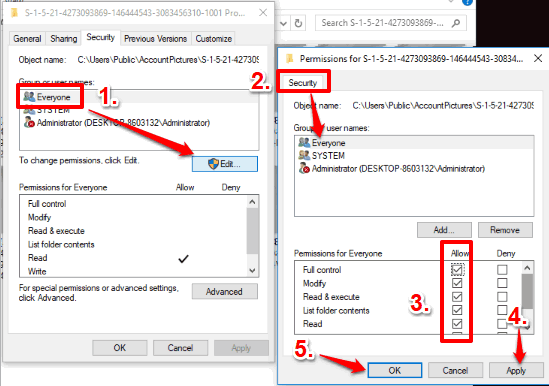
Now you have full permissions on “S-1-5-21-1552742968-253896417-2016179475-1001” folder. That simply means that you can paste the videos that we created earlier.
Step 14: Copy all the three custom videos that you resized and then paste those videos in “S-1-5-21-1552742968-253896417-2016179475-1001” folder.
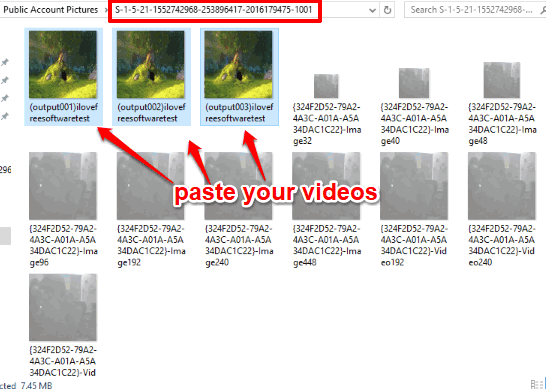
Step 15: This is also a very important step. Here, you have to rename all the 3 video files that you pasted in “S-1-5-21-1552742968-253896417-2016179475-1001” folder with the names of the recorded videos that are already present in that folder. So, first copy and paste names of recorded videos in Sticky Notes or somewhere else. After that, rename those videos as 1, 2, and 3. After that:
- Rename video having 192*192 width n height with “{videoname}-Video192“.
- Rename video having 240*240 width n height with “{videoname}-Video240“.
- Rename video having 448*448 width n height with “{videoname}-Video448“.
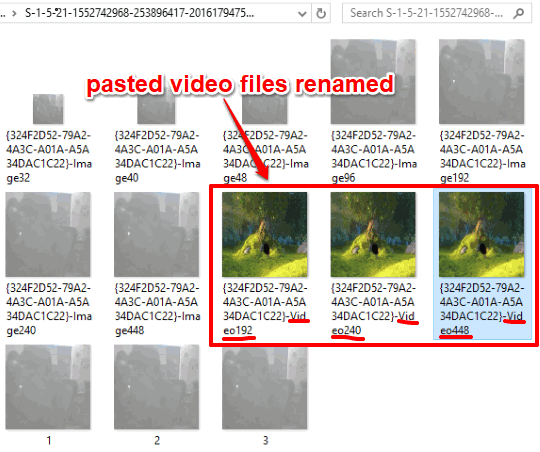
That’s it! You have successfully set video as sign in picture in Windows 10. Now lock your Windows 10 PC (Win+L). Access sign in screen and you will see that video is playing in profile picture section. Whenever you will access sign in screen, the added video will play automatically.
You may also check How To Show or Hide Lock Screen Image On Sign In Screen In Windows 10 and How To Open Command Prompt On Login Screen In Windows 10.
Closing Words:
Playing custom video in profile picture section of Windows 10 sign in screen was an interesting experience for me. I really liked it. If you also want to replace profile picture with a custom video in Windows 10 sign in screen, then carefully follow all the above steps and you will also be able to do it. Whether you want to see video of some special moment of your life, some achievement, etc., on sign in screen of Windows 10, this trick will be helpful.