This tutorial explains how to permanently set the priority level of a process in Windows 10.
Windows 10 and lower versions have this feature to manually set the priority level of a running process to high, low, above normal, below normal, etc. But the thing is when you re-open the program or restart PC, the priority level is set back to the default level. This is not so good option when you use a program (for example a game) multiple times a day. To keep the priority level of any process permanent, I have covered multiple ways in this tutorial. You can check all the ways and select the one that suits you the most. Also, do note that software you have chosen must be running. Otherwise, the program will run with default priority level only.
Let’s start with the first option available in this tutorial.
Permanently Set The Priority Level of a Process in Windows 10 Using Free Process Hacker Software:
Process Hacker is a fantastic software that also works as an alternative to Task Manager. It is portable and available for 64 as well as 32-bit PCs.
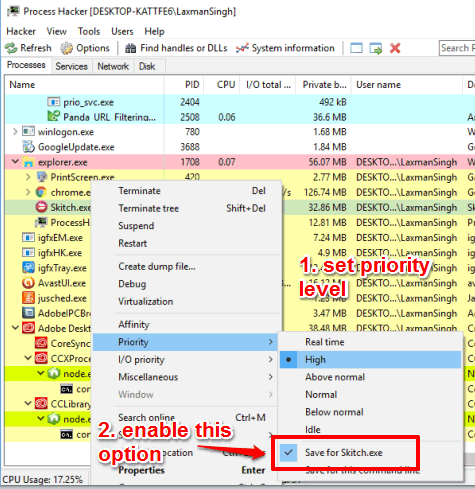
Opening the interface of this software will show you the list of all the running processes in a separate tab. You can right-click on any process and then set the Priority. The Priority section also provides Save for …. option as highlighted in the screenshot below. You need to select that option. Doing so will set the priority level permanent.

Now whenever you will close and relaunch the program, it will run with the same priority level which you have set.
This software has many other features like monitor network, running services, disk, etc. You can learn more about this software using the detailed review.
Make The Priority Level of a Process Permanent using Free System Explorer Software:
System Explorer is another great software that lets you set the process priority level permanent and can also be used as Task Manager alternative. This software has a simple interface and is quite similar to Process Hacker. The list of all the running processes can be viewed separately in Processes tab.
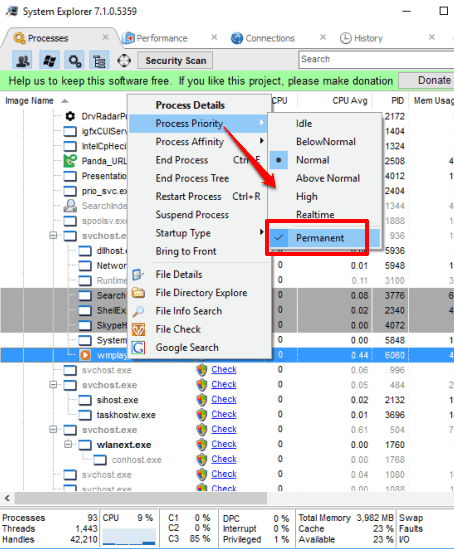
To set the priority level, right-click on a specific process → Process Priority → and set the level. There you will also find “Permanent” option. Enable this option and minimize the software in the system tray.

After that, whenever you will launch that particular program, the priority level will remain the same.
We have also written the full review of this software.
Note: There is also a popular software, Prio, but it didn’t work for me in Windows 10 PC. However, you may give it a try.
The Verdict:
If you have to run a program with high priority and want to give it most of the CPU usage, these software are definitely handy. Without manually adjusting the priority level again and again, just set the level once and minimize the software in the system tray and forget. Both of these programs are good to use. If I have to select only one from these software, I will go for System Explorer because its interface is cleaner than Process Hacker.