This tutorial explains how to disable built-in ad blocker of Chrome for specific sites. Starting with version 64, Google Chrome has come with its own ad blocker that works for websites to block intrusive ads (which includes pop-up ads, flash animation, auto-play video ads with sound, large sticky ads, etc.). It doesn’t block normal ads. You can read details and how this ad blocker works using this link. The purpose is clear that website owners must follow better ad standards to improve the user experience. However, there must be some websites that you follow regularly and are OK to show such ads. If yes, then disabling built-in ad blocker of Chrome for such websites is good for you.
To disable Google Chrome’s ad blocker for some particular websites, there are some very simple steps to follow. You need to access settings related to a particular website on Chrome and set Ads option to allow mode. Once a website is added to the whitelist, ad blocker of Chrome won’t work for such websites.

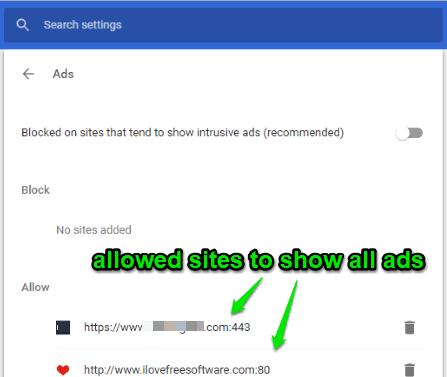
In the screenshot above, you can see a couple of sites added to the allowed list so that ad blocker of Chrome won’t work automatically for them.
Note: Chrome’s ad blocker works separately. That means even if you have installed some third-party ad blocker extension, it will work to block ads on websites unless you disable it for the websites of your choice.
How To Disable Built-In Ad Blocker of Chrome for Specific Sites?
Step 1: First of all, open Chrome browser and a website that you want to add to the whitelist to show any type of ads.
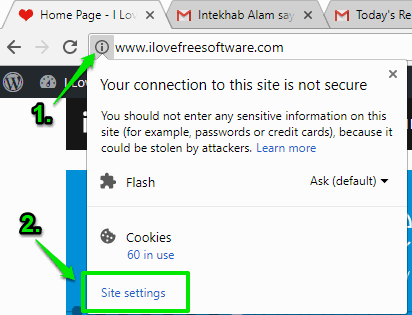
Step 2: Click on “View site information” icon (a green padlock showing Secure or “i” icon) visible just next to the refresh button of Chrome.

Step 3: A pop-up will open where “Site settings” option is visible. Click on that option.
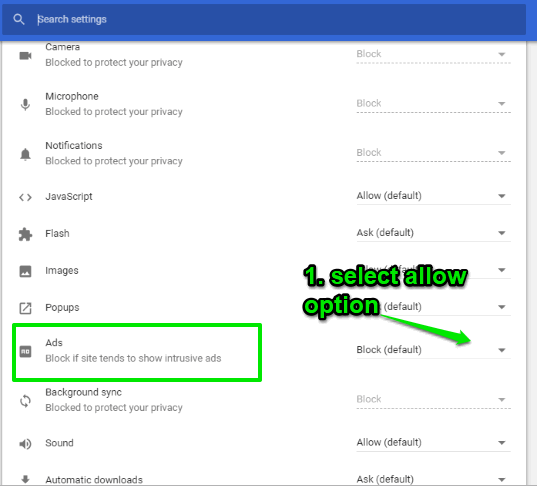
Step 4: Settings page for that particular website will open in a new tab. There you will see Location, Camera, Flash, and other options. Scroll down the page and you will see “Ads” option. You will see that Ads option is set to Block (which is the default setting). Use the drop-down menu and then select “Allow” option.

That’s it! By doing this, you have confirmed that you want that specific website to show all ads.
Step 5: When you want to block intrusive ads for the same website again, you can use the above steps and in step 4, you need to select “Block (default)” option using the drop-down menu.
You may also learn to set download limit for a tab and block spam redirects in Google Chrome.
The Conclusion:
From the users’ perspective, this is a good step by Chrome to disable intrusive ads for all websites. Still, there might be some websites that you trust and OK to show any type of ads. For that, Chrome has provided an option to disable its built-in ad blocker for specific sites. The steps mentioned above will help you add websites to the whitelist to show all ads.