This tutorial explains how to set the download limit for a tab in Chrome browser. You will be able to set download limit in kb/s and when you will download some file using that tab, the download limit will remain fixed. It won’t exceed the limit specified by you. The rest of the tabs will work with normal downloading speed. Only the specified tab will be restricted to the download limit of your choice.
To set the download limit for a tab in Chrome browser, you need to access Developer Tools of Chrome, create a new Network Throttling Profile and set the download limit. Doing this is pretty easy and the steps covered in this tutorial make the whole process easier. The limited download speed works till the tab is opened. As soon as you close the tab and open some new tab again, the download limit will be back to normal.
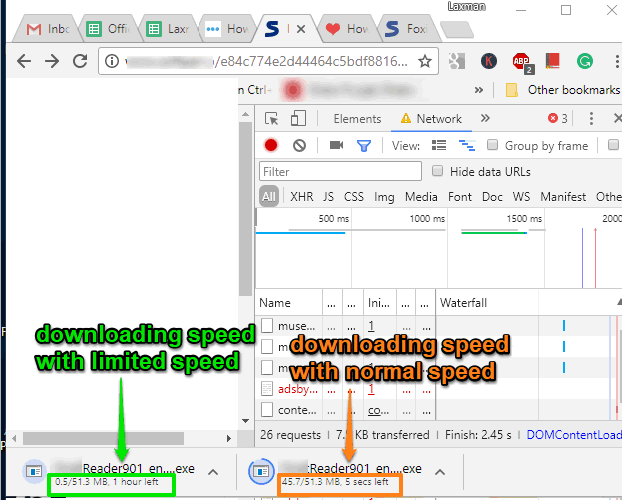
In the screenshot above, what I tried to show that I started the download process of the same file with two different tabs. The only difference is the first tab was downloading that file with the limit specified by me and the other tab was downloading that file with the normal download speed.
How To Set Download Limit for A Tab In Chrome Browser?
Step 1: Open a tab and access a webpage which contains the file(s) to download.
Step 2: Now you need to open Developer tools. You need to click the “three vertical dots” available in the top right corner of Chrome browser → access More tools → and then select Developer tools option.
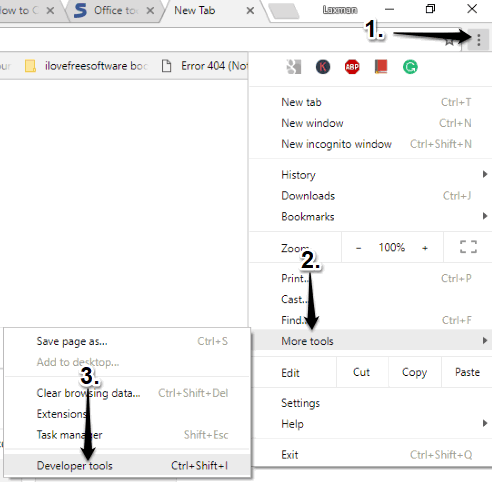
You can also press “F12” or “Ctrl+Shift+I” hotkey to quickly open Developer Tools window.
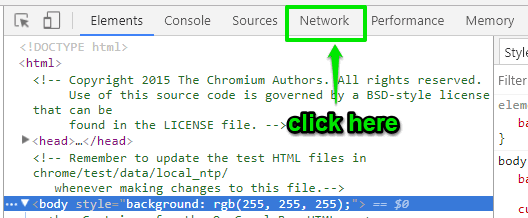
Step 3: In Developer Tools window, there are multiple menus like Console, Elements, Performance, etc. You need to select “Network” menu.
Step 4: Under the “Network” menu, you will see a drop-down icon on the right side. Click that drop-down icon and then select “Add…” option available under Custom profile. That means you are going to create a custom network profile where you will be able to set the download limit for that particular tab. If you don’t see any drop down icon, then you need to expand Developer Tools window.
![]()
There are preset profiles like Offline, Fast 3G, etc., also available for testing purposes but it is good to create a new profile.
Step 5: Network Throttling Profiles page will be visible. Here, select “Add custom profile..” button. After that, give a name to that profile and set Download speed (in kb/s). You just need to add a value like 50, 100, or any other number. Finally, press the Add button.
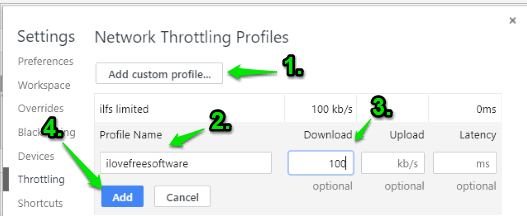
Options to set Upload limit and Latency are also available but you don’t need to use them.
Step 6: Close the Network Throttling Profiles page and then you will come back to Network menu again. Now, again use the Drop down icon and this time you will see the Network Throttling Profile name created by you. Select that name. Do not close Developer tools window. Otherwise, it will automatically set download speed to default mode. You can simply resize Developer tools window to occupy less space.
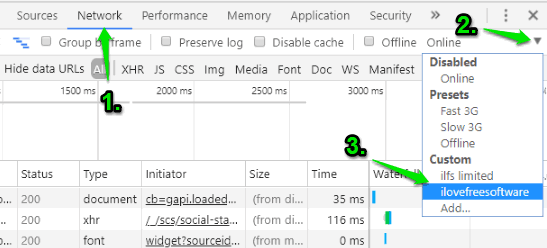
That’s it! Now the download limit for that particular tab is set in your Chrome browser. You can now try to download the item you want. You will notice that download speed is limited to the speed specified by you.
You may also learn to schedule downloads and receive notification after finishing download in Google Chrome.
The Conclusion:
There might be cases when you want to set the download limit for a particular tab on Chrome browser. For all such cases, this tutorial is gonna help you. You just have to follow the simple steps covered here and then set download limit of your choice for a particular tab. The good thing is download limit is removed automatically as soon as you close the tab.