adHoc 8 is a free tool that allows users to create Ad-Hoc networks in Windows 8. The app offers a simple interface wherein you can create an ad-hoc network by simply typing the network SSID and network Key, and then clicking on the Create adHoc button. You can then make the other devices connect to this Ad-Hoc network, and when you are done using the Ad-Hoc network, simply click on the Stop adHoc button.
If you are a power user of Windows 8 like me, you would have noticed that Windows 8 misses the GUI to allow users to create ad-hoc networks on their device. This may not seem to be a big deal for normal users, but for people who wish to connect devices to their Windows system for file transfer, internet sharing etc., this is one hell of a major annoyance.
adHoc 8 is an extremely smooth app that runs without any lags and does not consume much system memory while running. The only cause of concern here is that while the adHoc 8 software is running, the battery drains pretty quick, but there is no need to worry if you are plugged in to a socket and your device is running on AC power/charging. The app does not have any ads, which makes it all the more better. adHoc 8 is available as a free download.
Do note that adHoc 8 is also compatible with previous versions of Windows like Windows XP, Windows Vista and Windows 7.
What is an Ad-Hoc Network?
An Ad-Hoc network is a temporary wireless hotspot created by your system that can be utilized by other devices to connect to your system for file transfer, internet connectivity etc.
Features of adHoc 8…
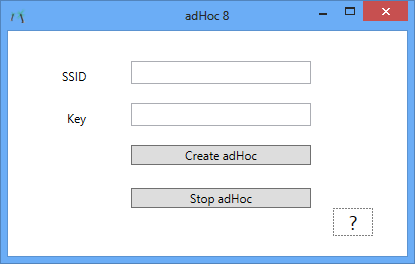
adHoc 8 is a nifty little tool that is available for free. Once you download and run the app (download link at the end of the article), you will be presented with an extremely easy to comprehend and minimalist interface, which would look like the following screenshot.
In the above Window, there are two text fields and three buttons. These are…
- SSID: Enter the network’s SSID here. SSID (Service Set Identifier) is the name of the Ad-Hoc network. The text that you fill in this field will be visible to devices as the name of the WiFi hotspot (Ad-Hoc connection)
- Key: In this field, enter whatever you desire to keep the password for your Ad-Hoc connection.
- Create adHoc: Start the Ad-Hoc with the entered settings.
- Stop adHoc: Stop the Ad-Hoc network.
- ?: This is the “About” button. Clicking on this shows the information about the developer, software version, etc.
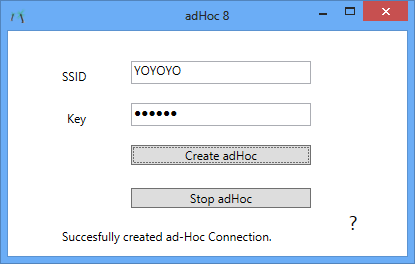
Once you have entered all the details, click on the Create adHoc button to create the Ad-Hoc connection. Once you have done so, you will see a confirmation message at the bottom of the window. The window with the confirmation message looks like the following screenshot.
In the above window, you will be able to see the message “Successfully created ad-Hoc Connection.” This confirms that your Ad-Hoc connection was established, and now it is available for other devices so that they can connect to it for sharing the internet, transferring files, etc.
To stop the Ad-Hoc connection, click on the Stop adHoc button at the bottom of the screen.
That’s it. This is all that you need to know to get started with creating an Ad-Hoc network on your Windows 8 machine. You can also check out another app, Wi Host, that provides the same functionality.
The Verdict?
adHoc 8 is a good tool for creating Ad-Hoc networks on Windows 8 devices, as it does not support them natively. Do remember that even if you have an older version of Windows like XP, Vista or 7, you can still use this tool! If you are into wireless file transfers or wireless internet sharing, you should definitely check out this tool.


