Lark Suite is now providing free email on your own domain with 50 accounts. This is a free alternative to Google GSuite and Microsoft 365. If you are a small business, then you can now host your email for free and exchange personal as well as work related emails. It offers some other collaboration tools as well that will make working together with your team easier and faster.
If you want, then you can also migrate from existing business suites to Lark and with all the data. It has all the alternatives to Docs, Notion, Microsoft Teams, and Google Sheet already and you get some other exciting features as well. The free plan is ideal for small businesses and small remote teams. It integrated well with other popular services such as Slack. You will learn more in the next sections.
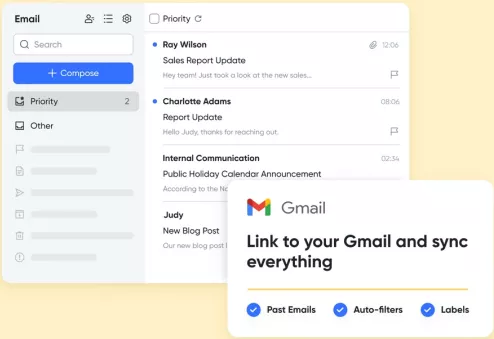
Main Features of Lark Suite Free Version:
- Just like Google Workspace and Microsoft 365, Lark offers extra tools and features to make collaboration and communication easier.
- Lark Messenger: You can use it to chat with teammates in your organization. It supports team chats as well as individual 1–1 chat. In the chats, you can send files and even start video calls.
- Lark gives free video conference for team members. However, the limit is 1 hour in the free version. But you will get the transcripts, virtual backgrounds, and automatic translation like features.
- To organize your time, Lark offers you a Calendar where you can plan things. The calendar can also be shared with others. You can create and manage multiple calendars, and even import one from Google Workspace if you want.
- Docs and Wikis are here to store team knowledge. You can create as many docs as you want, but for free you can only create 10 wikis. Docs support templates and Notion like block-based editing. You can share the docs via link and invite people as contributors too.
- Base and Sheets on Lark allow you to store tabular data. In Base, you can create actionable tabular modules to create simple dashboards and other simple apps.
- You get 200 GB mail storage combined for all mailboxes. There are dedicated desktop and mobile apps where you can sign in and start exchanging emails.
- Mailbox supports signatures, custom labels, flags, archives, layout, and more. Each user can customize the mailbox as per his/her needs.
- Mailboxes for the team members that you create here can be edited, transferred, and deleted. You can suspend members in 1 click and reset the password in case someone has forgotten.
- All mailboxes can be configured in Outlook and Thunderbird like emails client as it offers IMAP and SMTP access.
- All mailboxes here support auto replies and automatic filters to quickly filter out emails matching a specified criterion.
- The option to add multiple domains is supported in the free version.
Setting up Lark Suite for your Team:
On the main website of Lark, you have to sign up and choose the free plan. The first account you create will be administrator. The next step for you is to create an organization. For that, you enter a name and add the relevant details.
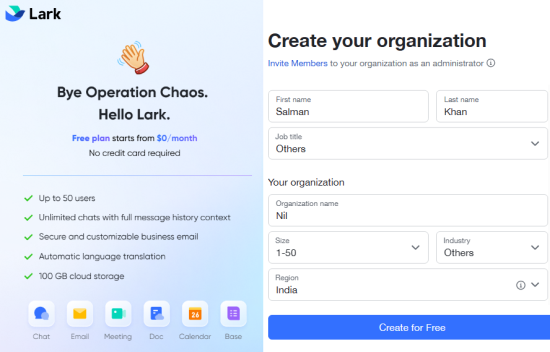
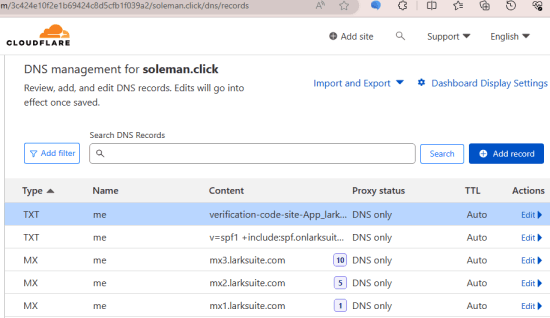
After adding organization details, you need to log into Lark Admin. Here, the very first thing you have to create is add a domain. So, enter the domain you want for the email addresses. Next, you need to verify the domain by adding some DNS records.
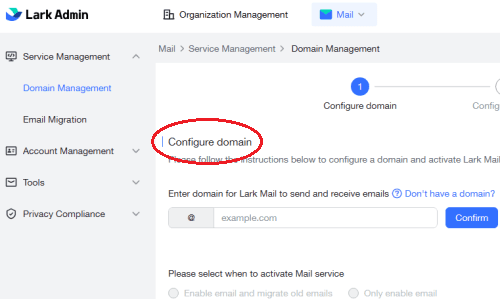
Log into the dashboard of your domain registrar. Open DNS records, and then you need to create the following:
- 2 TXT records; one for verification and another for SPF.
- 3 MX records with different priorities.
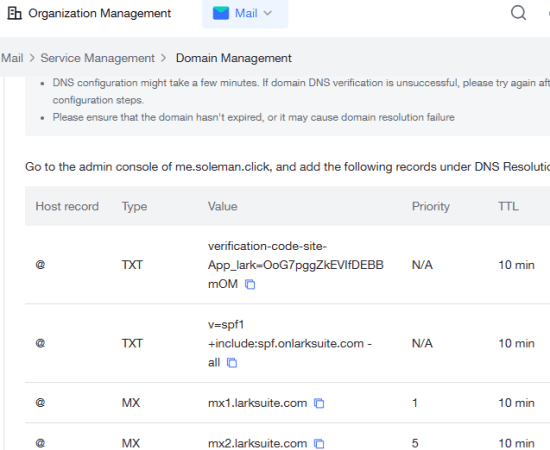
In the above screenshot, you can see the DNS records it asked me to add. For your domain, the values will be different and Lark will give to you. So, all you have to do is just copy and paste them. See my configuration below in Cloudflare as I use its nameservers.
After adding a primary domain, you also have to set a domain for your organization. Create this domain in the organization settings and on this address people from your organization can sign-in into Lark Suite services such as Mail, Messenger, etc.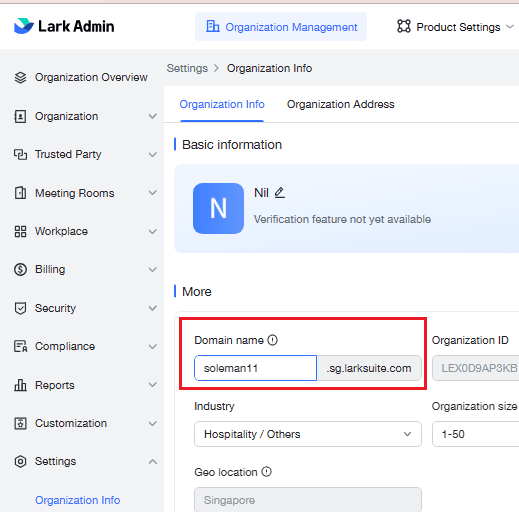
Once the domain has been verified, you are good to go for adding people in it. So, in the Lark Admin, go to Organization > Members and Departments section and add a new member. You can assign an email address for this member while filling out the personal details.
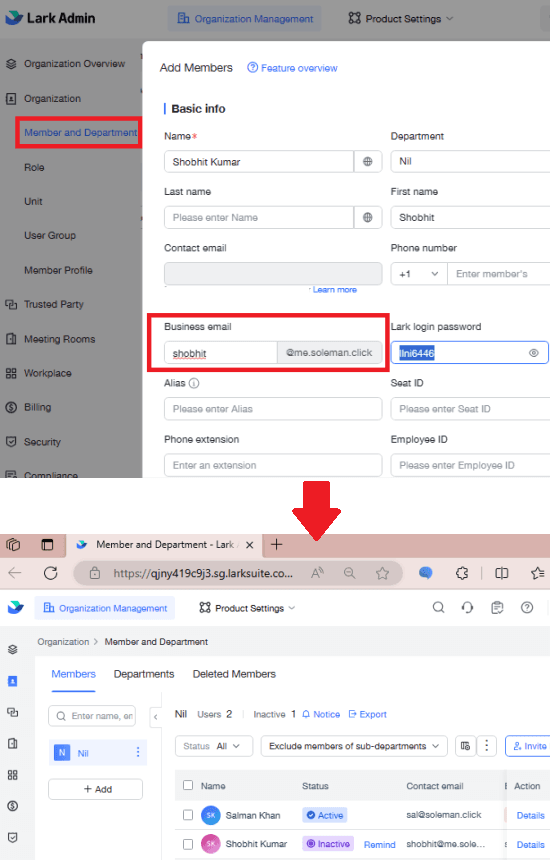
Similarly, you can create other users and share email addresses with them. Also, give them the address to the web interface. They can log in normally into the Lark Workspace and access everything that Lark has to offer including the mailbox.
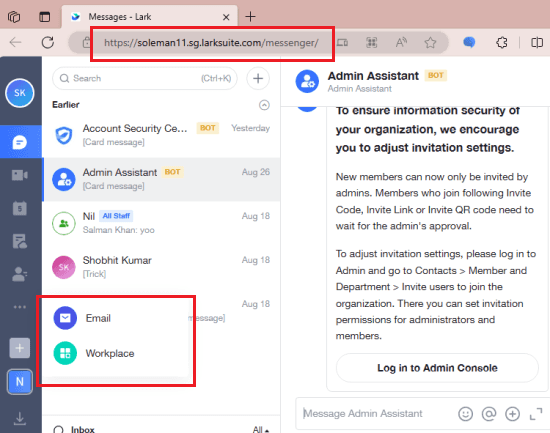
There’s still more to it. If you were using some other email hosting service before, then you may want to migrate your emails first. Lark allows that and in the next section; you can see how to do that.
Migrate from Google Workspace, Microsoft 365, and Zoho to Lark Suite:
In Lark Admin, there is an option to import an existing mailbox from the below-mentioned services and platforms. If you want to migrate existing emails from any of the following services, then you can easily do that. It can easily import your existing email data for all the users in your organization.
- Exchange On-Premise
- Office 365 operated by Microsoft
- Office 365 operated by 21Vianet (China)
- Tencent Enterprise Mail
- 163 Mail
- AliMail
- Zoho Mail
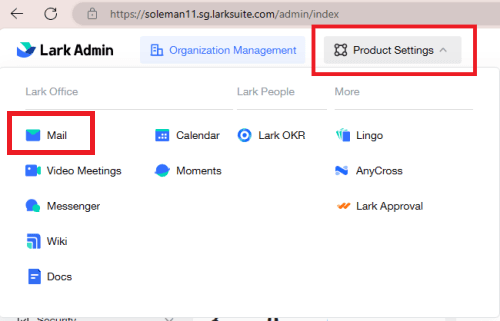
To start a migration task, you need to have the IMAP server addressed of the source server and the login credentials. To access the email migrator, in Lark Admin, click on Mail from the Product Settings menu at the top.
Now, in the mail settings, you can go to the Service Management > Email Migration to access this tool. Here it follows a wizard like process where you have to enter the correct credentials to start the migration process.
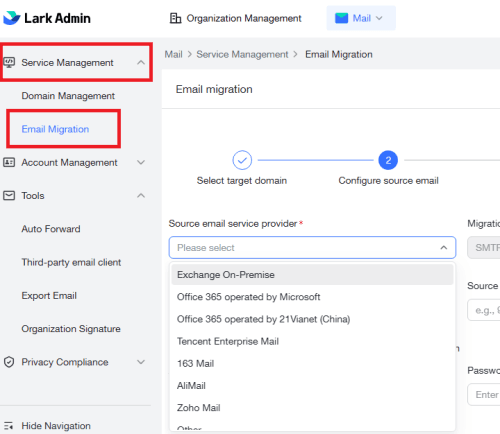
In the above form, enter all the required fields and then start the migration. You can choose to migrate data of all the users in the new Lark Mail, so your team can access their existing emails without any problems.
Using Lark Mail App to Send and Manage Emails:
Once everything is setup, people in your organization can use their email in the dedicated web UI. Or there is one better option via Lark desktop app. The desktop app is available for all major platforms even Android and iOS. So, send the download link to all your teammates and they can log in to your email.
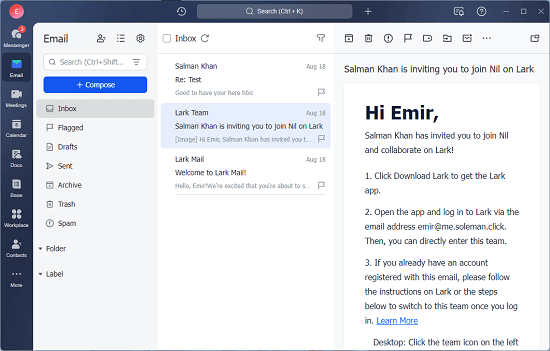
Lark Desktop offers you an Outlook like interface where you have an email list in one pane and then email viewer in the other. You will receive all your emails right here. Also, it will throw desktop notification for each incoming email.
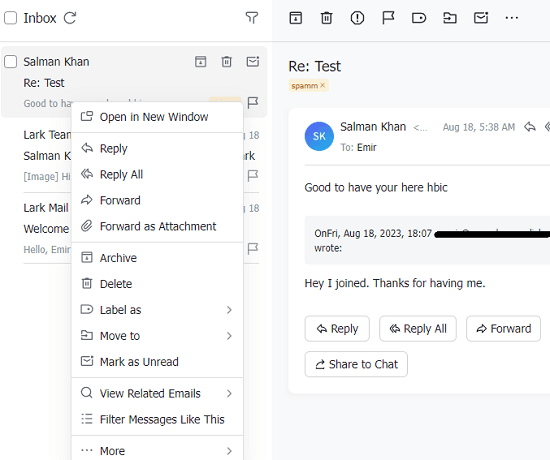
Right click on an email to see list of options that it offers. You will be given an option to forward the selected email, archive it, add label, and send a reply. It looks like as shown below.
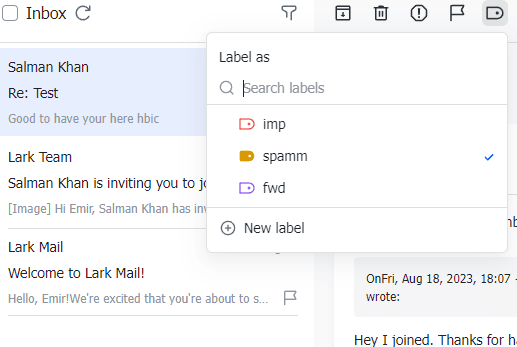
The next important thing that you can do to emails is add labels to them. To add a label, you can simply open an email and then form the top side, click on the label icon and then apply a label. You can create as many custom labels here with different colors and then assign them to as many emails as you like.
Finally, there is a dedicated section to configure essential email settings. Just go to the mail settings and there you will be able to configure things like email signature, auto replies, auto forward and app password for other third-party email clients such as Outlook.
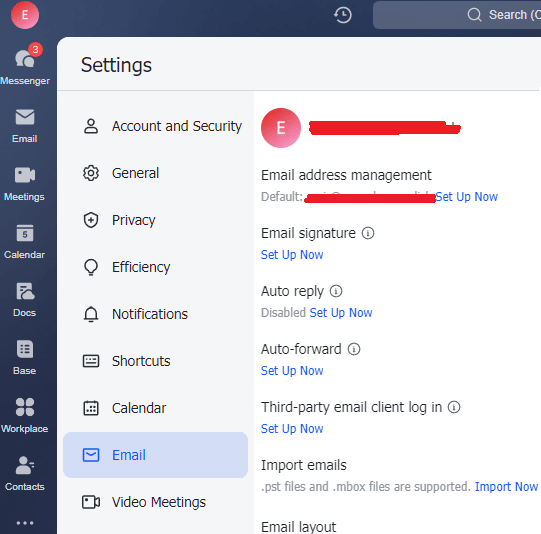
If you have some mbox and PST files then you can import emails from there in the desktop app and link them to your Lark account. And this way, you can keep using the desktop app of Lark Mail and manage mail and other apps offered by Lark. The shortcuts to messenger, docs like apps are in the left sidebar and you can access them from here in 1 click as well.
How to configure Lark Mail in Outlook over IMAP and SMTP?
If you do not want to use the official desktop app of Lark then you can use Outlook instead. This can be the case if you’ve been using the Outlook app for years and do not want to transition. There is good news for you that Lark allows mailboxes to be configured in email clients such as Outlook.
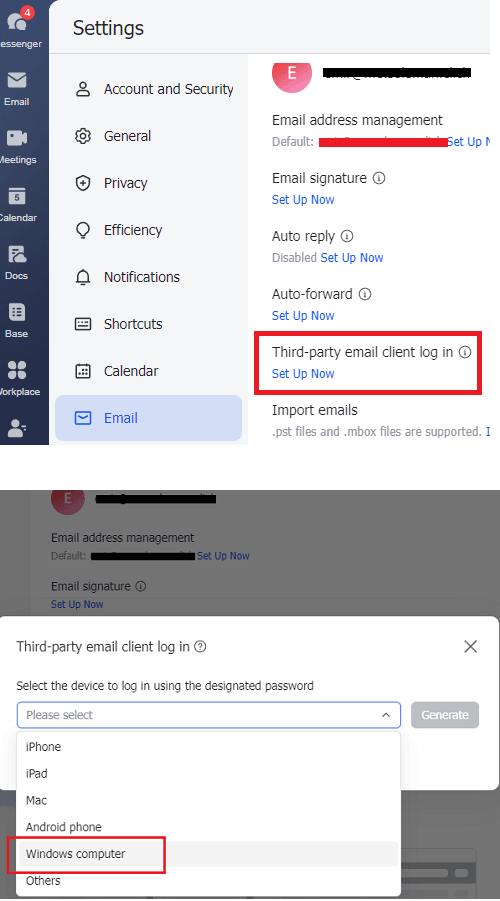
So, for that, in the desktop app of Lark, go to the email settings. From here, configure the “Third-party email client log in” option. Choose the type of device where you want to configure Outlook.
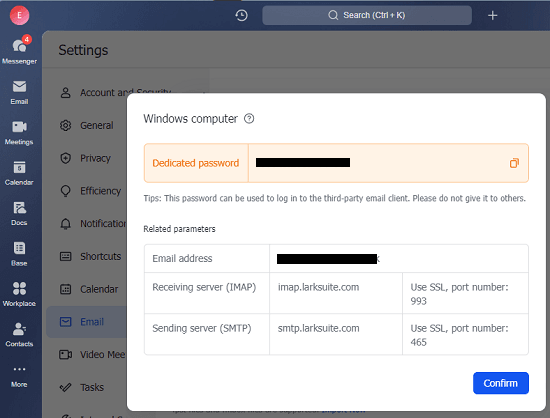
After that, it will show you a random password that you have to use for login. In addition, you will see the SMTP and IMAP settings that you will need to configure in Outlook.
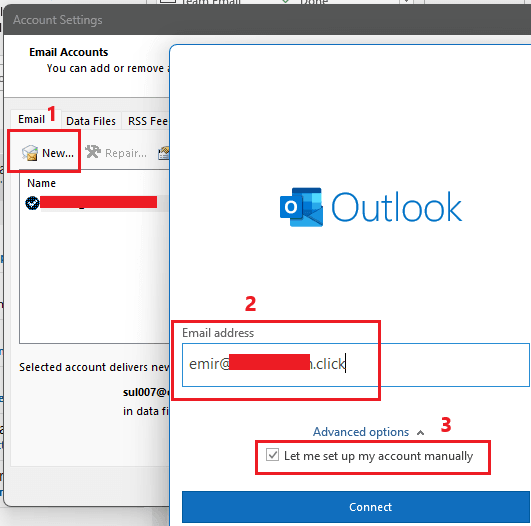
Now, open Outlook app on desktop and configure Lark Mail. Go to account settings in Outlook and a new profile. A popup will open where you have to enter the Lark email address. But do not proceed, as you have to select “Let me set up my account manually” option.
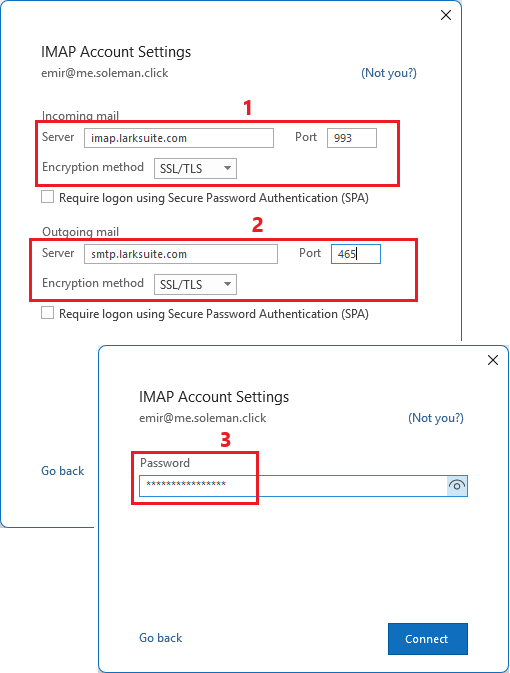
In the next step, choose IMAP/SMTP option and then a form will be displayed. Here, you now need to enter the IMAP and SMTP server details Lark has already given you. Enter the server address and port number carefully and do not forget to choose SSL/TLS mode. Click and in the next screen, you need to enter the app password that Lark generated above.
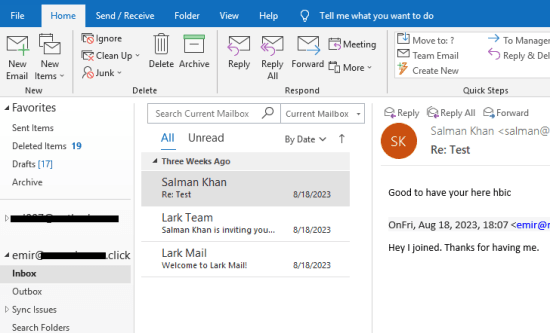
Finally, if everything goes right, Outlook will now start loading your emails in the inbox. Once the mailbox is synced, you will see all your emails there. You can also start sending and receiving emails now just like you normally do in Outlook.
This is all about setting Lark Mail in Outlook. You can follow a similar process on the Android/iOS and macOS platforms.
Closing thoughts:
If you are looking to host emails on your own domain with a small team then Lark Suite is probably the only free option out there. Previously Yandex was offering a similar service but they have also discontinued that. Disappointed with their decision, I started to look for alternatives and then I stumbled upon Zoho and Lark Suite. Since Zoho is only free for 5 people, I using Lark Suite made more sense as it lets me host 50 mailboxes for free on custom domain with extra features.