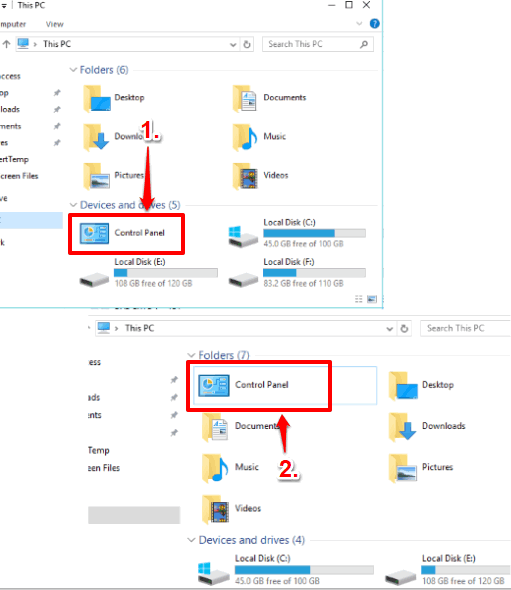
This tutorial explains how to add Control Panel to File Explorer in Windows 10. This can be done in two different ways. You can either use Registry Editor, or a free software, or both (whatever you prefer). I have added step by step process for both methods to help you add or show Control Panel to File Explorer. Using the first method, Control Panel is visible in Devices and drives section of This PC (or My Computer) in File Explorer. And using the second method, Control Panel is added in the Folders list in This PC of File Explorer. You can select which method is suitable for you.
You can also remove Control Panel from File Explorer anytime. So you don’t have to worry about how to remove Control Panel when you don’t want to see it in File Explorer of Windows 10.
Let’s start with the first method, which is Registry Editor.
Method 1: How To Add Control Panel To File Explorer In Windows 10 Using Registry Editor?
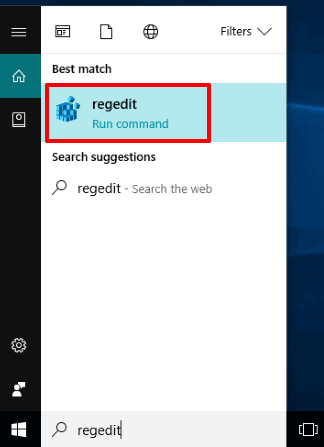
Step 1: Click on Search box and then type “regedit“. This will help you start the Registry Editor.
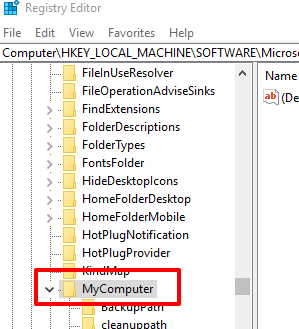
Step 2: Access the MyComputer Registry key. To access it, expand HKEY_LOCAL_MACHINE (main or root key), then expand SOFTWARE key, Microsoft, Windows, CurrentVersion, Explorer, and then MyComputer key will be in front of you.
Step 3: Expand MyComputer and then you will see NameSpace key. Under that NameSpace key, right-click and access Key option available in New option. This will create a new key. You have to rename that key with “{26EE0668-A00A-44D7-9371-BEB064C98683}“.
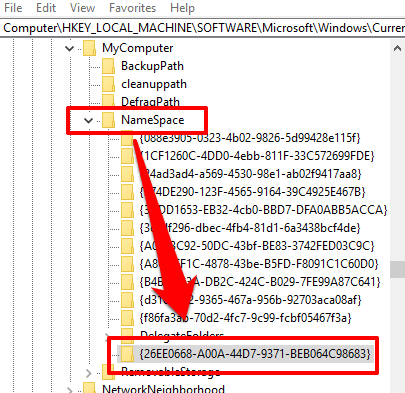
That’s it! That key is used to show Control Panel on My Computer.
You can open File Explorer (Win+E) and you will notice that Control Panel is added to This PC. Double-clicking its icon will open Control Panel.
When you don’t want to see Control Panel in File Explorer, you can simply delete that new key created by you.
Method 2: Add Control Panel To File Explorer In Windows 10 Using Free Winaero Tweaker Software?
Winaero Tweaker is a popular software that comes with a lot of tweaks. Among those tweaks, adding Control Panel to File Explorer is also available. This adds Control Panel in Folders section (Documents, Pictures, Downloads, etc.) of File Explorer, which is visible just above Devices and Drivers section.
Step 1: Use this link to get the zip file of Winaero Tweaker. Install the software.
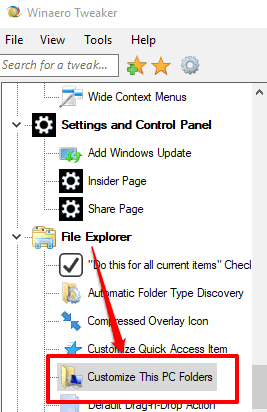
Step 2: Scroll down the list of options available in the left sidebar of this software. Click on “Customize This PC Folders” option which is available under File Explorer menu.
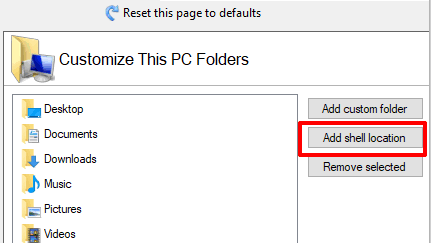
Step 3: On the right side, you will see “Add shell location” button. Click that button.
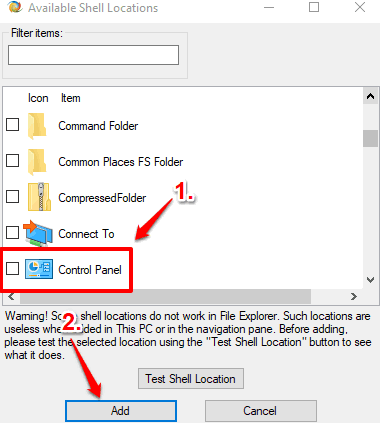
Step 4: Available Shell Locations window will open. That window contains all the shell locations of system. Scroll down that list and you will find Control Panel option. Select that option and use Add button.
You have successfully added Control Panel to File Explorer of your Windows 10 PC. You can open File Explorer and see that Control Panel is visible in Folders section.
To remove Control Panel from Folders section, you can access Customize This PC Folders option in Winaero Tweaker, select Control Panel, and use Remove selected button.
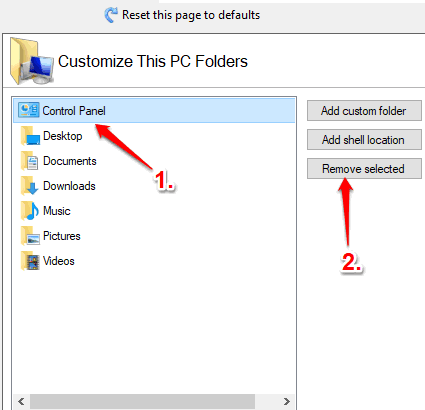
This will immediately remove Control Panel from File Explorer.
You can also try How To Disable Control Panel In Windows 10 and How To Add Administrative Tools To Windows 10 Taskbar.
The Verdict:
These are two options to help you add Control Panel to File Explorer in Windows 10 PC. For me, method 1 is perfect because I am quite familiar with Registry tweaks. Those who want to avoid Registry tweaks, method 2 is quite good for them.