In today’s tutorial, we shall discuss about adding a language and using it as your primary language on your Windows 8 machine. Language really matters. There are many people who just want the Windows messages to be displayed in their native language. There are some for whom the Windows 8 gets installed in a language other than English (pretty damn rare, but trust me, it happens if you select the wrong language during the Windows installation on your machine) and they want to get the English language back. To do so, many would think that going ahead and reinstalling Windows with the correct language selected will fix the issue, but trust me, there is a much easier and simpler way to do the same.
So today, Sensei Pranjal will teach you how to change the language on your Windows 8 machine. So without further ado, let’s get started.
How to Change Language in Windows 8:
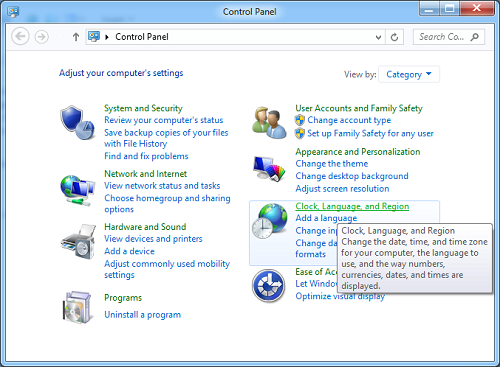
Step 1: Go ahead and head into the Control Panel of your system. Here click on the Clock, Language and Region option.
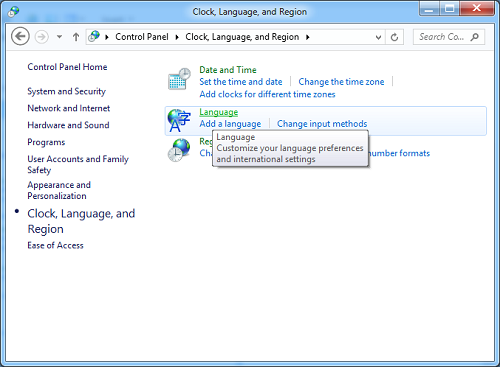
Step 2: Click on the Language option in the next screen.
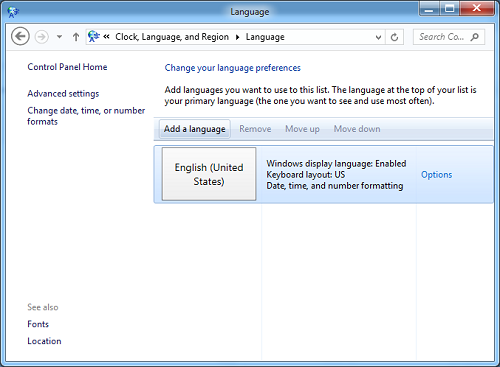
Step 3: Once the Language screen has opened up, click on the Add a Language button.
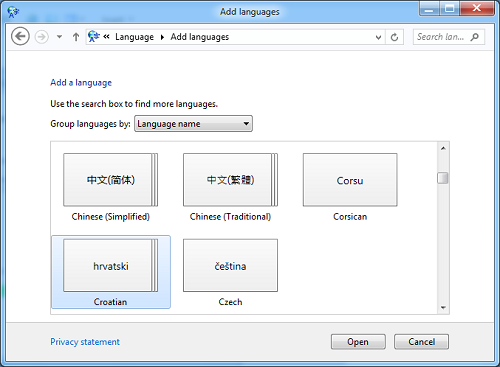
Step 4: Choose the language that you want to use from the list of languages that will appear on the next screen. I selected Croatian from the next screen, you can choose from any of the language that you wish to use.
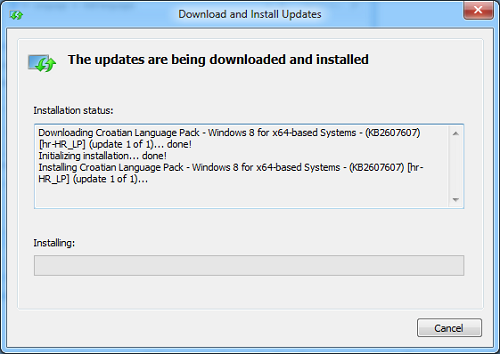
Once you click on the language, click on the Open button in the bottom right corner of the screen shown in the above screenshot. If you are on a different service pack, the button shown for you will be Add and not Open. In essence, both perform the same function. Next, you will be asked to download and install the Croatian language pack for your Windows machine.
The installation window will look like the following screen.
Be patient, this can take some time.
When done, simply remove the English US language (or whichever it is in your case), and that’s it. Your Windows messages will now be displayed in Croatian (in my case), or whichever language language that you have selected in your case. (You need to log off/sign out of your computer for the changes to take effect, remember to tick the Set as primary language button.)
The result?
Well, the result is pretty obvious, but here are the images to prove it anyway.
Before:
After:
Look at all the text at the right, at the left, in the title bar, everywhere! It has changed, and thus, we have successfully changed language in Windows 8. Yay!
And in case the text size is not as per your liking or you would want to try a different font for your language, you already know how to change text size in Windows 8 and how to install font in Windows 8.
This is all that you need to know to accomplish changing the language of your system. I hope that you will enjoy changing the language of your system. Do let me know of your experiences with this tutorial in the comments below, I’d love to hear from you!
Till then, cheers, and happy customizing Windows 8 PC.
