In this short tutorial I will explain how to remove vocals from a song, and export the extracted music from it to make a karaoke on your own.
The freeware that we can use this purpose is Audacity. It’s a free software, that allows you to do normal audio editing and then export the edited song in many popular formats. We have already reviewed Audacity here. Therefore in this tutorial all that I am going to do is cover how to make own Karaoke song by removing vocals from any song. Once you have the karaoke song, all you need is a good Karaoke software and lyrics of song to have good Karaoke fun.
How to remove vocals from a song using Audacity:
Step 1: After you are done with the installation part, double click on the icon that will open the Audacity window. Now add any song, from which you want to remove the vocals and create your own Karaoke song.
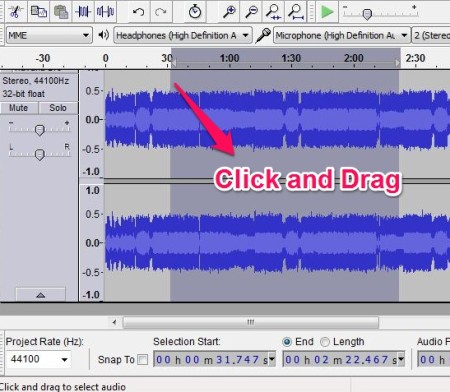
Step 2: Be sure to pause the song before starting the operation. Select the part of the song that you want to use from the wave (the part from which you want to remove the vocal). You can do this by dragging the mouse through the wave. If you want to select the complete song, just double click on the wave.
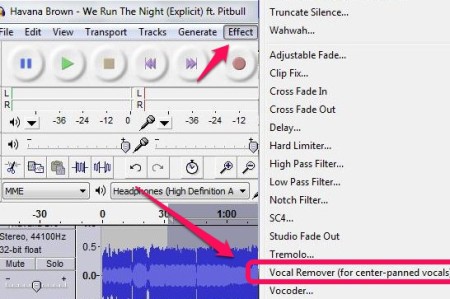
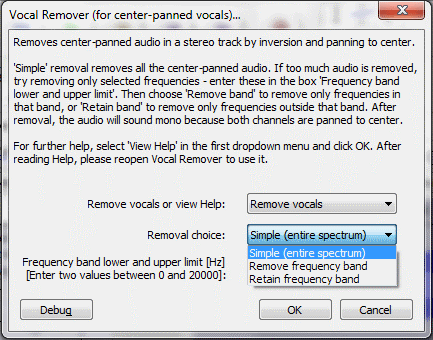
Step 3: After you have selected the part, go to option that spells “Effects” and choose the option “Vocal Remover”.
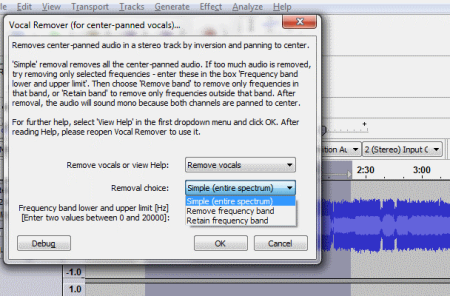
Step 4: A window should have opened where you have to choose between the three Vocal removing options: Simple, Remove frequency band, and Retain frequency band.
I will explain differences among these in a bit. For the time being, let’s just choose the option “Simple” and carry on with the editing. Now click “OK”, your revised song that contains only the music and no vocal, will appear instantly.
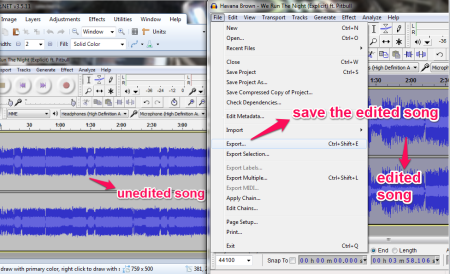
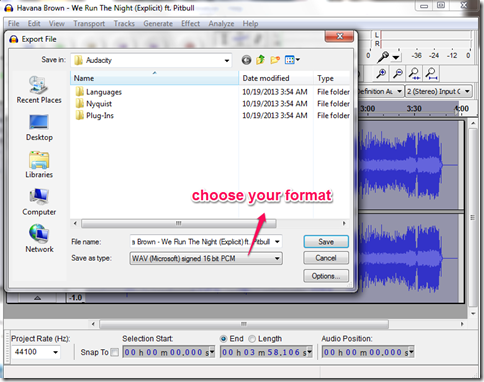
Step 5: Play the song to cross-check if the vocal has been removed from the desired part, now hit the pause button and go to the File option and select “Export” (this option will let you convert your audio to popular formats). A window will appear that will ask your preference of the format. Choose any format you wish to.
Your own Karaoke of the song is now created with the help of this free software and four simple steps. Now upload it on the internet, learn the tunes of the instruments used, or perform in a show without the help of any live band playing for you.
P.S.: Audacity’s help website shows a different method for this, but that method is outdated, as Audacity has started including this “Voice Remover” plugin in standard installation of Audacity.
Removal Choices
Now let me detail you with the three Voice removing options about which which I promised earlier that I will talk about.
- Simple (Entire Spectrum): In a song the vocal is always sandwiched in between the sound of the instruments. By using this option of vocal remover the software will compress the center band, thus the vocals are properly compressed.
- Remove Frequency band: There is a dialogue box provided where you can specify the lower and upper band. This option will help you to remove the sound that lies within that frequency band range.
- Retain Frequency Band: This helps you to retain the audio of the lost frequencies such as drum or bass. The audio may be outside the limit that you have provided in the dialogue box. This option removes the duplicated sound that lies beyond that limit.
Thereby, wrapping up the article I would really like to say that this freeware is very good when it comes to making Karaoke or doing normal sound editing. I have been using this software since years now for my own sound editing and karaoke making purposes, and it has given me no reason to look for another option.
Get your free Audacity from here, and go happy Karaoking :)
