In this article, I have compiled a list of 4 free school timetable software. These timetable software can automatically generate timetables from the subjects, teachers, classrooms, etc. data. So, in most of these software, you just need to enter details of classes, subjects, instructors, etc. and rest of the work will be done by them. The best part is that you can generate multiple timetables for students and teachers and export these timetables in CSV, PDF, JPG, etc. format.
What makes them more useful is that they can optimize breaks and clashes between the lectures to cater all of your timetabling needs.
In case you want an online solution to generate timetables for your school then you can check out these 5 free websites to create timetable online. If you want to generate timetable on the go, then take a look at these 5 free timetable apps for Android.
Today, in this post, you will read about some free school timetable generators which can be used to generate complex timetables. So, let’s get started:
College Time Table:
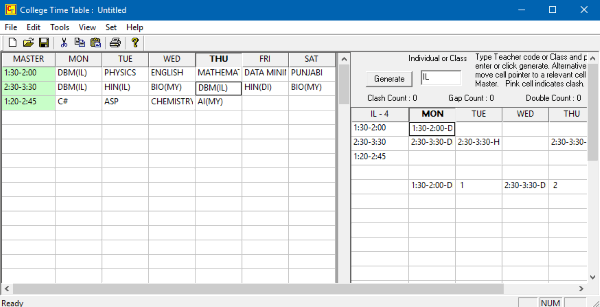
College Time Table is a free timetable software that can be used to generate a school timetable. You can easily use it to generate timetables for students and teachers. It also lets you print the generated timetables for classes and teachers separately. However, there is no option to save the timetable in CSV or XLS format. In this timetable generator software, all you just have to specify subject codes along with the teacher codes and it will automatically generate timetables based on these codes. It also generates reports like gap and clash reports which can notify you about the number of breaks and clashes between lectures. It comes with a pretty clean Excel-like interface which makes pretty easy to add data like time slots, subjects, teacher code, etc. The main interface of College Time Table is shown in the screenshot above.
Well, you can start by adding time slots in the “Master” column by following this format “startHours:minutes – endHours:minutes”, e.g. “3:00-4:00”. After that, you need to specify a subject and teacher code in weekday columns in this syntax “SubjectName (TeacherName)”, e.g. “MAT(HT) for subject: Maths and teacher: Himanshu Tyagi”. Do note that the total limit to specify a subject and teacher code is 5 letters (excluding brackets). In this 5 letters code, the first 3 are treated as the subject code and last 2 are used as teacher code. Now that you have added the timetable data, you can proceed further to generate timetables. The left section of its main interface is dedicated for that purpose only. You just have to enter a subject or teacher code and then hit the “Generate” button. This will show you the timetable of the subject or teacher based on the entered code. If there are some clashes between the lectures, then it highlights them with red color.
Additional features of College Time Table:
- Automatically remove gaps and clashes between lectures.
- View clash and gap reports of timetable.
- Print class and teachers timetable separately.
- Timetable Wizard to easily add time slots, classes, and number of lectures.
Free Timetabling Software:
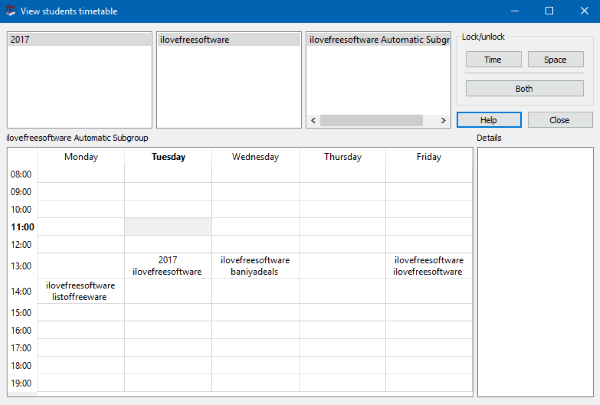
Free Timetabling Software is yet another free school timetable software. In fact, it can be used by any institution of any size to cater to their timetable scheduling needs. I am going to use it as a school timetable generator software to make a timetable for students and teachers. The best part is that you can create more complex timetables as it lets you divide students into different groups, assign subjects to teachers, etc. You just have to manually specify this data and it will then automatically generates separate timetables for students and teachers. It can also automatically detect clashes between the lectures and notify you about the same. Another good thing about FET is that you can export all the timetable data in a CSV file.
Let’s now see the steps to generate timetable in Free Timetabling Software:
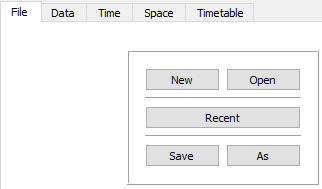
Step 1: Download it from the link provided above and extract the downloaded ZIP file. After that, run its EXE file from the extracted downloaded file to launch it. On its main interface, you will see a small section at the center, as shown in the screenshot below. From this section, you can access all the options to create a new FET file, insert data, generate timetable, etc. First, you have to create a new FET file. Click on “New” button to create one instantly.
Step 2: Now, switch to the “Data” tab in order to enter the details of the institution, students, subjects, teachers, etc. You can divide students into different batches, groups, and subgroups and assign subjects to teachers to which they are qualified to teach. Click on any option to add data to it.
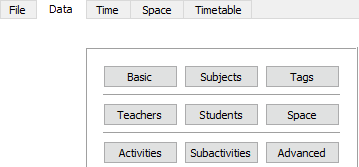
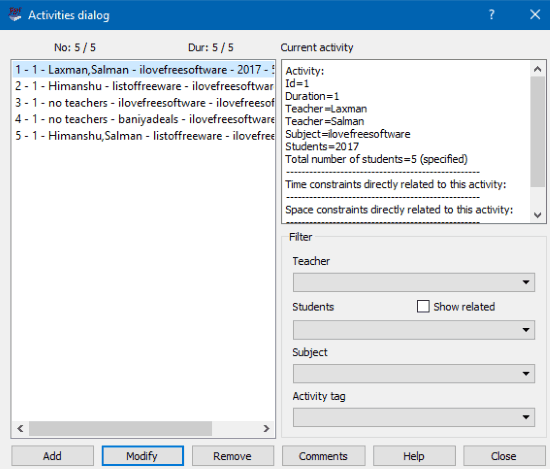
In order to generate a timetable, you first have to add activities. An activity can be referred as a lecture of a specific time duration which can involve multiple teachers and n number of students. In order to create a new activity, click on the “Activities” button and then add a new one from the “Activities dialog” box, as shown below.
Step 3: Once all activities have been added, you can now specify data constraints for teachers and students like maximum days, gaps, hours, etc. for a teacher and similar type of constraints for students. Switch to the “Time” section to specify these constraints, as shown in the screenshot below.

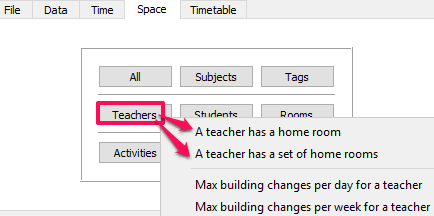
Step 4: In this step, you will specify space constraints i.e. number of rooms available for students and teachers. Switch to the “Space” section to specify these constraints, as shown below.
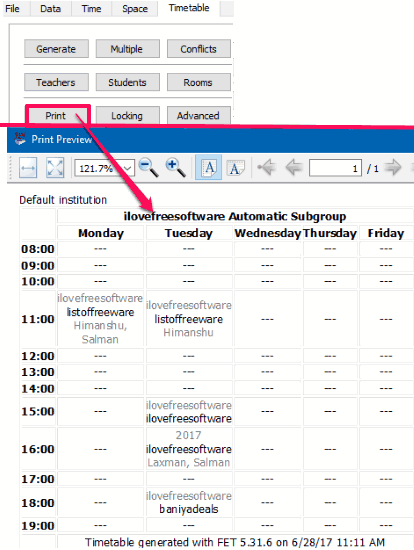
Step 5: In this step, you can finally generate a timetable for students, teachers, or both of them at once. Switch to the “Timetable” section and select any option to generate a timetable for all, teachers, students, subjects, rooms, etc. You can even print it from its interface, as shown in the screenshot below. It can also generate multiple timetables at once and save them in HTML format on your PC.
Free Class Schedule Maker:
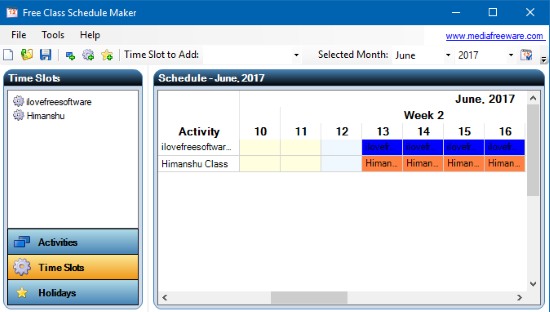
Free Class Schedule Maker is another free school timetable software for Windows. It is a pretty simple timetable software in which you just have to enter activities, time slots, and holidays. This software then automatically generates the timetable based on that data. Also, it gives you the option to export the timetable as a JPG file.
Let’s see the steps to generate timetable using Free Class Schedule Maker:
Step 1: Download and install Free Class Schedule Maker from the link provided above. Open it and you will see its main interface as shown in the screenshot above. Now, you first have to add some activities to auto generate timetable from them. From the Tools menu at the top, select the “Add Activity” option. This will open a dialog box in which you have to specify the activity name, description and time slot, as shown in the screenshot below. To specify the time slot of an activity, you have to first add one. To add a time slot, click on the “+” button and then specify the time duration of the activity and weekdays on which the activity will be performed.
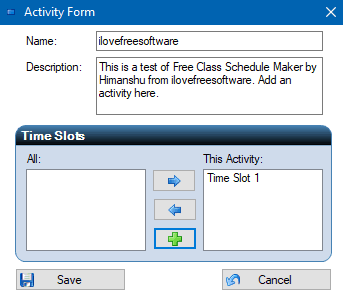
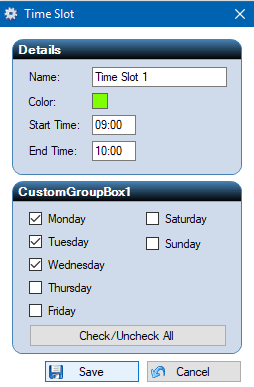
Step 2: If you want to first add time slots, then you can also specify them explicitly from the “Tools” menu; select the “Add Time Slot” option. After that, specify time duration, name, weekdays, etc. to add that time slot. Now, you can assign this time slot to any new activity that you add.
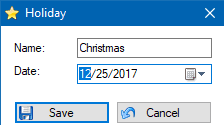
Step 3: You can also specify dates of holidays and when it generates the timetable it also highlights all the holidays in it. To add holidays, select the “Tools>>Add Holiday” option and then specify the holiday name and its date, as shown in the screenshot below.
Step 4: After you have added all time slots, activities, and holidays, you can proceed further to generate a timetable from this data. Simply click on the “Auto-Generate Schedule” button on the top. It will then show you a pop up in which you have to specify the start and end date of which schedule has to be generated, as shown below.
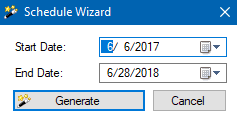
In the end, click on the “Generate” button and it will show you the schedule of all the time slots, activities, and holidays, as shown in the screenshot below. 
It also gives you the option to export timetable as JPG file. In order to export the timetable, select the option “Export Schedule” from the Tools menu.
Wise Timetable Basic:
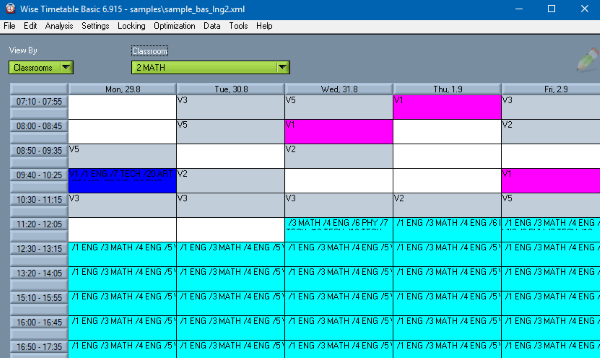
Wise Timetable Basic is another advanced school timetable software for Windows. Just like other school timetable software on my list, it can also detect clashes and gaps between the lectures, but the best part is that it can optimize the complete timetable to fill the gaps and avoid any clash between the lectures. It can also be used to find unallocated classes, optimize students’ and teachers’ break, plan examinations, etc. In short, it is quite a powerful software that can solve most of the timetabling problems on its own and you will be escaped from manually solving them out. The generated timetable can be saved as PDF or you can directly take out its print out.
Do note that when you download and install it, you will get a 1-month free trial and after this period is over it will be automatically reverted back to the basic version. Some of the limitations of basic version are:
- You won’t be able to connect it to any database or web application.
- Some restrictions in automatic timetable generation and reports.
- No mobile phone functions.
There is nothing much you have to do in order to generate timetable in Wise Timetable. The only major task is to enter the subject, lecture, students, teachers, etc. details and it will automatically generate the timetable for you. As I mentioned, you don’t need to manually fix the breaks and clashes between classes, it can optimize all of them in just a click.
Let’s see the steps to generate timetable using Wise Timetable Basic:
Step 1: Download and install Wise Timetable from the link provided above and install it. After that, open it, and you will see its main interface as shown in the main screenshot above. Do note that it comes preloaded with some dummy data. So, you first need to create a new file from the “File” menu. Now, you can proceed further to insert data required to generate the timetable.
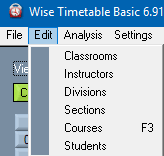
Step 2: From the “Edit” menu, choose an option to insert data of classrooms, teachers, courses, sections, etc. as shown below.
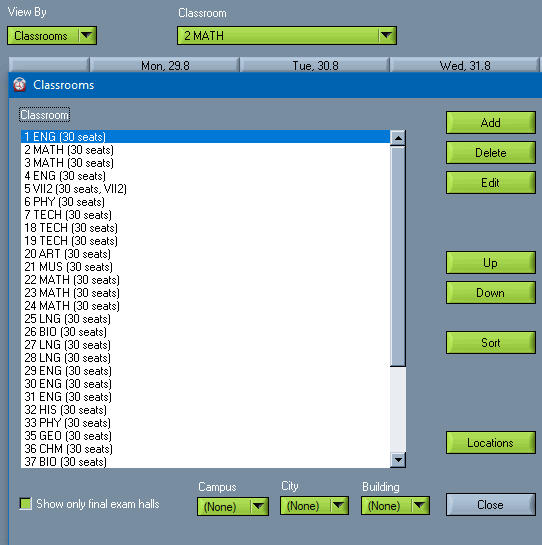
Step 3: Let’s say you choose to insert data in classrooms then you will see a screen, as shown below. Now, you can add more classes by the “Add” button or delete existing classes by the “Delete” button. In a similar fashion, you can insert data for students, teachers, courses, etc.
Step 3: Once you have inserted all the required data, you can view timetables by instructors, classrooms, section, etc. on its main interface itself. You just have to choose a filter from the “View By” field and other filters that appear based on the filter selected in the View By field, as you can see in the screenshot below.
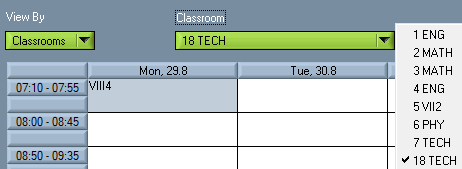
If you want to export the timetable then select the “Save As PDF” option from the File menu. There is also an option to export all timetables i.e. instructor, students, etc. at once.
Verdict:
In this article, I introduced you to 5 free school timetable software. These free timetable generator software can solve all your timetabling problems as they can automatically detect clashes and gaps between the lectures. If you need to make complex timetables, then I will recommend you to go with Free Timetabling Software and Wise Timetable Basic. Apart from that, if you need to quickly generate a timetable, the College Time Table and Free Class Schedule Maker are worthy to be checked out.