In this article we will be explaining the steps to send an email to yourself from Google Sheets with the contents of a cell or a range of cells in the Sheet as a body of the email. This can be very handy in case you wish to send a daily report to yourself right from the confines of a Sheet and for a variety of other reasons.
The process can be easily and quickly carried out using a Google Apps Script as shown below. No third party software or extensions is used for the execution.
Steps:
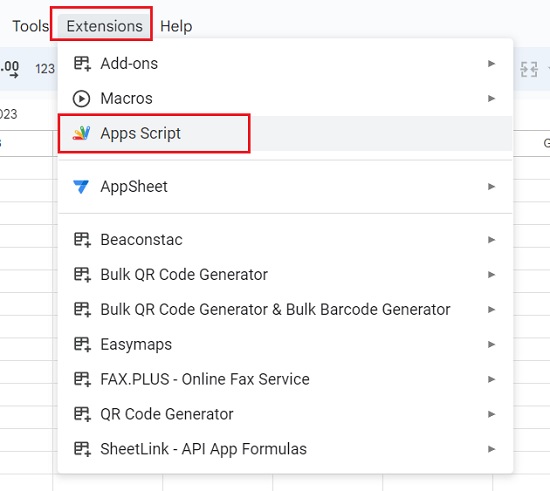
1. Navigate to Google Sheets and open a new sheet. Click on Extensions -> Apps Script and this will open Google Apps Script in another browser tab.

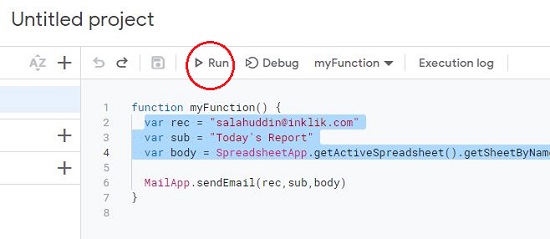
2. Paste the following script between the curly brackets (after myFunction) as shown in the screenshot below.
MailApp.sendEmail(rec,sub,body)
Rec, Sub and Body are the corresponding variables for the Recipient, Subject and Body of the email. The next step will be to define all these variables in the script.

3. Move your cursor to the beginning of script that you pasted above, and press enter a couple of times to create blank lines.
4. Insert the following commands in the blank lines to define the variables used in the script.
var rec = <yourmailaddress@mail.com>
var sub = “Today’s Report”
var body = SpreadsheetApp.getActiveSpreadsheet().getSheetByName(“Sheet1”).getRange(“A1”).getValue()
You must insert your mail address in place of <yourmailaddress@mail.com> and the subject of the email in place of “Today’s Report”. The body of the email obviously cannot be some plain text. So, the variable ‘body’ has been defined in such a way that the contents of the cell ‘A1’ will automatically be included in the body of the email. You can change the range as required.

5. Make sure you have some text in the cell range that you have defined above. Save the script by pressing Ctrl + S and then click on the ‘Run’ button in the toolbar at the top.

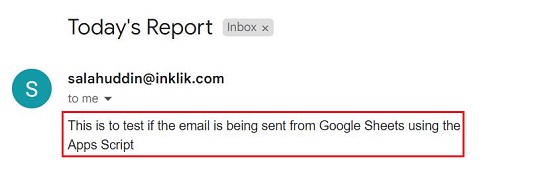
6. Check your inbox and you will find a new email with the same subject as you have defined in the variable and the body from the contents of the cell range that you have specified.

7. To configure a trigger to send this email automatically at specified times click on the ‘Trigger’ icon in the side bar on the left of the Apps Script window.
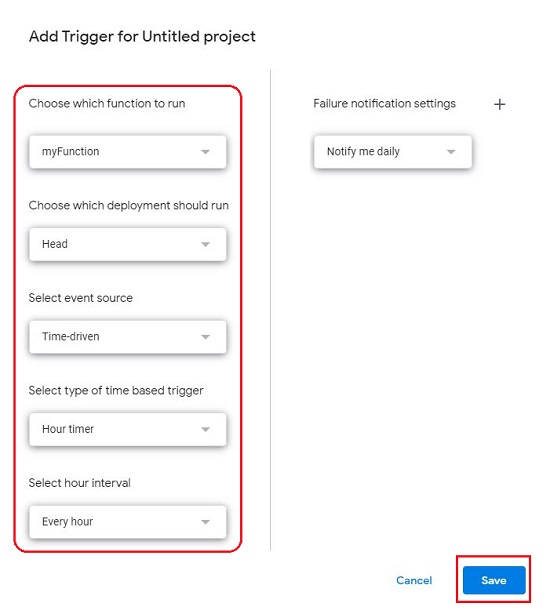
8. Click on ‘Create a new trigger’ and in the ‘Add Trigger’ popup, choose the function that you have defined above in Apps Script.

9. Under ‘Select event source’ choose the option ‘Time-driven’, in the dropdown to ‘Select type of time-based trigger’ choose any option such as Minutes timer, Hour timer, Day timer etc. and finally select the ‘Interval’ in the last dropdown menu.
10. Click on ‘Save’ to save the Trigger settings and you will see a trigger appear on the Triggers page. Henceforth the email will be automatically sent to your mail address based on the interval that you have defined in the Trigger.

Closing Comments:
The above method is a quick and easy way to send an email to yourself from Google Sheets without using any third part applications or extensions. Try it out and let us know what you feel.