This tutorial covers how to disable automatic scroll bar hide in Windows 10. You must have noticed in Windows 10 that when using Settings, Microsoft Store, or other UWP app, when you are not interacting with scroll bar, it is hidden or shrunk automatically. You then need to hover or place mouse cursor on scroll bar position to make it visible each time you want to use it. But now, you don’t have to do this again and again. Windows 10 now supports built-in feature(s) to disable this automatic scroll bar hide option.
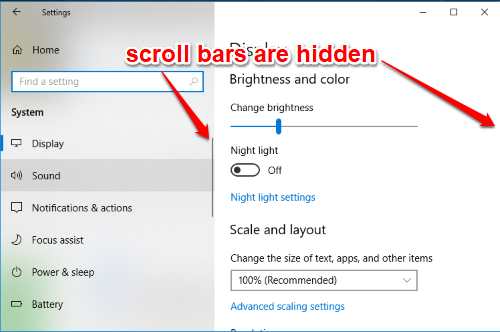
To turn off or disable automatically hide scroll bars in Windows 10, there are two native methods. You can use Registry Editor or an easier method which is Settings app. This tutorial has covered both for you. First, see the screenshot below where you can see that scroll bars are hidden.
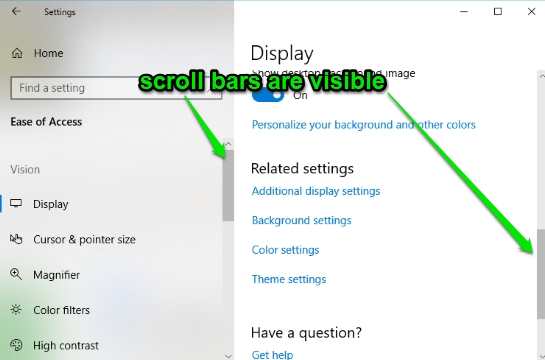
Now have a look at the screenshot below. As you can clearly see, the scroll bars are visible with full height and width or I say in expanded mode.
Note: This feature is currently in the preview build 17083 or higher of Windows 10. If you are using any of those builds already, then you can try this feature right now. Otherwise, you should wait for the next stable update or use preview build to use this feature.
Method 1: How To Disable Automatic Scroll Bar Hide Using Settings App of Windows 10?
Step 1: This is a very simple step. Take the help of Start menu to open Settings or shortcut key “Windows logo key + I“.
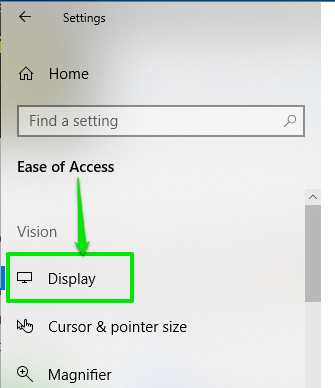
Step 2: In Settings app, first select “Ease of Access” and then “Display“.
Step 3: Display page has some options that are visible on the right side. Scroll down those options and you will see that “Automatically hide scroll bars in Windows” option is turned on. All you need to do is turn off this option.
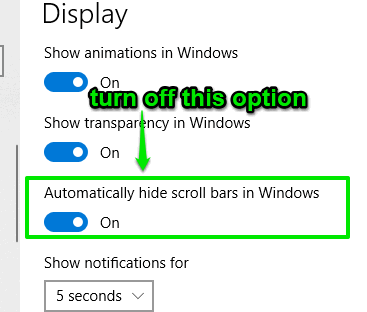
That’s it! You have disabled automatic scroll bar hide in your Windows 10 PC. To enable scroll bar automatic hide feature, you can again turn on the same option.
Method 2: How To Disable or Turn Off Automatic Scroll Bar Hide Using Registry Editor of Windows 10?
This method does the same thing but with the help of Registry Editor.
Step 1: Enter regedit in Search box and results will show Registry Editor option. Select it.
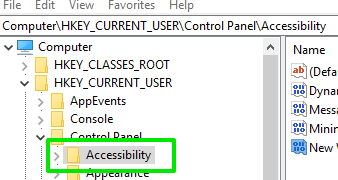
Step 2: After opening Regedit window, you need to find Accessibility key. Its path is as follows: Computer → HKEY_CURRENT_USER → Control Panel → Accessibility.
Step 3: Accessibility key has a “DynamicScrollb” DWORD value whose data is set to ‘1‘ by default. This means scroll bars will hide automatically. To disable it, double-click that value, set ‘0’ in data field, and save it.
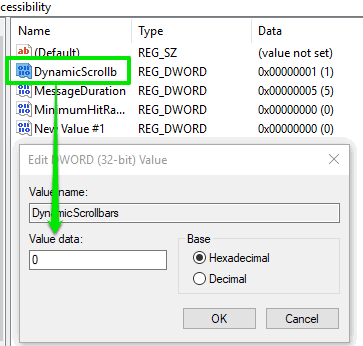
This will immediately disable automatic scroll bar hide for all apps, Microsoft Store, and Settings app of Windows 10. To enable scroll bar hide automatically again, you can simply change the data of DynamicScrollb value back to ‘1’ and save it.
Did you know you can enable automatic hide scroll bars in Chrome browser also?
The Conclusion:
This automatic scroll bar hide option in Windows 10 might be useful for many users. But for me, it is irritating sometimes as I have to wait till scroll bar is visible to use it. Not anymore as thankfully Windows 10 gives built-in methods to disable automatically hide scroll bars.