This tutorial explains how to run an application with preferred priority using context menu of Windows 10. You will be able to launch a particular application with high, low, normal, above high, or below normal priority. This will come in handy when some application needs more system resources than others and vice-versa. In that case, you can launch that application with high or low priority level as per your needs.
To run an application with preferred priority level using context menu, you first need to add all the priority level options in right-click menu of Windows 10. For that, you have to add some entries and set their values in Windows 10 registry. I have added all those steps for you in this tutorial. So, adding priority levels to Windows 10 context menu and then launching an application with specific priority will be very easy for you.
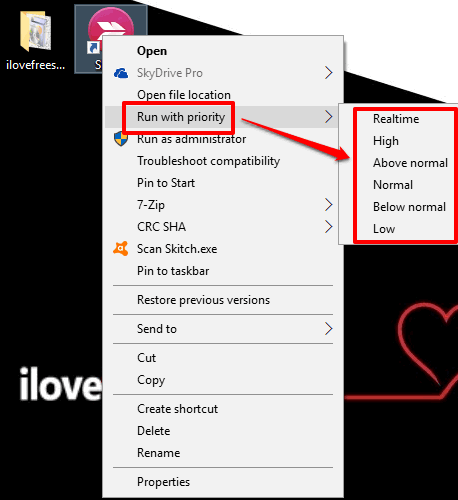
In the above screenshot, you can see priority level options for an application visible in right click context menu of Windows 10.
How To Run an Application with Preferred Priority Level Using Right-Click Context Menu of Windows 10?
Step 1: Use hotkey “Windows logo key + R” to open Run Command. After that, type ‘regedit‘ in text box, and Enter. It will start Registry Editor.
Step 2: In Registry Editor, go to “HKEY_CLASSES_ROOT\exefile\shell“.
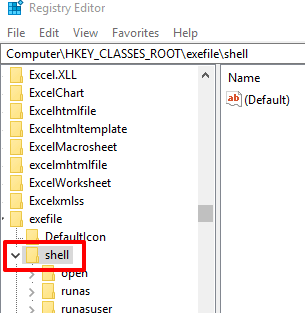
Step 3: Right-click this ‘shell‘ key to create a new key with name “Priority“.
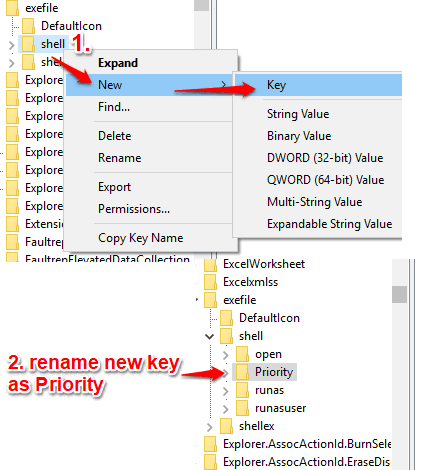
Step 4: Under Priority key, right-click on the empty area, access New option, and then tap String Value option. It will add a new String value. Rename it as “MUIVerb“. Repeat this process again to create another String Value and name it as “SubCommands“.
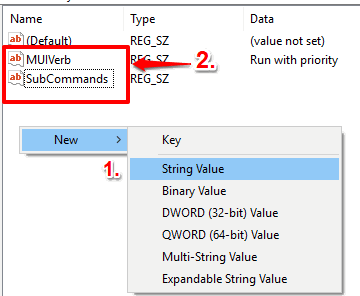
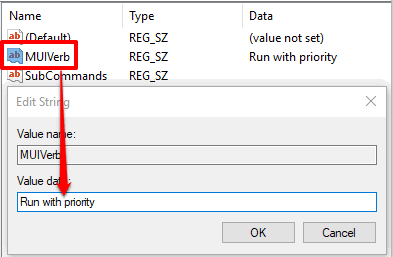
Step 5: Double-click that MUIVerb String value and then write “Run with priority” in Value data. This Run with priority option will be visible in the context menu when you will right-click on an application. And under SubCommands String value, you have to add priority levels (low, high, normal, etc.). Those priority levels will be visible under ‘Run with priority’ context menu option.
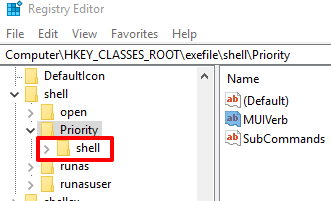
Step 6: Come back to Priority key that you created in step 3. Create a new registry key under Priority key, just like you created Priority key, and set its name as “shell“.
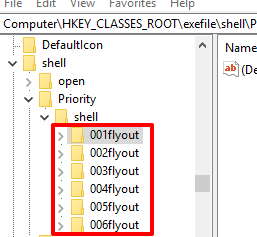
Step 7: Under this new shell key, create 5 registry keys and name them as 001flyout, 002flyout, 003flyout, 004flyout, and 005flyout.
Step 8: Each flyout key will have a “Default” name String value. These values are created automatically, you don’t need to add them. Access those Default String values one by one and add names in their value data fields. For example, first, double-click on the Default value of 001flyout key, and add “Normal” in its value data. This Normal option will be visible under Run with priority option in the right-click context menu of Windows 10. Repeat this for other Default String values of other flyout keys and add their names. The names should be like this: Normal, high, Above normal, Normal, Below normal, and Low. You don’t have to follow this order. You can add any name under value data of any Default String value.
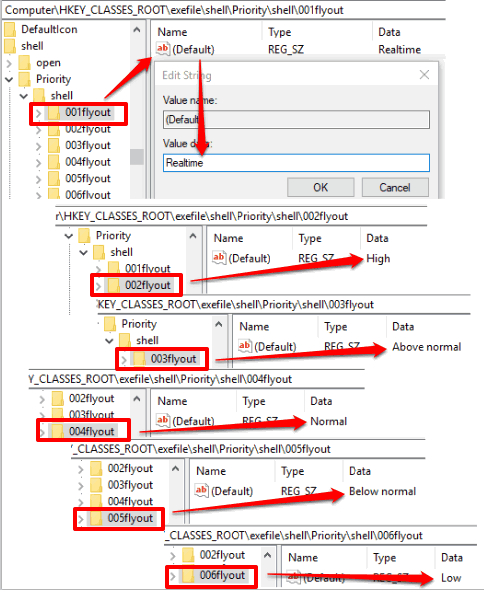
Now you will be able to see Normal, High, Above Normal, and other options under Run with priority option in Windows 10 context menu. But, these options won’t do anything unless you add commands for these options. So, move to the next step and setup commands for each priority level option.
Step 9: Create new keys under each flyout key and name them “command“. See the screenshot below.
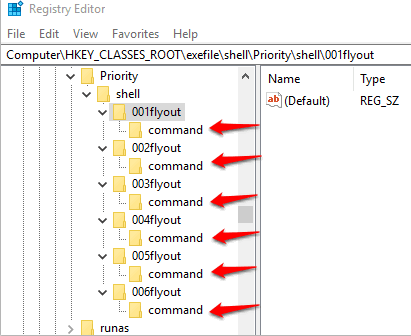
Step 10: Like flyout keys, all command keys also have “Default” name String value. You just have to add command in their value data fields. The commands contain following parameters “cmd.exe /c start "" /PriorityLevelName "%1"“. Here you need to replace PriorityLevelName with its actual name. For example, if you have to add command for “Low” priority level option, then the command is: “cmd.exe /c start "" /Low "%1". Below are all the commands that you need to add in Default String values of command keys:
- cmd.exe /c start “” /Realtime “%1”.
- cmd.exe /c start “” /High “%1”.
- cmd.exe /c start “” /AboveNormal “%1”.
- cmd.exe /c start “” /Normal “%1”.
- cmd.exe /c start “” /BelowNormal “%1”.
- cmd.exe /c start “” /Low “%1”.
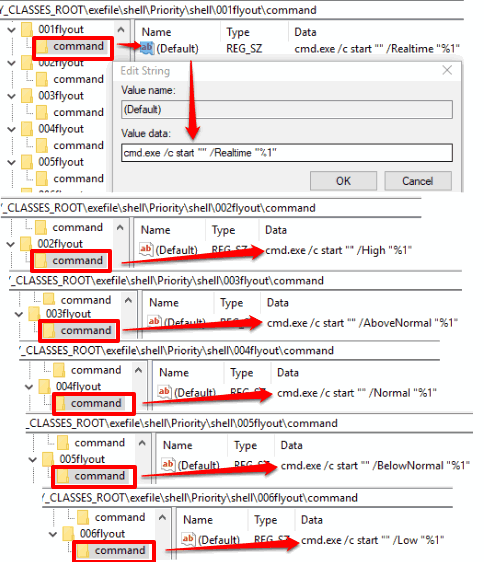
Carefully add commands in value data fields of each Default String value.
Now you can close Registry Editor.
Step 11: Right-click on an application or its desktop shortcut and you will see “Run with priority” option in the context menu. Accessing that option will show all the priority level options that you added in Registry Editor. Select a priority level and the command associated with that priority level will execute.
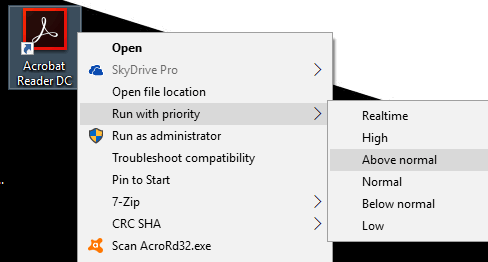
That’s it! This way, you can run a particular application with the preferred priority.
The Verdict:
Windows automatically sets priority level for applications that you run. But, if you think a specific application should run with higher or low priority, then this trick will help you do this. Just add priority levels in Windows 10 context menu and then you will have the choice to launch an application with the priority level of your wish. If you face any trouble while setting up priority level options in Registry, then you can share it using the comments section below.