Here is a tutorial that explains how to compare data between two Oracle databases, and how to synchronize differences between them. This tutorial uses a free tool called dbForge Express for comparing and synchronizing Oracle databases. Note: You need to have some Oracle client installed on your system to use this tool.
Step 1: Start Data Comparison Wizard
dbForge comes with a free Data Comparison wizard. This wizard will guide you through steps to compare data between two Oracle databases. Just start this wizard.
Step 2: Connect to Oracle Databases to be Compared
Once you are on oracle data comparison wizard part of dbForge, click on “New Data Comparison” option. This will bring up a pop-up window where you can specify connections to the Source and Target Oracle database. You can choose any oracle database, including free Oracle database. Once you have specified the connections, you can choose the schemas that you want to compare.
Step 3: Specify Comparison Options
Once you have chosen the schemas that you want to compare, you can specify comparison options. Free version lets you compare tables. You can choose to see the records that are in source, but not in target DB, records that are in target but not in source DB, and the records that are different between source and Target DB.
Step4: Specify Mapping Between Objects:
dbForge automatically maps tables of same names between the source and target schema. If it finds some tables that are in source but not in destination, or vice versa, it lets you create a custom mapping for those tables. The paid version also lets you create mapping at column level.
Step 5: See Comparison Results
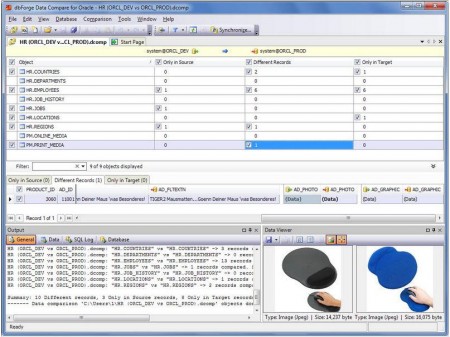
After completing the mapping, you can start comparison between selected Oracle databases. dbForge quickly completes the comparison, and reports the findings. This is where the real meat lies. The comparison results window of dbForge is designed in best possible manner.
In top half of the window you can see names of the tables that dbForge compared. With each table, dbForge shows if there are any records that are only in source, or only in target, or different in both. You can click on any of the table to see the records that dbForge reports.
In this window, you will also notice that each table that has some differences has a checkbox besides it. This checkbox indicates that you want to include this table in the synchronization script that will be created later. In case you want to exclude some table from synchronization, you can uncheck the box for that.
Step 6: Create Synchronization Script
This step takes away all the pain from manually synchronizing Oracle databases. Based on the differences that dbForge found in above step, it creates a synchronization script to be run against target database to bring it in sync with source database. Here you can see a summary of the differences that were found in a tree form. You can also choose to create the script here. You can choose to save the script to a file on your PC, or open the script in internal editor that comes in dbForge.
You also get an option to directly execute the script against target database, but I would not do that. I would instead choose to either save the script on my computer, or open in Internal editor of dbForge so that I can review the script before I make any changes to my DB.
Step 7: Run Synchronization Script
Based on the option that you choose in above step, you can open the synchronization script in dbForge, or using some other PL/SQL Editor. You will notice that the script is completely standards compliant, and very easy to read. If everything looks fine, you can run this script in your target database, or edit it before executing.
These simple steps will remove differences between source and target Oracle databases, and make your oracle databases in sync. This tool works only with Oracle, and not other DB like Firebird.
