Mouse Without Borders is an incredible desktop application to control multiple computers with one keyboard and mouse. Developed as a Garage project by a Microsoft employee, Mouse Without Borders lets you control up to four computers using a single mouse and keyboard, provided they are connected to the same network. It works with both Wired and Wireless networks. Thus, you can use it to to perform almost all standard file operations (e.g. cut, copy, paste) across the connected computers. You can cycle through the connected computers to select the one you want to remotely control, via simple keyboard hotkey combinations. Apart from this, you can even switch mouse control from one screen to another by simply moving the mouse pointer to the edge of the screen(s).
We reviewed a similar software called Input Director a few years back, but Mouse Without Borders is definitely more feature rich and comes directly from Microsoft.
Mouse Without Borders: Installation and User Interface
Before even getting started, I think it’s important to note down the following obvious (but important nonetheless) points:
Note 1: Since Mouse Without Borders is essentially a remote administration tool, you need to install it on all the computers that you want to remotely control.
Note 2: All of the above said computers need to be connected to the same network (Wired or Wireless).
The installation of Mouse Without Borders is a pretty standard affair. All you have to do is download the fairly small (just about 1.1 MB) application from its homepage, install it on all the computers that you want to control via a single keyboard and mouse, and you’re good to go. When you launch Mouse Without Borders for the first time after installation, a simple start up screen asks you to install and configure the application on all the other computers as well. However, you can easily skip this screen (using the Skip link at the top right corner) to get to the main program, since that allows a more granular configuration.
Mouse Without Borders features a pretty busy, but easy to navigate tabbed interface. It’s divided into three subsections, which can be easily navigated via their respective tabs. These are briefly described below:
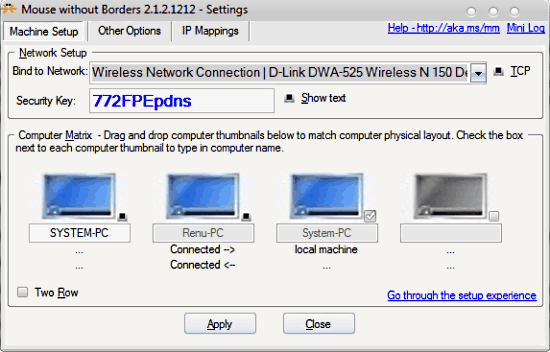
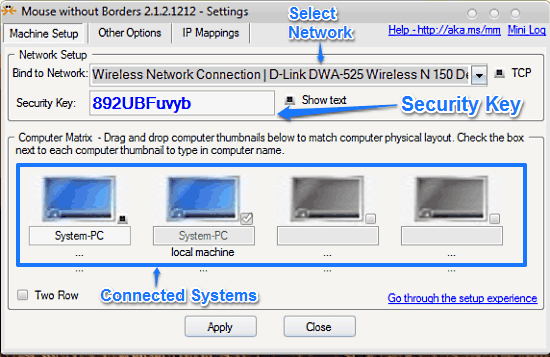
- Machine Setup: This is the default landing section. The Machine Setup tab consists of a couple of options that let you perform majority of the initial set up to get started with Mouse With Borders. Under this section, you can select the default network to which the computers to be controlled are connected (Wired or Wireless). Apart from this, you can also view the unique ten character alphanumeric security key. This is the security key that you need to type in on all the computers that need to be controlled via Mouse Without Borders. It also shows the icons for the four computers connected via Mouse Without Borders.
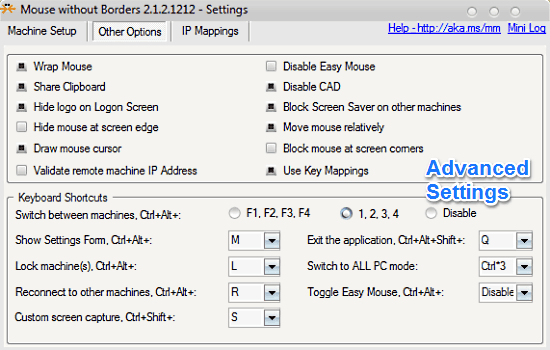
- Other Options: This section lets you access a lot of extra advanced options that let you configure Mouse Without Borders to your needs. Amongst the many settings configurable under this section, you can enable/disable mouse wrapping (automatic switching of screen when mouse moves to either edge of the screen), block screensaver activation on the machines being controlled, specify key mappings, enable/disable shared clipboard and things like that. You can also configure predefined desktop shortcuts to quickly perform standard functions like lock computers, switch between machines, switch to universal PC control mode etc..
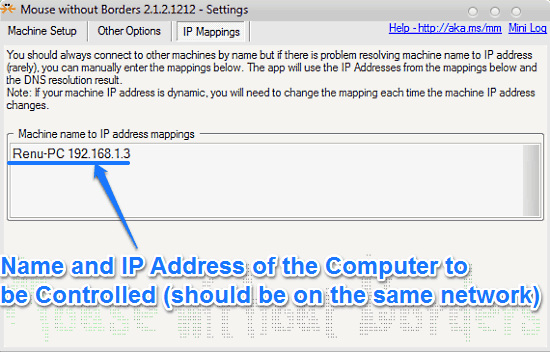
- IP Mappings: Normally, Mouse Without Borders can easily connect to other computers by their names. However, in case it’s not able to find a machine by its name, you can manually map the machine name to its IP address under this section.
How To Use Mouse Without Borders To Control Multiple Computers With A Single Mouse And Keyboard?
Now that we know about the various settings and configuration options of Mouse Without Keyboard, it’s time to know how it actually works. Here’s how Mouse Without Borders makes easy work of controlling multiple (up to four, and two in the process outlined below) computers via a single mouse and keyboard:
Step 1: Set up Mouse Without Borders on both the network connected computers. To do this, enter the ten digit unique alphanumeric security key displayed on (any) one computer to the other one. Also, select the Network to which both the computers are connected.
Step 2: Enter the Machine name to IP address mapping (detailed above) of each computer in the IP Mappings tab of Mouse Without Borders on the other computer.
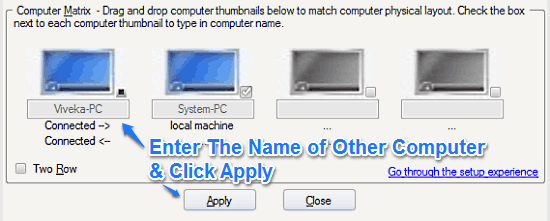
Step 3: Finally, enter the computer name of the second computer under any vacant computer preview thumbnail, and click Apply. Once you do that, the other computer will be connected to your local machine over the common network.
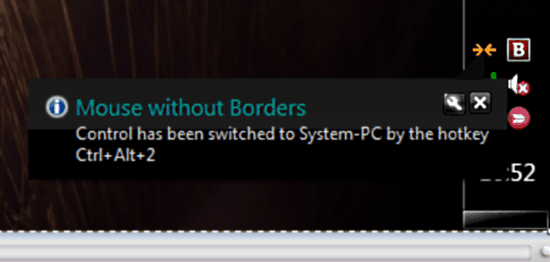
Now, you can simply move the mouse control from one computer screen to another by taking the pointer to the edge of your screen. When the mouse control switches to the screen of the second computer, the keyboard control shifts to the other screen as well. You can use simple predefined keyboard shortcuts (Ctrl+Alt+<number 1-4> or Ctrl+Alt+<F1-F4>) to switch control from one system to another. Each time the control shifts from one system to another, Mouse Without Borders notifies you of the same via a tray notification.
Conclusion
Mouse Without Borders is a really amazing application that lets you do some really cool stuff while working with multiple computers. It is an indispensable utility for those who have to regularly work with multiple computer (screens). The ability to switch control to another computer by just moving your mouse to either edge of your screen is amazing. It’s a small, yet incredibly powerful (and of course, fun to use) application. I suggest you give it a try, you’ll love it.