Paisa is a free open-source Personal Finance Manager that is available as a command line interface (CLI) as well as a desktop application for Windows and Mac users. It can help you with expense tracking, budgeting and more and displays several charts and visualizations that can enable you to take important financial decisions in time.
Your financial data in Paisa is safe and secure as it never leaves your system. The program builds on top of the Ledger, a powerful command line double entry accounting system that adheres to the principles of plain text accounting. You must however remember that Paisa is bundled with an embedded Ledger, and you are not required to use it via the command line unless you expressly desire to do so.
In fact, Paisa awards a lightweight and easy-to-use graphical user interface that has been built on the top of Ledger, so that it is accessible to a significant range of users who may find it difficult to use it via the command line. Nevertheless, you should be familiar with the terms and concepts used by Ledger. Click here to read about them.
Features:
The following is the brief list of Features offered by Paisa:
- The Journal and Configuration information related to Paiss is stored in plain text files that can be version controlled swiftly and easily. You can also collaborate with other users by providing them the access to the files.
- Paisa can automatically track the latest market price of your Mutual funds, NPS funds, Stock holdings and more. Additionally, it can also indicate the Mutual fund and Stock holding that is eligible for LTCG (Long Term Capital Gains) so that you can plan your tax harvesting.
- Paisa allows you to convert existing CSV files or Excel sheets to a Ledger Journal. This helps you to import your existing financial data from other applications that you may be using.
- The Paisa Dashboard provides you with a whole range of graphical charts and visualizations related to your Income, Expenses, Cash Flow, Assets, Liabilities and more. These charts can help you to make proper financial decisions in time.
Working:
1. Click on this link and follow the instructions that have been provided to download the Pre-built Binary (Desktop application & CLI) for Windows or Mac.
2. Install the application in your system by running the respective setup file and launch the application.
3. At the outset, you will be prompted to visit the Configuration page where you can set your financial year starting month, default currency, locale, path of Journal & DB, etc. You can also specify your Allocation targets, Commodities, and other configuration settings from this screen. Click on the ‘Save’ button at the top to save your configuration data.
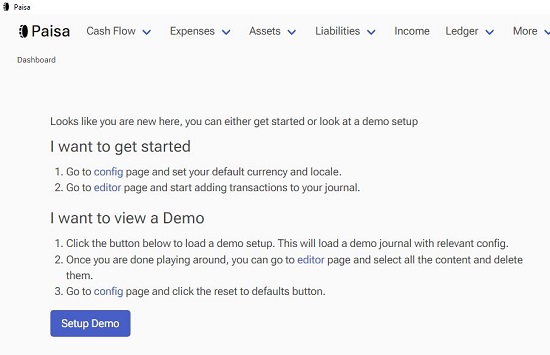
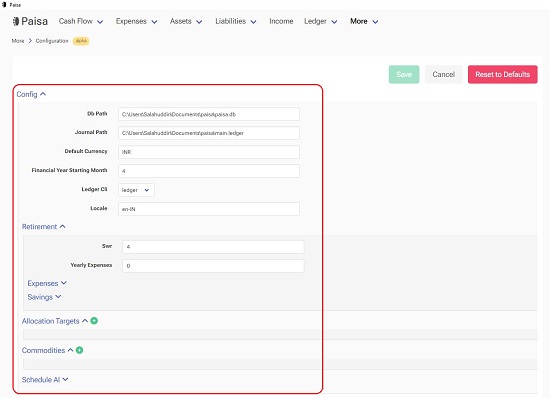
4. Once you are through with the above step you can begin adding transactions to your journal by clicking on Ledger > Editor in the top navigation bar. The Journal file captures all your financial transaction that may include a grocery purchase, mutual fund purchase, retirement contribution and more. By default, Paisa creates a Journal file for you named main.ledger.
5. As indicated earlier, the Ledger follows a double-entry accounting system which means that it tracks the movement of your money from the Debit to the Credit account. Look at the screenshot below to understand. The first line shows the date on which the transaction occurred, and a description followed by the list of credit or debit entries. In this example, Income:Salary:ABC and Assets:Checking are the debit and credit accounts respectively.
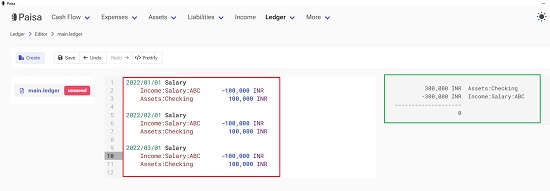
6. As you proceed with the editing of your journal file, the journal balance will be depicted towards the right of the page. Observe that there will be a zero balance as this is the inherent characteristic of a double-entry accounting system in which you always have to enter both the credit and debit side.
7. Look at the screenshot below to represent Deductions. It indicates a debit of an amount by a company towards PPF and EPF. Observe the changes in the journal balance shown towards the right and the use of the hierarchy in account names.
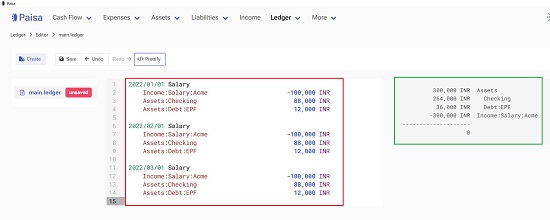
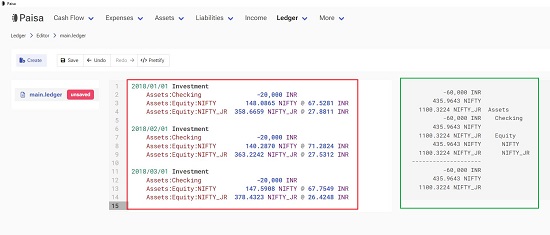
8. To input Commodity investments, you can see the screenshot below for details. It shows an investment in UTI Nifty Index Fund and ICICI Nifty Next 50 Index Fund every month. Look at the 148.0865 NIFTY @ 67.5281 INR. Here NIFTY is the name of the commodity and 148.0865 units have been bought at 67.5281 INR per unit.
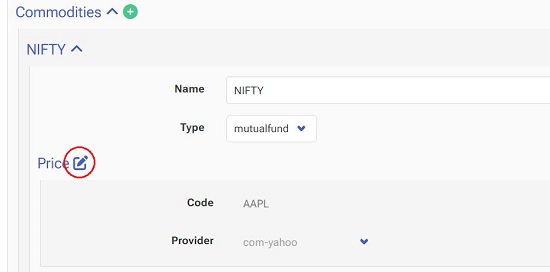
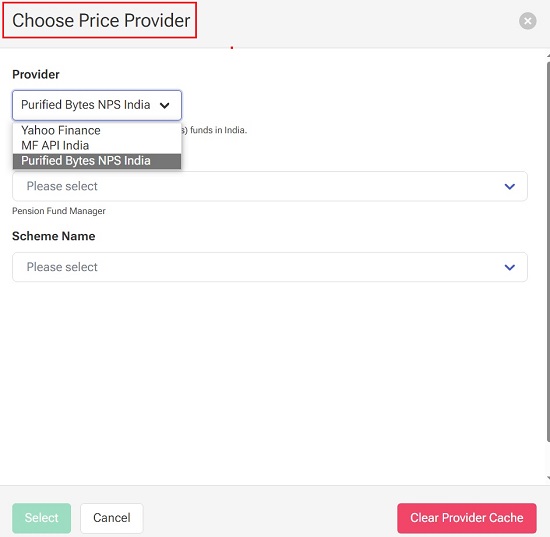
9. Paisa offers support for fetching the commodity price from some providers. For this, you must navigate to the Configuration page, expand the Commodities section, and click on the ‘+’ icon to add a new one. Edit the name to Commodity as per your requirements and click the ‘pen’ icon adjacent to ‘Price’ section to specify the Price Provider details. Next, save the configuration and click on ‘Update Prices’ from the drop-down menu at the top right of the interface.
10. Click on this link to access a tutorial that will introduce all the concepts associated with Paisa and help you to get started. Click here to go through all the financial and accounting terms and important conventions related to Paisa
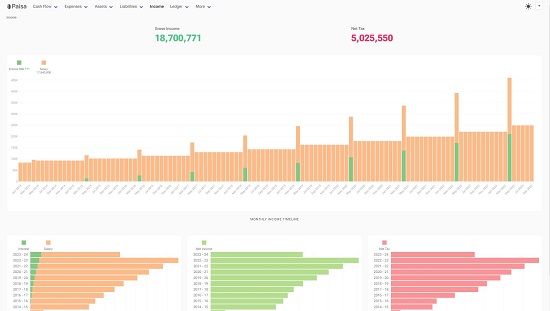
11. The Paisa dashboard gives you access to several visualizations related to your Income, Expenses, Cash Flow, Assets, et. To view these graph and charts, just hover your mouse over the various options available on the navigation bar at the top of the interface and choose the visualization that you like to observe.
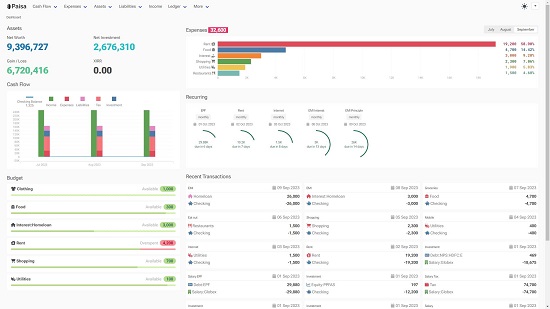
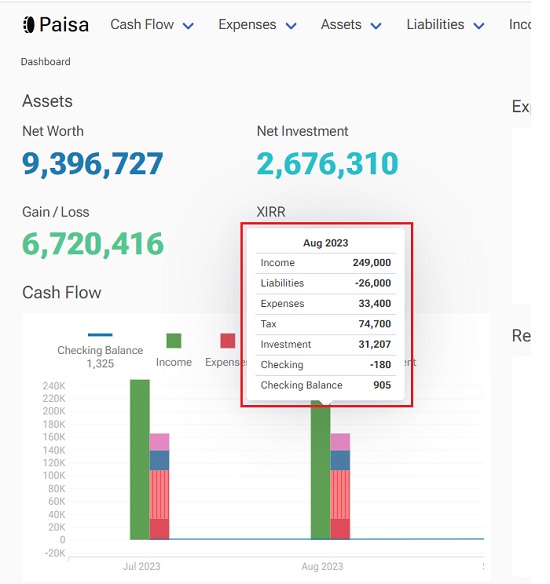
12. You can hover your mouse over the bars related to any of the charts to get fine details and obtain more information about it.
Closing Comments:
Paisa is a great and open-source Personal Finance Manager for Windows and Mac and is available as a command line interface as well as a desktop application. It follows the principles of plain text accounting and offers a very simple and easy-to-use interface that helps you with budgeting, expense tracing, financial analysis and more.
The plethora of visualizations related your Assets, Liabilities, Cash flow and more offered by Paisa can be very handy for you to take important financial decisions.
Go ahead and try out the product and do write to us on what you feel. Click here to navigate to Paisa. To experience a functional demo of Paisa, click here.