This tutorial explains how to set a webpage as screensaver in Windows 10. You can add any webpage to set that as your Windows 10 screensaver. The best part is that you can add multiple webpages and set time interval to see those webpages one after another in screensaver. Also, you will be able to open webpage links within the screensaver, that is really interesting.
Setting a webpage as screensaver is not possible natively in Windows 10, but this can be done very easily using a free software, called “Web-Page-Screensaver“. This software lets you add URLs of one or multiple websites, set their position, time interval to display webpages, and set the screensaver. After that, when screensaver is activated, the set webpage(s) will visible.

Above you can see screensaver preview of my Windows 10 PC where a webpage is visible as screensaver.
How To Set A Webpage As Screensaver In Windows 10?
Step 1: Use this link to get the “Web-Page-Screensaver.scr” file.
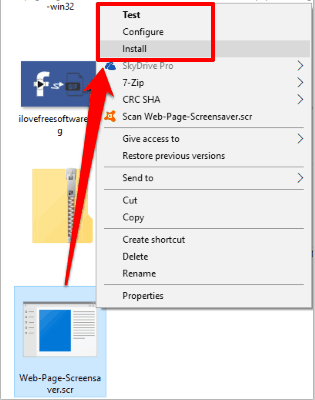
Step 2: After downloading that scr file, right-click on it. You will see three different options:
- Test: This option helps to quickly test it.
- Configure: This option is perhaps added to configure the screensaver settings, but this option simply opens screensaver preview. If you have to configure settings of this software you need to access Screen Saver Settings window.
- Install: As the name suggests, this option will install the software.

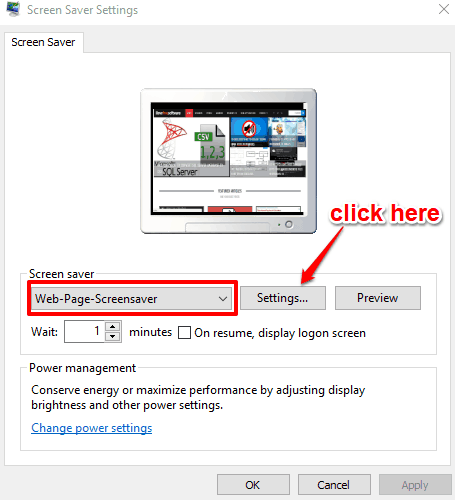
Step 3: After installing this software, Screen Saver Settings window is opened automatically. There you will see that Web-Page-Screensaver is set as screensaver. But the work is not over yet. You need to set its configuration. So click “Settings…” button.

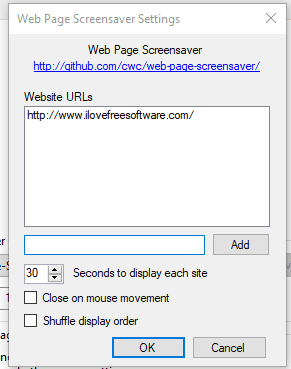
Step 4: Web Page Screensaver Settings will have two default webpages. You can easily remove them by right-clicking and selecting Remove URL option. If you want to keep them, then there is no need to do anything. Now to add a webpage of your choice, use “Add” box. Enter webpage URL in the available box, and press Add button. The webpage will add in the list. You can add more URLs of your choice. Apart from that, you can also set time (in seconds) to display each webpage in screensaver.

There is also an option to “Close on mouse movement“. If this option is not selected, then screensaver will remove immediately as soon as you move mouse cursor. If you want to open links of webpage in screensaver, then you need to enable Close on mouse movement option.
Step 5: An option to shuffle display order of webpages for screensaver is also available that you can enable as per your choice. Configure settings and press OK.
After that, you can set wait time for your screensaver and save the changes. Now when screensaver is activated, you will be able to see the webpage(s) added by you.
You can also check 5 Screensaver Creator Software For Windows 10.
The Verdict:
This is an interesting software using which you can set webpage as screensaver in Windows 10. If you want to see any of your favorite webpages in Windows 10 screensaver, then you must try this software.