TestDisk is a free cross platform data recovery utility which you can use in order to recover deleted system partitions and also deleted files. Next to being able to recover lost partitions, this free data recovery software can also be used in order to fix un-bootable disks by scanning and fixing the master file table or MFT for short.
Similar software: NTFS Undelete, Disk Digger, Pandora Recovery.
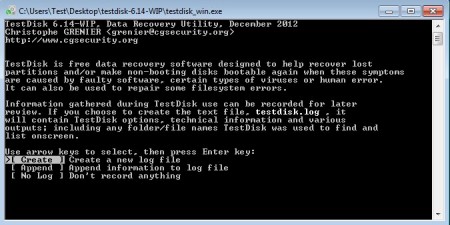
This is what waits for you after you start TestDisk. As you can see this is a command line application. Don’t worry, you won’t have to know any kind of special commands in order to use it. Despite of the fact that this is a command line data recovery utility, it offers a wizard-like approach, first step of which can be seen above. By going through the steps of the wizard, you’re gonna be selecting the disk where partition was deleted, type, and so on until everything’s setup. Key features of TestDisk – free partition recovery software are:
- Scan for errors and fix partition tables and damaged partitions
- Recovery – recovers completely deleted partitions from hard drives
- Rebuilds boot sectors on NTFS, FAT12, FAT16 and FAT32 partitions
- Scans for and recovers deleted files and documents
- Works with Linux file systems – ext2, ext3 and ext4
- Cross platform – works on Linux, Windows, Mac, BSD, Solaris
- Portable – doesn’t require installation – click and run
Partitions and data loss isn’t that uncommon, at least not when you suffer from virus infections or when partition tables get damaged due to human error. In these types of situations the best shot you have at recovering lost data is by using data recovery utilities like TestDisk. Here’s a few pointers to help you get started.
How to recover data and partitions using TestDisk
The first step in the recovery setup process asks you to select if you want to save a log file. After that you’re gonna have to select the hard drive where the lost or daLinux, Windows, BSD, Mac, Solarismaged partition was located. Several steps more wait for you, most important one being the partition type selection. TestDisk will advise you with the partition type it has detected.
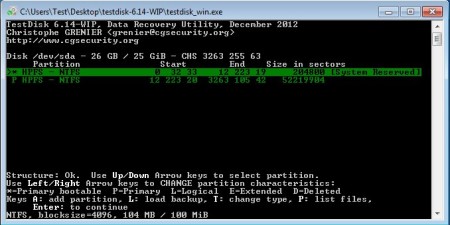
When you click next on this step, you’re gonna be presented with the list of partitions which were found. Browse through them until you find the one you’re interested in recovering.
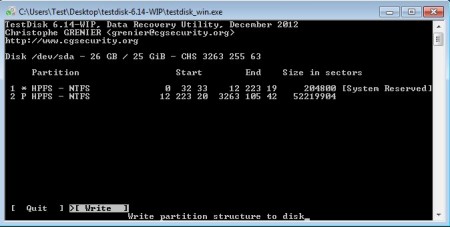
Last step will appear where you’ll need to confirm that you would like to write the new partition structure with the recovered partition to the disk. Keep in mind that any existing data on the hard drive will be lost, so be careful. To recover data, deleted files and documents, you’re gonna have to start the wizard again and select the Filesystem Utils option and then Undelete.
Conclusion
Even though TestDisk doesn’t have more user friendly interface, using it isn’t difficult at all. Every step of the data recovery setup is explained and pretty much self evident. Scans and recoveries are fast, but this of course depends on your system and hard drive type. Give it a try and see how it goes. Free download.


