In this tutorial, you will learn how to run apps in tablet mode on Android phones. This is especially useful for bigger smartphones and phablet devices since they have more screen real estate to play around with. Tablet mode for many Android apps is meant to add convenience, by displaying more data on the screen, and sometimes is significantly different from the Phone layout. And if you too want to run apps in Tablet mode, you need to take full advantage of Android’s versatility and ROOT your device first.
Caution: This tutorial requires a rooted device. If you do not know what ROOT is, you should back-off now; this post is NOT meant for you and you should NOT follow this tutorial. Also, there’s always room for error in such stuff as you are making changes to your system settings, which may or may not work in the desired way. I don’t need to mention that if something goes wrong with your device, I won’t be held responsible. But I can assure you that it has been tested comprehensively by me.
To achieve this, you will need to install two apps. The first one is Xposed Framework app, and the second is “App Settings“. These will be explained in a bit more detail in their respective sections.
How to Install Xposed Framework and App Settings Module:
Xposed Framework is an app which gives you a safer way (as compared to other methods) for applying system tweaks, and it also gives you the option to enable or disable them whenever you want.
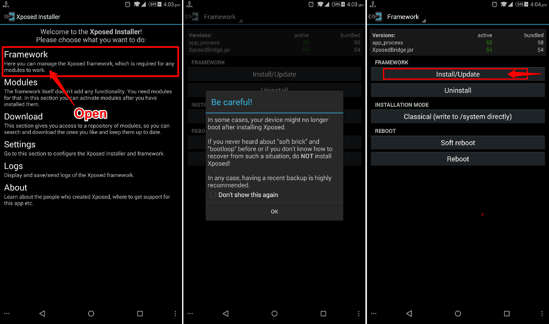
So, the first thing you need to do is install Xposed Installer apk file (link at the end of this post). Once installed, open the app, click on “Framework”, and then click on “Install / Update”. This will install the Xposed framework on your device. After this, reboot your device.
The second app (namely, App Settings) can actually be installed from within the Xposed Framework itself (such apps which work like plugins within the Xposed Framework, are termed as Xposed Modules). This is so because Xposed Framework doesn’t give you any features by itself, and rather acts as a platform for downloading, enabling, or disabling such modules like App Settings.
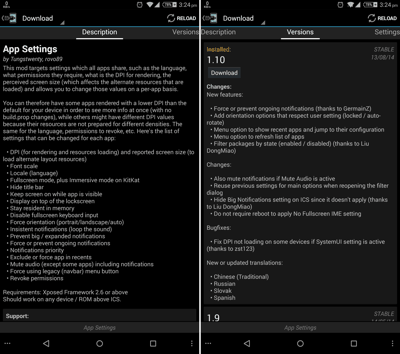
So once you have rebooted the phone after installing the Xposed framework, just open Xposed app and go to ‘Download’ section from the main screen. Now, search for App Settings Xposed module here, download it, and install when prompted.
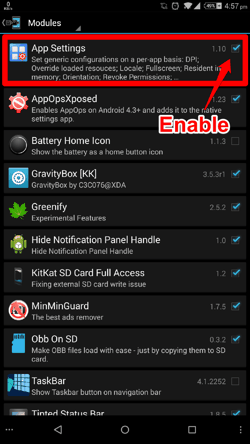
Once the module App Settings is installed, you need to launch Xposed app again -> Go to Modules -> Tick the box next to “App Settings”. Now you need to reboot the phone again. (Don’t worry this was the last time that I asked you to reboot your beloved device).
The first setup part is done. Let’s configure an app to open in Tablet mode by default.
How to Configure App Settings to Run apps in Tablet mode on your Android phone:
Now follow these steps to configure any specific app:
- Open the app named “App Settings” from your app drawer. In that, search for the app that you want to configure.
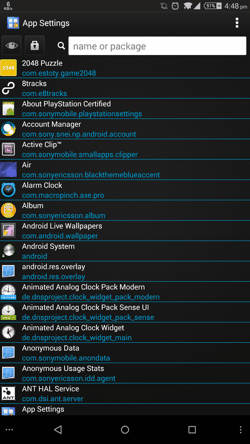
- Open the app. For example, let’s Open Chrome.
- You will see options similar to the way they are in this screenshot below. I know they seem pretty complicated. But worry not, we will change just two settings from here.
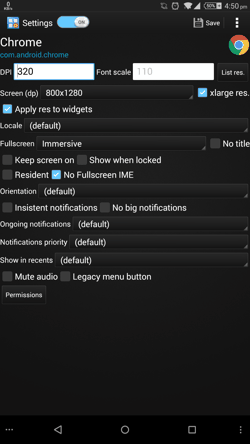
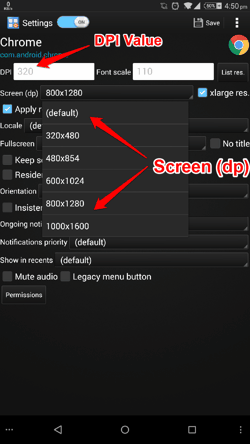
- The two values that we will modify are DPI value and Screen DP value (both are encircled in the screenshot above). I will explain in a minute what these mean, but let’s proceed to changing these values. Unfortunately, there is no fixed setting that would work for each app or device, so we will have to try different combinations of DPI and DP values. Don’t worry; I will tell you how to do that.
- First is Screen DP. This will show “default”. In the drop-down, select 800*1280.
- Next is DPI. Set this to 320.
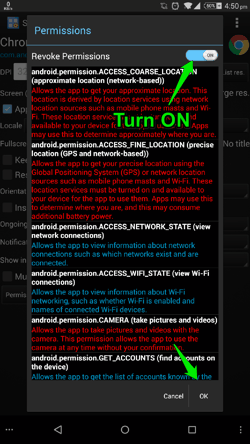
- Once you’re done, click on Permissions and switch it ON like it’s shown here.
- Finally, Click on “Save” button on the top right corner and click OK when a dialog box states that the specific app (Chrome on this instant) will be Force Stopped to apply your changes.
- Now Open Chrome and check whether you can open it in tablet mode.
- If the app does not open in tablet mode, go back to the Step II above, reduce the DPI value (I would reduce it by 10), and then repeat the steps from there on. You will need to keep doing that till you find the DPI that works. Do note that if it does not work even when you reach 160, then you need to change the Screen DP (the one that we set to 800*1280 in the Step I). Select the higher Screen DP (1000*1600), then again set the DPI to 320, and repeat the cycle all over again. I know it’s a pain to repeat that procedure and apply hit-n-trial, but I can’t really help it. If you know a better way, do let me know in comments below.
- Once you have set an app to tablet mode, you can proceed to do the setting changes for any other app as well. Do note that the same DPI and DP values might not work for all the apps, so you will need to tinker around with settings for each app individually. However, I recommend you start with the settings that work for one of the apps.
So, what the heck is DPI?
DPI: DPI or Dots per Inch, refers to the number of pixels contained within a physical area of the screen. When we set a lower DPI, it would mean that the corresponding number of pixels will be used for displaying the same content. So more info can be viewed on the same screen size.
Look at it this way — setting a lower dpi, (suppose 320 rather than 480) would use just 320 pixels to display the same data as before (which took 480 pixels earlier). Hence, the app will be scaled and display more info in less space.
Screen DP: This is also sometimes referred to as dip because it refers to Density Independent Pixels. This value determines the dimensions of an asset on screen.
To know more about DPI and DP, you can read this and this.
You can also use App Settings for controlling other things specifically for an app, like orientation, notification priority, and full-screen mode.
Congratulations! You can now run apps in tablet mode on your phone! You can select as many apps as you want, and even configure different DPI settings for different apps! Enjoy.

