Stickered For Messenger is a free Android app from Facebook to add stickers to photos. Released just in time for the holiday season, Stickered for Messenger is basically a companion app for Facebook’s own Messenger app (something that I’m sure its name instantly makes it clear). However, it’s important to note that Stickered For Messenger can work just fine on its own, even if you don’t have Facebook Messenger installed. Extremely lightweight and fun, Stickered For Messenger lets you snap a photo (or a Selfie!) and then apply some really cute and fun looking virtual character overlays on it. There are hundreds of overlays (smileys, animals etc.), segregated into categories that you can choose from. You can freely move the overlay around on the photo, or even resize and rotate it to adjust it as you want.
Once you’ve beautified the image with stickers, you can send it to your Facebook Messenger contacts in one click (This is where Messenger comes into play, as you need to have it installed for this to work). But even if you don’t have Facebook Messenger installed, you can easily share the edited photo via other sources, as it’s saved to your device’s Camera Roll.
As of now, Stickered For Messenger is only available on the Google Play Store, with the iOS variant of the app coming soon.

How To Use Stickered For Messenger Facebook App To Add Stickers To Photos?
Getting Stickered For Messenger up and running on your Android device is a standard affair. Head over to the Google Play Store, search for the app, and tap the install button. Here’s a step by step tutorial, illustrating how to use Stickered For Messenger:
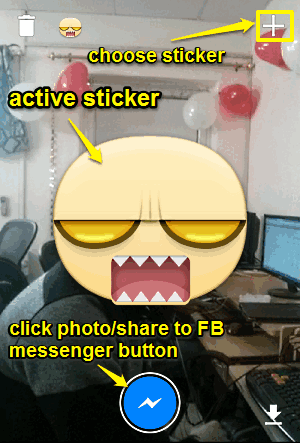
Step 1: Tap the app’s icon to launch it. Here’s how the primary UI of Stickered For Messenger looks like:

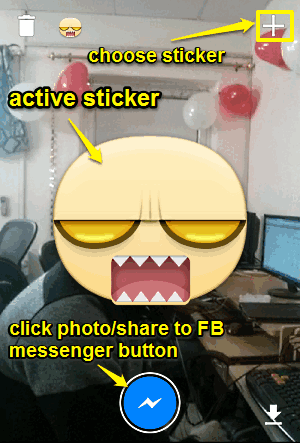
As illustrated above, Stickered For Messenger features a pretty standard UI, largely similar to that of the Camera App. The lower section consists of the one touch photo click button. This button serves a dual purpose. That’s because when you’re done adding stickers to your photo, you have to tap it to directly share the edited photo to one or more of your Facebook Messenger contacts. Moving over to the upper section, there is a delete icon on the left (for removing all the stickers added to the photo), and a “+” icon on the right (for choosing one or more stickers from the app’s sticker collection). The enlarged graphic shown front and center is the currently selected sticker. As mentioned before, you can move this sticker around, rotate it, and even resize it.
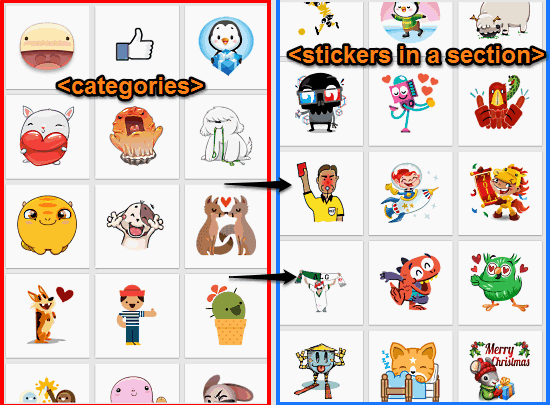
Step 2: To start things off, snap a photo. After that, click on the plus icon on the top right corner to view the different categories of stickers available in the app. You can tap on any category to see all the stickers that are available under it. Check out the screenshot below, showing the categories in the red box, and the stickers in a selected category in the blue box.

Step 3: Once you’ve selected a sticker, it’ll be immediately overlaid on the snapped photo. Here, you can easily drag it around on the screen, resize it, and rotate it to adjust it as much as you want. Once done, click on the one touch Share to FB messenger button. As you do that, Facebook Messenger will open up. Select the contact with whom you want to share the stickered photo, and your photo will be instantly shared with the selected contact. Pretty cool, right?

Wrap Up
Stickered For Messenger is a pretty fun app to add some fun overlays to your photos and share them with your FB pals. It’s simple, lightweight, and has a huge selection of fun stickers. Add to it the fact that it can (mostly) work even if you don’t have Facebook Messenger installed, and this thing gets a little bit more worth checking out. Try it out, and let me know your thoughts in the comments section below.