This tutorial explains how to set custom zoom level for specific sites in Microsoft Edge. It can be done with a free extension available for Microsoft Edge, known as “Zoom“. You can set a specific percentage (say 50%, 90%, etc.) of zoom level for a website and different percentage (40%, 200%, etc.) of zoom level for other website. So when you will open any page of the first website, the zoom level is adjusted to the defined zoom level automatically. Same happens for the other website for which you have set the zoom level.
Using this extension is also very easy. Just enter the address of a website, set the zoom level, and done. The next time you open that particular website, its zoom level is automatically adjusted to the level set by you.
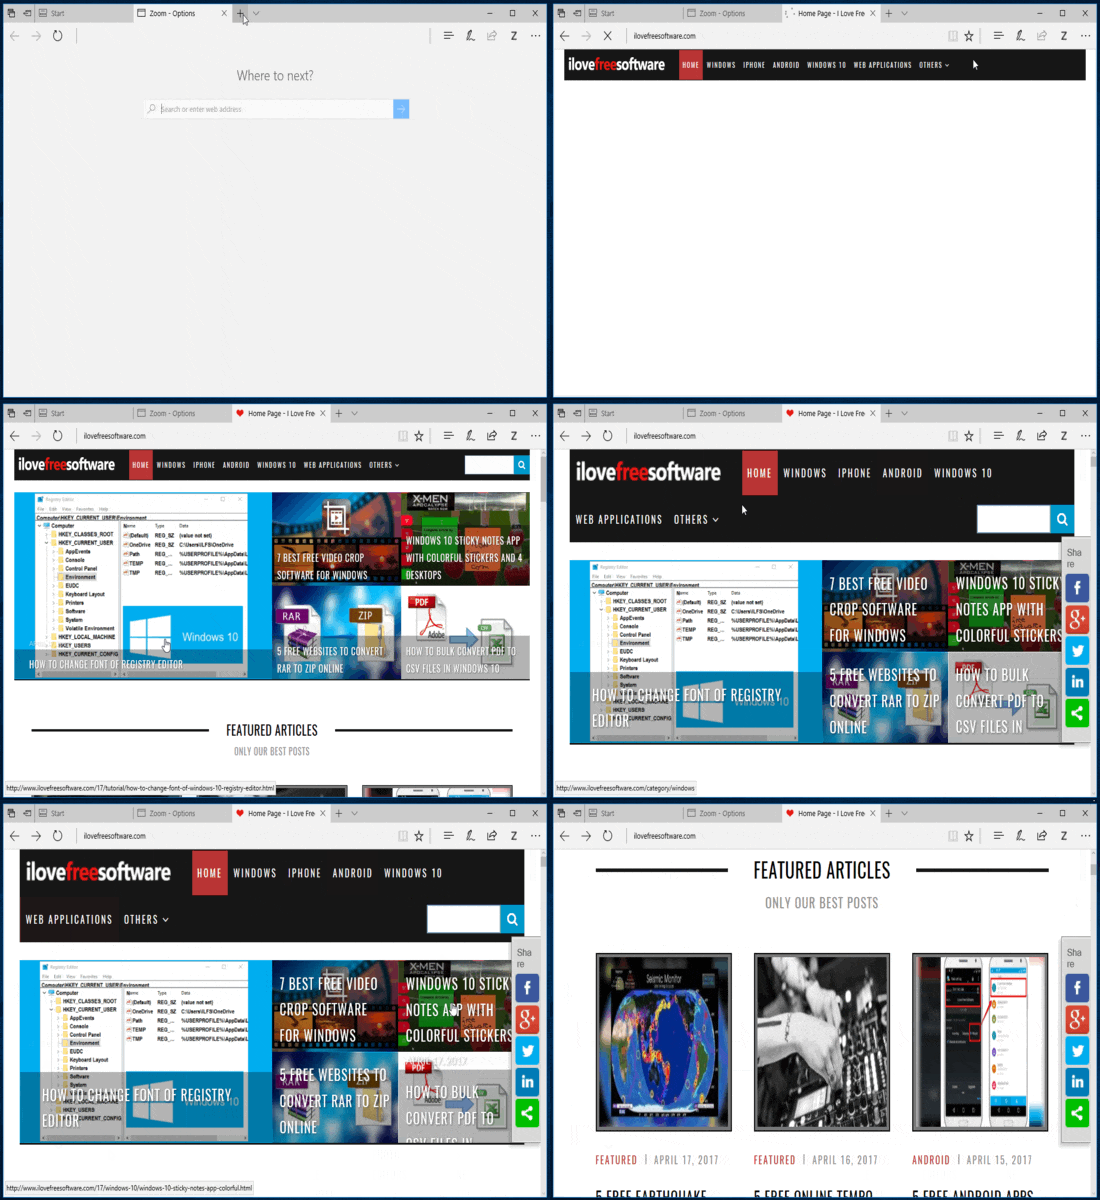
The recording above shows that as soon as a webpage is loaded completely, its zoom level is set to the defined level automatically.
Just like other modern browsers, Microsoft Edge also supports feature to zoom in a webpage using “Ctrl and +/-” button and “Ctrl+middle mouse button/wheel”. But, this doesn’t help to set different zoom level for different websites. Therefore, this extension is handy for that case.
How to Set Custom Zoom Level for Specific Sites in Microsoft Edge?
Step 1: This extension doesn’t seem to have a homepage yet. So to use this extension, you first have to open Microsoft Edge browser, then click More/Settings icon available on top right side, and then click on Extensions option. This will show “Get extensions from the Store” option.
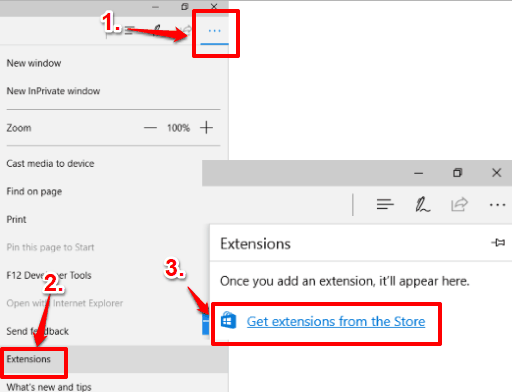
Use that option and Store app will open showing all the extensions available for Microsoft Edge. Scroll down the list, select Zoom extension and then install it.
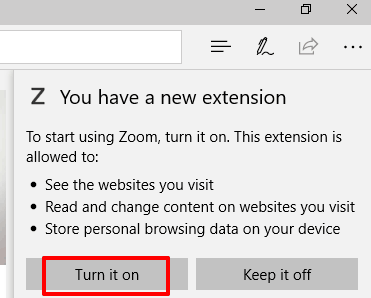
Step 2: After installation, when you access Microsoft Edge browser, you will see a pop-up notification to turn on or off the extension you just installed. Use Turn it on option so that Zoom extension can work for you.
Step 3: Even after turning the extension on, you won’t see its icon on the address bar. We need the extension icon on address bar so that we can easily access its options to add websites and set their zoom levels. So to show icon of Zoom extension on address bar, click More icon (three dots), right-click on Z icon, and select “Show next to address bar” option.
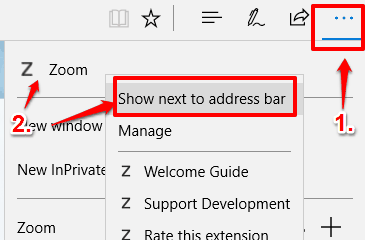
Now the extension will be visible on the address bar.
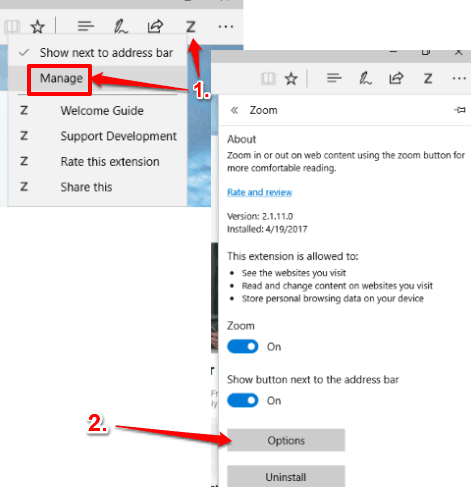
Step 4: To set custom zoom level for different websites, access Options of this extension. Right-click extension icon and click Manage option. After that, click Options button, as is visible in screenshot below.
Step 5: Options page of this extension will open in a new tab. Scroll down the page and you will see 3 websites are already in the list and their zoom level is set by default. You can either keep those websites or remove them.
To add a website of your choice, use the Website box and enter the address of that website. The address must be like: “https://ilfsdev.inkliksites.com“. If you will enter “ilovefreesoftware.com” or “https://ilfsdev.inkliksites.com/“, then it will not work. Therefore, be careful while entering the website address. After that, enter the zoom value for that website in the zoom value box. You can enter zoom value in percentage, such as: 70, 250, 20, etc.
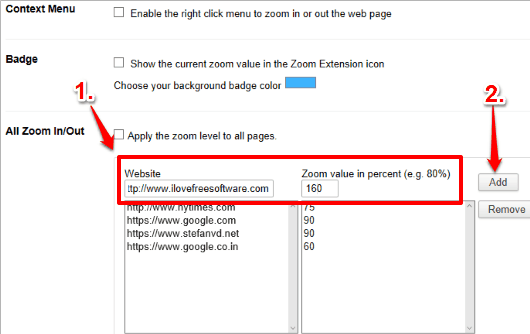
When options are set, click Add button. That’s it! You have set zoom level for that particular website. In a similar way, you can add other websites and set their zoom levels. You don’t have to save the changes as all changes are saved automatically.
Now when you open a website that you have added in the list, you will notice that its zoom level is automatically adjusted to the defined zoom level. This applies for all pages of that particular domain.
Options page has many other options, like show badge icon (for showing the zoom level of current webpage), enable context menu of extension, set default zoom level (reset level), etc. You can use those options also.
You can also use icon of this extension and reset the zoom level anytime. In case you want to remove a website from the zoom level list, you can access Options page, go to the list, select website, and use Remove button.
You may also check How To Turn Off Page Prediction In Microsoft Edge? and How To Set Tabs Aside In Microsoft Edge In Windows 10 PC.
The Verdict:
This is a very useful extension for Microsoft Edge. If you usually browse a particular website with a particular zoom level, then instead of adjusting its zoom level again and again, this extension can be used. Simply set the zoom level of a website only once, and always browse that website with that particular zoom level.