Many people are really frustrated by Windows 8’s (annoying) feature that takes them to the Start Screen upon boot-up of the system instead of taking them to the desktop. People who have migrated from the earlier versions of Windows like Vista, 7 etc. find this a bit annoying and confusing as well, as most don’t want to click the Desktop tile on the Start Screen and then be taken to the desktop. If this process was automated, many would definitely like Windows 8. Fret not. Today, we will talk about a simple technique that does not take a lot of time to be learnt, and when used, this will directly take you to the desktop of your Windows 8 device upon boot-up. And yes, this doesn’t even require you to download any software! How cool is that!!!
The steps involved…
Booting to the desktop on your Windows 8 machine isn’t as complicated as it sounds. In fact, it is so easy, that if you know the right way to do it, you will be booting your system to it’s desktop state upon its boot-up in no time at all.
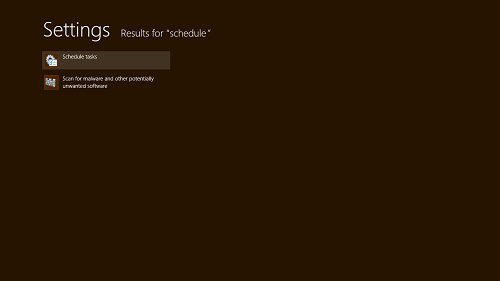
Step 1: Head over to the Start Screen, and type in “Schedule”. Select Settings from the pane on the left. Now you will be displayed a screen, where you will be able to see the option Schedule Tasks. Select that option.
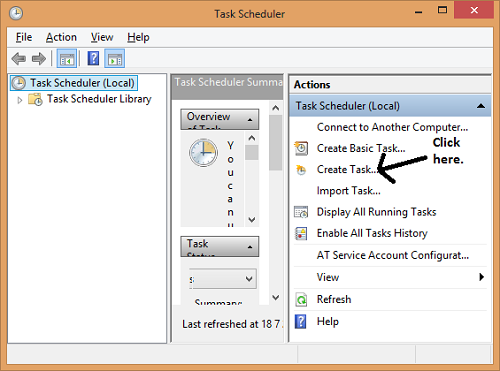
Step 2: Once you click on the schedule tasks option, a window where you can schedule tasks to be performed on your machine will open up on your screen. In this Window, click on Create Task option on the right pane, and clicking there will take you to the options that will allow you to create new tasks to be scheduled on your system. This option is shown in the below window.
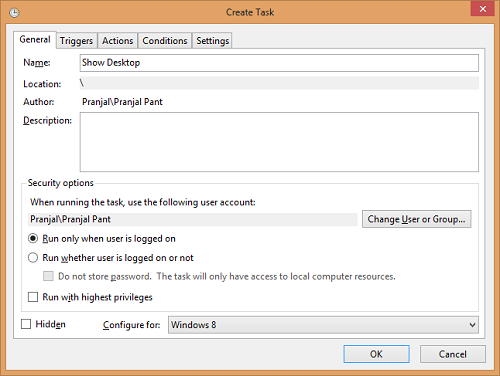
Step 3: Upon clicking the Create Task option, you will be taken to a screen where you can create new tasks. Here, give a name for your task. It can be anything of your choice, as it does not matter much. Also, remember to select Windows 8 from the drop down menu at the bottom of the window marked as Configure for. This is a compulsory step.
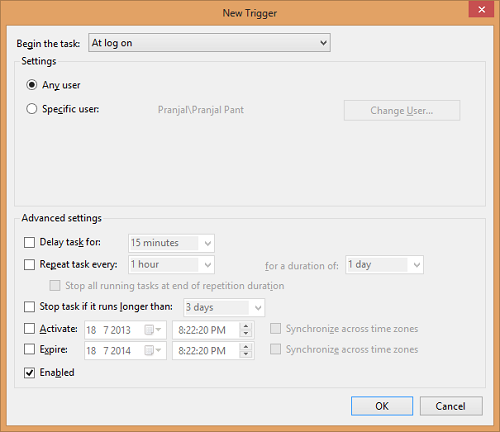
Step 4: Head over to the Triggers tab. Here, click on the New button at the bottom of the screen. When you click on the New button, you will be presented with a window that looks like the below screenshot.
If Begin the task At log on is not selected in the drop down menu at the top, select it. Make sure that ONLY the Any user and Enabled options are checked. Rest all should remain unchecked. Now, click the OK button at the bottom.
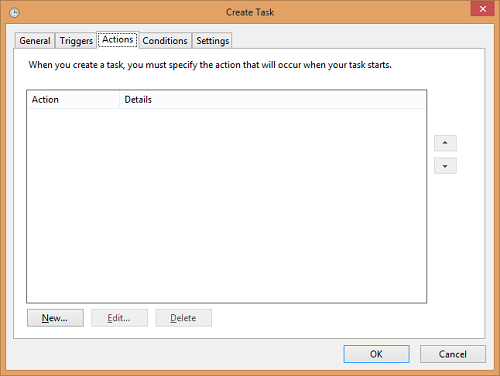
Step 5: Head over now to the Actions tab. This should look like the following screenshot.
Click on the New button at the bottom. Once you click this button, the following window should open up on your machine.
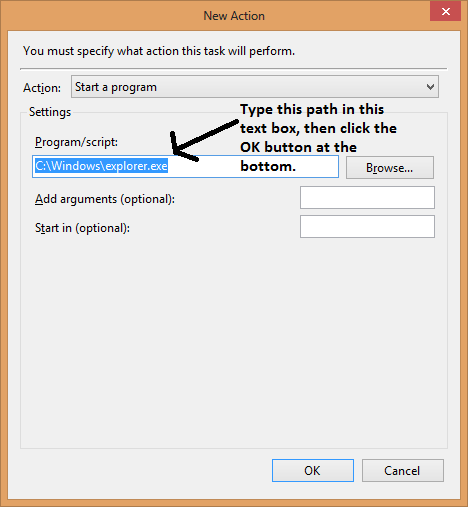
In the Window that opens up, select Start a Program from the drop down menu, and then copy and paste this path in the Program/ Script textbox —> “C:\Windows\explorer.exe”.
Note that you have to copy and paste this without the quotes. Click the OK button once you are done doing this.
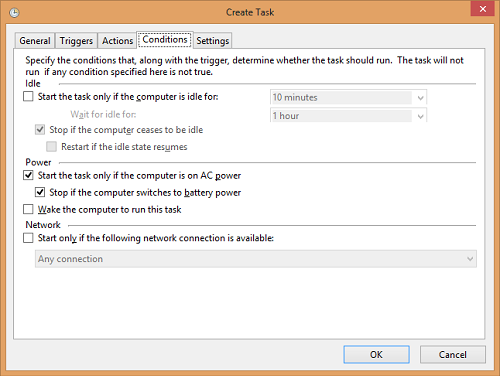
Step 6: Now, click on the Conditions tab. Here, uncheck the option Run the task only if the computer is on AC power if you always want to boot up to desktop, regardless of your laptop plugged in to AC power or not. Click the OK button.
NOTE: The above step is only required for laptop/ tablet users.
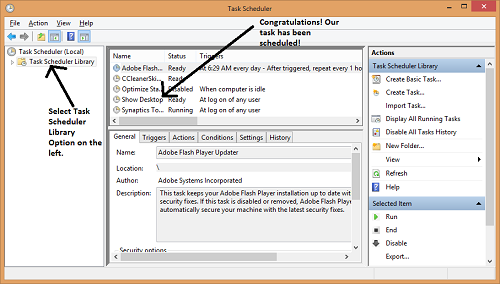
Step 7: That’s it. Now you should be able to see your scheduled task in the main window. To be extra sure, go back to the main window and cross check.
As you can see in the above window, our task has successfully been scheduled. Now, restart your system to see the changes taking effect!
In case you don’t want your system to boot to desktop after you have created this task, you can simply return to the Task Scheduler window by following the Step 1 of this tutorial, and head into Task Scheduler Library. Next, select the task that you created, and press the delete button on your keyboard.
This is all that you need to know to make your Windows 8 boot to Desktop mode instead of the Start Screen. I hope that you enjoyed reading this tutorial as much as I enjoyed writing it!
Difficulty Rating?
This tutorial has a difficulty rating of 3 out of 5, i.e., sufficient computing knowledge is required before you attempt this tutorial.
