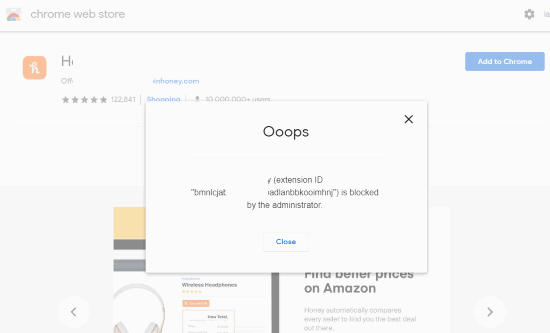
This article covers how to disable installing Chrome extensions in Windows 10. When you’ve done that, whenever you will access the homepage of some Chrome extension and try to install it, it won’t happen and you will get an error.
I have covered three methods here which work differently. That means one method helps to disable existing extensions as well as disable installing new Chrome extensions. The second method lets you install or use only the specific extensions and the rest of the extensions are disabled. And the third method will help you disable installing new extensions and continue using the existing extensions.
As you can see in the screenshot below, an error is visible when I tried to install a Chrome extension. This is just an example. Let’s check all the methods one by one.
Method 1: Disable Installing Chrome Extensions in Windows 10 and Disable Installed Extensions using Local Group Policy
This is my favorite method because I like to configure different settings in Windows 10 with the help of Group Policy. Using this method, neither new Chrome extensions will be installed nor existing or installed extensions will work.
Step 1: First of all, you need to add Group Policy settings for Chrome browser in Windows 10. The link added in this step will help you open the dedicated article for the same so that you can add it without facing any issue.
Step 2: After that, open Group Policy window using the Search box. You need to write gpedit.msc in the search box.
Step 3: When the Group Policy window is opened, follow this path: Computer Configuration → Administrative Templates → Classic Administrative Templates (ADM) → Google → Google Chrome → Extensions
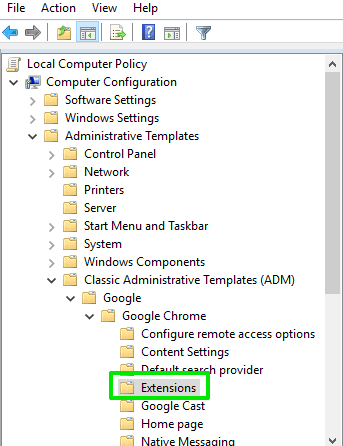
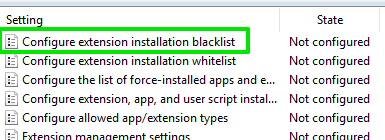
Step 4: On the right-hand side, double-click the “configure extension installation blacklist” option. See the screenshot below.
Step 5: A new window will be in front of you. There, select ‘Enabled‘ and then click on Show button. A small window will be visible to you. There, double click on the Value field, add “*“, and use OK button.
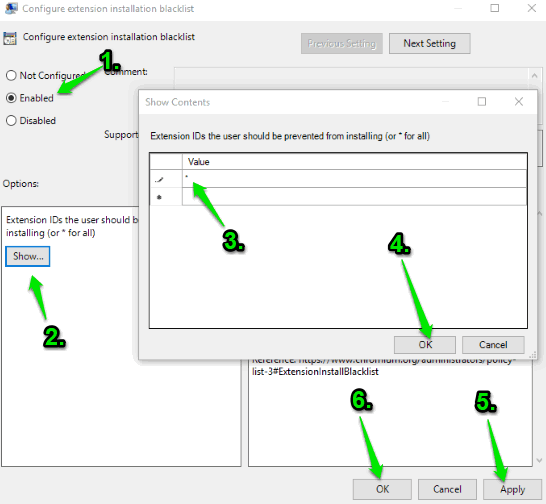
It will immediately disable all Chrome extensions, including installed extensions. If you have already opened Chrome browser, you will notice that it is showing an error and all extensions are disabled. Even if you will access Extensions page and try to enable some extension, it won’t open. And for the new extension, it will show the error.
Step 6: To undo all the changes, simply set “Not Configured” in the window that opened in step 5 and save the setting.
Method 2: Disable Installation of Chrome Extensions in Windows 10 and Allow Only Specific Extensions
This method takes the help of Group Policy Editor. The only difference is using this method, you will be able to install or use only specific extensions and rest of the other extensions will remain disabled (including already installed extensions).
Step 1: You need to follow all the steps of method 1. This will disable existing as well as the installation of new extensions.
Step 2: Now again, repeat step 1 to 3 of method 1 so that you can access the Extensions folder in Group Policy. On the right-hand side, double-click the “Configure extension installation whitelist” option.
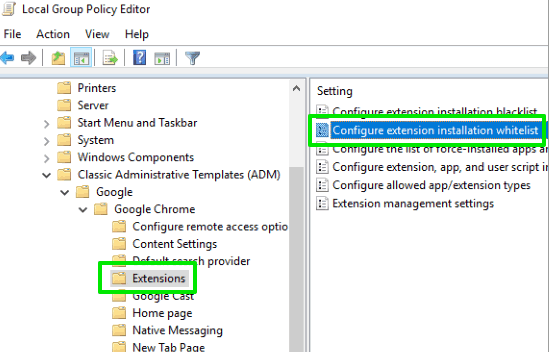
Step 3: A new window will be there. On that window, use Enabled option and then click the Show button. Another window will open. There you can enter the extension id in the Value field. If you want to find extension id of a new extension, then check its URL on the extension homepage. The end part in the URL is extension id which you can copy.
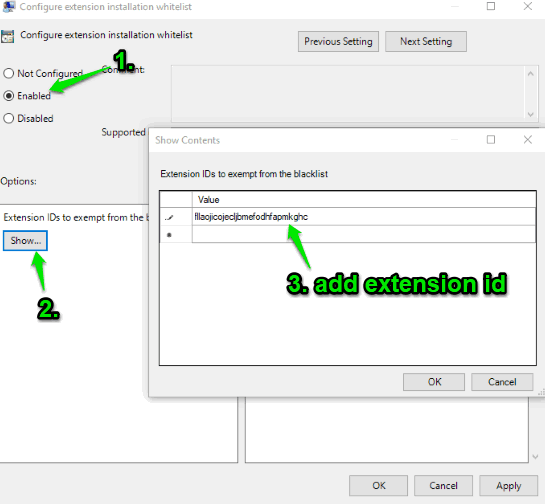
If you want to use the id of already installed extension, then access Extensions page and there you will see ID of each extension separately. Once the Id is added, press OK button.
That’s it! The changes are added immediately. You can install only that specific extension. If that extension is already installed, then only that will remain active and the rest of the extensions will remain disabled and new extensions will also not install.
Step 4: To revert the changes, just go to step 3, set Not Configured option, and save this. Make sure to set Not Configured option for blacklist extensions also that you set in method 1. Only then you can install all extensions and use installed extensions.
Method 3: How to Disable Installing Chrome Extensions by Denying Write Permissions of Extensions
This method is also effective but it works for a particular Chrome profile only. Users can add extensions to other profiles. If that’s not an issue, then you should definitely try this method. Also, this method blocks the installation of new extensions. You can continue using the already installed extensions.
Step 1: First of all, access the Default folder of your Chrome browser. Paste the following path in the File Explorer address bar and press Enter to access that folder.
C:\Users\%username%\AppData\Local\Google\Chrome\User Data\Default
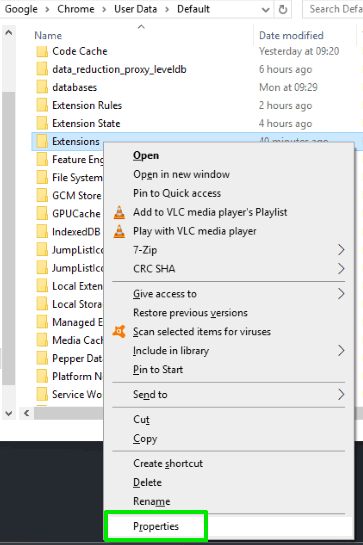
Step 2: Under that Default folder, open right-click menu of Extensions folder and use Properties option. See the screenshot below.
Step 3: When Properties window is opened, use Security tab, and select the username for which you want to disable installation of Chrome extensions. After that, click the Edit button.
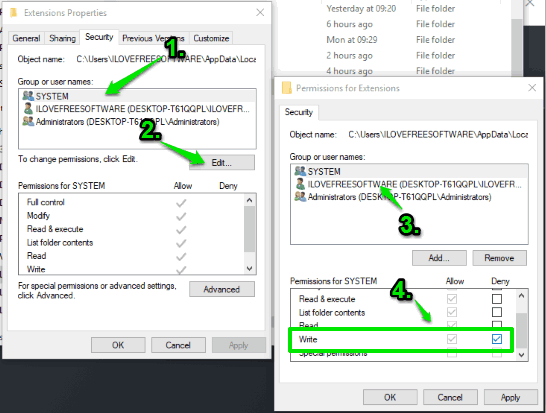
Step 4: Another window will open. In that window, again select the same username, and then check mark on the Deny option for Write permission. See the screenshot above. Save all these changes.
That’s it! Now when you will try to install some Google Chrome extension, it will show some error that “could not move extension directory into profile“.
To undo the applied changes, simply remove Deny option for Write permission by following the above steps and save this change.
The Conclusion:
So, these are three effective methods using which you can disable installing Chrome extensions in Windows 10. All are good and works as explained. Still, for me, the method 1 is better than others. I prefer Group Policy method a lot and using it also pretty easy.