Here is a simple tutorial on how to compress PowerPoint file for sharing via email.
Have you ever come across a situation where you tried sending a large PPT file via email and got a file size error? PowerPoint presentations which are larger in size are hard to send as an email attachment since the allowed file size of an attachment is limited to a fixed amount (25 MB for Gmail). Also, some organizations limits the size of email messages to less than 7 MB, so the intended recipient may never receive the mail if the attached file exceeds the size limit. In that case you might look up for options like some good PPT file compressor tool that can compress your PowerPoint presentations and reduce them in size. However, most of them are generally commercial ware and available for free trail for a limited period only.
So here we are, with a solution to your problem: a simple way to optimize the file size of your PowerPoint presentation using some easy tricks. This is like a home-made remedy which lets you quickly reduce large PowerPoint presentations in size without installing any third party software in your system.
Let’s have a look on these useful options.
Turn Off Fast Saves and Re-Save PowerPoint file:
First thing you can do to reduce the size of your PowerPoint file is to turn off the “Fast Saves” option. Fast Saves option is available in earlier versions of Microsoft PowerPoint (2003 and earlier). It allows you to save only the changes you made since the last save instead of saving the whole presentation every time. Turning Off Auto Save enables PowerPoint to remove excess data attached with the file every time you save it. Follow these steps to implement turning off Auto Save in PowerPoint 2003 or earlier versions.
- Go to “Tools” menu.
- Click “Options”.
- Click on the “Save” tab.
- Uncheck “Allow Fast Saves” check box.
(To enhance security measures, this option has been removed from PowerPoint 2007 and later versions.)
After you turn off Auto Saves, you can re-save your PowerPoint file with another name to reduce the redundant data (e.g. used images, earlier drafts, etc.) in the file and keep a back up of it on your system. This second copy would be smaller than the original presentation.
Convert BMP, TIFF to JPEG and Reinsert:
If your PowerPoint presentation contains BMP or Tiff images, convert them to JPEG format and reinsert in your presentation.
Compress Images in PowerPoint files:
If your PowerPoint presentation is really big in size, the chances that your presentation contains over-sized, high-resolution images increases. Images which are up to 1024 × 768 pixels in size are appropriate for PowerPoint presentations, so in case you have image files of larger size, you can compress them to reduce the file size of your presentation.
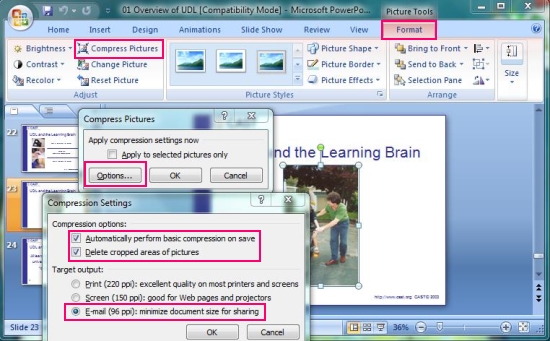
PowerPoint 2002 and higher versions provides built-in solution to remove unnecessary data from images and compress them in size. Here I am going to cover it for PowerPoint 2007. Follow these simple steps listed below to compress images in PPT files.
- Select the picture.
- Click on the “Format” menu on the top panel.
- Click on the “Compress Picture” option on the left.
- A dialogue box will open. Click on “Options..” button.
- Under “Compression Options” section, check “Automatically perform basic compression on save” and “Delete cropped areas of pictures” (if they are uncheck).
- Under “Target Output” section, choose “E-mail (96 ppi)” option and click “OK”.
- Click “OK” in the “Compress Pictures” dialogue box. Uncheck “Apply to selected pictures only” check box to apply compression to all the images in the presentation.
This would reduce the size of your PowerPoint file to great extent.
Shrink Embedded objects, Dragged, or Pasted Images:
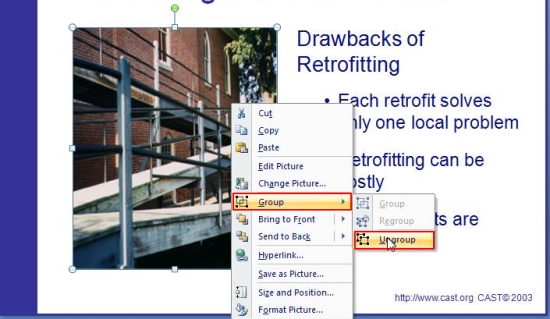
Whenever you copy-paste an image graphic or drag it to any slide on your PowerPoint presentation, PowerPoint creates an embedded OLE object for it, which contains the Windows Metafile (WMF) picture of the image. PowerPoint compresses the images quite well, but it can’t compress images in these OLE objects, which can still make your file quite large.
As a solution, you can shrink these OLE images by ungrouping and then immediately re-grouping them back. The “Group” option can be found in the context menu of the image. Ungrouping removes the OLE data and leaves just the image that can easily be compressed using PowerPoint’s image compression method.
Do Not use Big Fonts like Unicode:
Some of the new fonts like Unicode takes enormous space in your PowerPoint presentation and makes it large. Check the size of these fonts before embedding and avoid using them if the size of the font file is too large.
Avoid Saving PowerPoint files to Earlier versions:
When you save a PowerPoint file in later versions, it becomes smaller in size. On the other hand when saved in earlier versions, it grows in size. So you should never save your PowerPoint file in earlier versions, specially in PowerPoint 95 since it doesn’t support image compression.
Insert hyperlinks instead of inserting Audio or Video files:
If your PowerPoint presentation contains audio or video files, you can upload them to some free file-hosting service and insert a link in your presentation instead of embedding the whole audio or video file. This can reduce the presentation in size and make it convenient to send them via email.
Convert your Presentation into a Flash Video:
Another thing you can do is to convert your PowerPoint presentation into a flash file (in case you do not need to further edit it), which is smaller in size and easy to share. There are lot of free tools available out there which lets you easily convert PowerPoint files into flash video, which can be played across different platforms.
You can then upload this flash video on some video-hosting site like YouTube and send an embedded-code of it to your friend or colleague, instead to sending the whole presentation as an email attachment.
These are some of the easy tips which you can use to reduce the file size of your PowerPoint presentations to a great extent. If you don’t want to go for an expensive way to reduce the file size of your PowerPoint presentations, then try out these quick tricks and send your PowerrPoint files hassle-free.
If you find some better free alternative, do let us know in comments.

