This easy tutorial explains how to turn ON BitLocker Drive Encryption in Windows 8. This tutorial even explains how to temporarily suspend BitLocker Drive Encryption in Windows 8.
BitLocker Drive Encryption is a feature of Windows 8 to protect all files of a particular drive. When you turn ON the BitLocker on your Windows 8 PC for any Drive, then it will protect your drive from being accessed by any unauthorized person. Users need to type the password, termed as recovery key to use that drive.
BitLocker Drive Encryption doesn’t effects the User Login, or accessing file of any other Drive. It only blocks the access of files of the particular drive, for which it is enabled. To access those files, you need to type the password whenever you login to your Windows 8 PC.
WARNING: If you forget the password, then you can use Recovery Key generated automatically by BitLocker. Unfortunately, if you loose the Recovery Key, then you won’t be able to access the Drive ever, and you will loose all the data of that particular drive.
How To Turn ON BitLocker In Windows 8?
To enable the BitLocker feature of Windows 8, follow the instructions below:
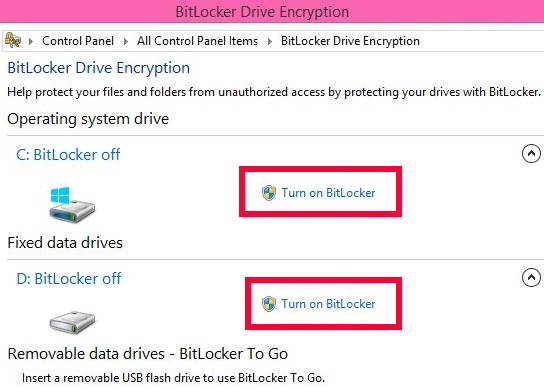
Step 1: The first thing that you need to do is open the “BitLocker Drive Encryption”. To open, use Windows Key + X. It will open WinX menu. From the menu, tap on Control Panel. In Control Panel (icon view), tap on BitLocker Drive Encryption.
Step 2: In BitLocker Drive Encryption, you will see the various Drives available in your Windows 8 PC. Each drive has a link that says “Turn on BitLocker”.
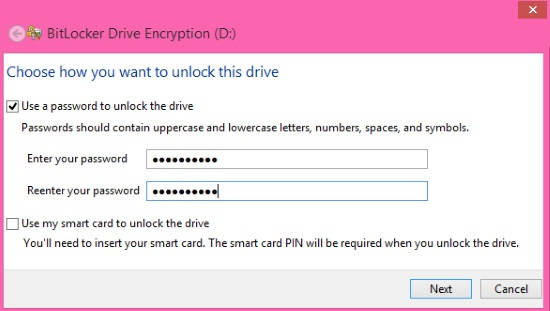
Step 3: In the next window, it will ask you how you want to unlock this drive. It will give you two options. It is recommended to select use a password to unlock the drive. Then, type the password, and click on the Next button.
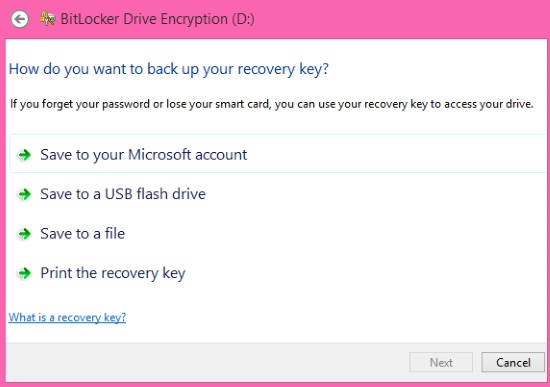
Step 3: In the next window, it will ask you how you want to backup the recovery key. Click on any one option as per your preference, then click on next.
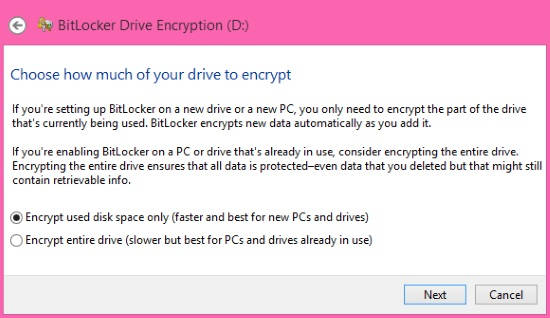
Step 4: In the next window, choose how much disc you want to be encrypted: Used space of the drive, or the entire drive. Select an option, and tap on next.
Step 5: Depending upon the size of files on the drive, the BitLocker will be enabled in few minutes.
That’s it.
The BitLocker has been enabled now. You can see an opened lock appear on the Drive. When you will log-out and log-in again, you will find it locked. You need to type the password to unlock it.
How To Suspend BitLocker Temporarily In Windows 8?
You can temporarily suspend the BitLocker as well. After suspending, you can resume it manually, whenever you want.
BitLocker provides an option “Suspend Protection” for the OS drive (the drive in which Windows is installed). Go to the BitLocker Drive Encryption, by following the Step 1 mentioned above. With the OS drive, you will see a link “Suspend protection“. Click on it to suspend the protection.
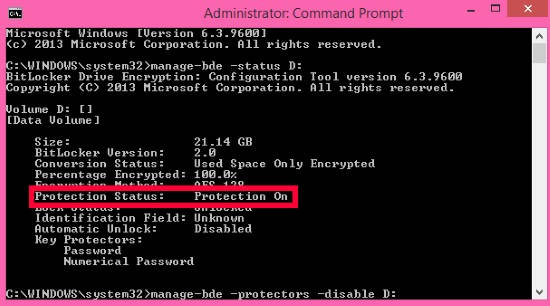
Alternatively, you can use Command Prompt to suspend the BitLocker of any Drive. Open administrator command prompt.
In the CMD, type the below mentioned code to check the BitLocker Status of the Drive:
manage-bde -status D:
Replace D with the drive, on which you have enabled the BitLocker. It will display the BitLocker status.
If it says Protection ON, then use the below code to suspend the BitLocker:
manage-bde -protectors -disable D:
Replace D with the drive, for which you want to suspend the BitLocker.

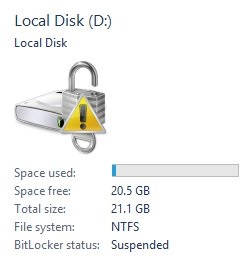
Now, go to This PC, you will see the status of BitLocker is suspended.
To again resume the BitLocker, use the below code:
manage-bde -protectors -enable D:
That’s it.
You can even Turn OFF the bit locker whenever you want, by following the Turn ON method mentioned above.
Also learn, 3 Ways To Disable User Account Control In Windows 8.
