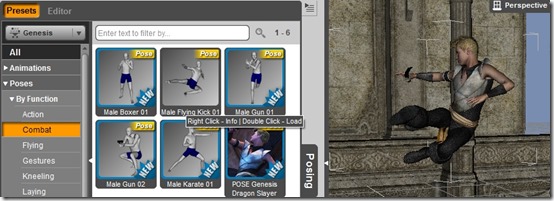
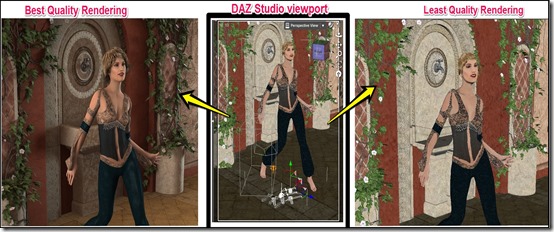
DAZ Studio is free software which helps you create 3D animation images and videos with tonnes of customization options to develop spectacular effects. It comes with built-in animation tools that offer you a wide range of Faces, Wardrobe, Poses, Animations, Lights, and Camera effects. DAZ Studio has an excellent Quality vs. Speed Option that allows you to decide the rendering quality of final output.
Its a wonderful software for animators as it allows you to design people, avatars, fight or horror scenes, logos, and a lot more in 3D view. It offers a very simple control on the three dimensional view by giving X-axis, Y-axis and Z-axis control options for size and “point of view” control. To make it more user friendly, makers have provided the perspective view control at the top right corner of the viewport. Viewport is the area where your images and animations are created.
Arrangement of the toolbars is also impressive and easy-to-understand, but I would still suggest the beginners to try “Quickstart Guide“, which is available at the home screen. This guides you to recreate the Barefoot Dancer scene, where you can learn using most of the basic tools and operations in DAZ Studio.
Some other 3D animation software we covered earlier include: trueSpace, Alice, Muvizu, and K-3D.
How to Create 3D Animation Image and Video With DAZ Studio
To download DAZ studio, you must register with DAZ 3D and download the DAZ Installation Manager. You can reach there by following the download link available at the end of this review. After installation of this manager, you will have the option for downloading 14 files, which include the DAZ Studio. Other 13 are not mandatory but they are helpful plugins for DAZ Studio. I would suggest you to download and install all these files for the optimum use of DAZ Studio.
This will consume more than 1 GB of Hard Drive space when you install all the available applications. For me, installation was hassle free but I could not install the “3D bridge for DAZ Studio” plugin. I believe that was because my system didn’t have the 3D output support.
After installations complete, you can run the DAZ Studio. The home screen will give you 7 options to choose. Most of these are to help you learn the use of this software. Once you are done with tutorials, you can start animating on your own.
To create an animation using DAZ Studio, you can follow these steps:
-
Choose the workspace
- Click the “Window” option on the menu bar.
- Choose workspace and then select “Select Layout”.
- Select the desired workspace and the click accept to start working.
-
Design Characters and Scene
- Click on the “Actors, Wardrobe & Props” below menu bar. This will open vertical toolbar on left hand side.
- Click on the “Smart Content” tab on the vertical toolbar. It will give you many options like, accessories, figures, environment, etc. for animation.
- Design the basic scene and characters of the animation here. Then click on the “Shaping” tab to give finishing to the shape of the characters.
- Click on the “Coloring” tab to decide the colors of various parts of the scene like, props, clothes, hair, etc.
-
Poses of the Character
- Click on the “Poses & Animate” tab on main toolbar. It will open new vertical toolbar on the left hand side.
- To add the motion animation, click on the “Animation” like, running, kicking, punching, walking, etc. on the vertical toolbar and choose from the given options. You need to double click the animation to select.
- To add a static pose to the characters, click on the “Poses” and then double click on the pose to apply.

-
Finishing Effects on the animation
- Select the “Lights & Cameras” tab on the main toolbar.
- Click on the “Lights” on the left hand side toolbar to alter the light effects on the scene.
- Then, choose the “Camera” on the same tab to finalize the camera position for the scene.
- Your scene is ready for the rendering now.
-
Developing the Output
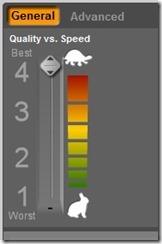
Process of developing output file from the computer animation is called rendering. Rendering will take more time for better quality output. DAZ Studio uses a Quality vs. Speed scale to control the quality of rendering (see the screenshot below).
Steps to Render/create 3D animation images and videos with DAZ Studio are:
- Click “Render” tab on the main toolbar.
- Choose between Render style like, “Shader”, “Dimensions”, and output location, etc. from the left hand side vertical toolbar.
- Here, you also need to decide between, Image, Image Sequence and Movie and their format for the output.
- Select the “Rendering Quality” on the scale.
- Click on the Render to prepare the output. This step will take time to finish, depending on quality.
- After Rendering finishes, you can give name for the animation and click “Save”.
Final Verdict
DAZ Studio is an excellent tool to create 3D animation image and video. Only fault that I felt in this freeware was with light effects. There is no undo option with light effects. Only way to cancel the light effect was click and delete on viewport. In case you have applied any environment, you’d have to delete the environment layer first and then further delete will cancel the light effect. That was little frustrating for me.
There are enough options to design human avatars, plus you have got the option to customize their shape and size as well. But you don’t have any option for animal creations other than a dinosaur (named dragon in DAZ Studio). It limits my creativity, as an animator.
Other features and tools are perfectly operational. Their control is also easy. I enjoyed animating with DAZ Studios and I will certainly recommend this freeware to all animators. Even if you have don’t have much idea about animation, it’s a good option to begin with.
Try DAZ Studio.


