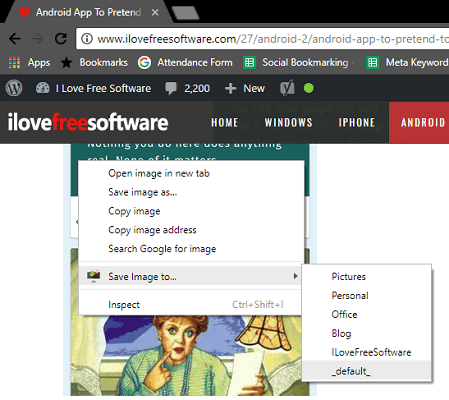
Save Image Router lets you save images to custom locations from the right click menu in Chrome. Basically it is an extension that allows you to add various folder names in the right-click menu of Chrome. You can assign the path to the folder, name, and opt for file overwrite options. After configuring it you can directly save images to any of the folders you have specified. If the folder you have specified doesn’t exist, then it will create a new folder. However, this extension only lets you create custom locations in the configured download folder. You cannot just choose any directory from your hard disk. For example, if the default download folder is Downloads, then you can create custom locations in that only.
While browsing websites you comes across certain compelling images and if the downloads folder on your PC is messy, then surely you will lose that image. And downloading an image manually to custom locations will take a lot of your time as well. In that scenario, this Chrome extension comes in handy. You just have to assign different folders in it along with the name that will show up in the right-click menu. After that you can directly save the image to any specified folder from the right-click.

How to Save Images to Custom Locations from the Right Click Menu in Chrome?
Save Image Router Chrome extension is open source and you can easily use it to save images in custom locations easily. As I have already said above, that this extension makes the nested folders in the configured download folder, so if you want to save it to another folder, then in my opinion, you can configure the download folder to somewhere else.
These steps will guide you to how to use Save Image Router to save images to custom locations.
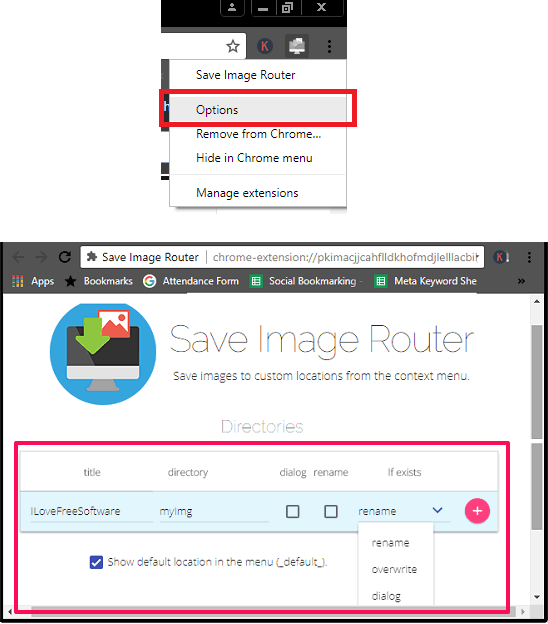
Step 1: After installing Save Image Router extension, open its configuration window by clicking on its icons and then click on Options. Here you can specify the name of the folder that will appear in the right-click menu. Also, you can specify the name of folder where the images will be saved. Along with this there are some other options you can opt for. You can specify a overwrite action here.

Step 2: Now, after configuring the extension, you can start using it. Open any web page and then right-click on it. In the Save Image Router entry, you can select the folder where you want to save that image. And the image will get saved in that folder instantly.

This is how Save Image Router Chrome extension works. You can easily use it to save images to custom location directly from the right-click menu.
Closing Words:
Save Image Router makes it very easy to save images to custom locations directly from the right-click menu in Chrome. The extension is simple you can easily use it to save images in Chrome and that to in different locations. Though, there you will have configure it first, but once after configuring it you can use as long as you want.