Update 2022: This service no longer exists now. We recommend you to try some other alternative instead.
This tutorial explains how to filter RSS feed easily using Yahoo Pipes.
Yahoo Pipes is a free online service from Yahoo that lets you create mashup of various different data sources and tweak them in the way you want. You can then choose to publish the output data in any way you want. Yahoo Pipes is a pretty sophisticated web service that can do lot of complicated things, but in this tutorial, I will only focus on how Yahoo Pipes can be used to easily filter RSS feeds. If you thought Yahoo Pipes were difficult, you will be surprised to see how simple it is to filter RSS feeds using Yahoo Pipes.
In this tutorial, I will take couple of scenarios of using Yahoo Pipes. Both are pretty simple, but useful cases.
How to Use Yahoo Pipes:
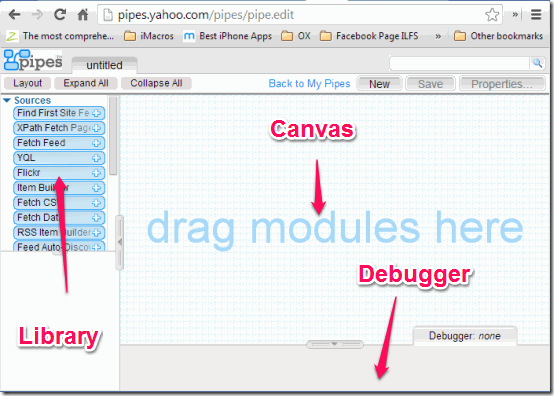
Let me start by giving you a quick primer on Yahoo Pipes. It is completely free, and you will need to sign in with your Yahoo id. The interface of Yahoo Pipes has three parts: Editor (or Canvas), Debugger, and Library.
The basic steps of creating a Pipe are always same: You grab a few modules from the library that you want to use, then you link them together, see the output of any module using Debugger, and get the final output that you can publish or use in any feed reader.
Now let’s see how to use Yahoo Pipe for our purpose.
How to Filter RSS Feed for Specific Words Using Yahoo Pipes:
As I said, I will start with a simple example. Let’s say you love our website www.ILoveFreeSoftware.com, but don’t like to read about iPhone or Android articles. So, you need to filter out or remove all the articles from feed which have iPhone or Android in the article title, and retain remaining articles only. Let’s see how to do that.
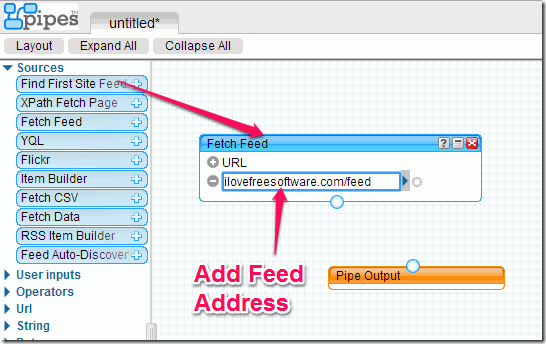
Start by grabbing “Fetch Feed” module from Library on Left side and drag onto to Canvas. You will notice that “Pipe Output” module will automatically get added. That is totally fine. Now, in the Fetch Feed module on canvas, just enter the Feed that you want to filter.
If you notice, there is a “+” sign with “URL” in Fetch Feed module. If you click on that, you can add more feed sources, so you can work with multiple feeds together. Let’s ignore that for time being and focus on one feed we are working on.
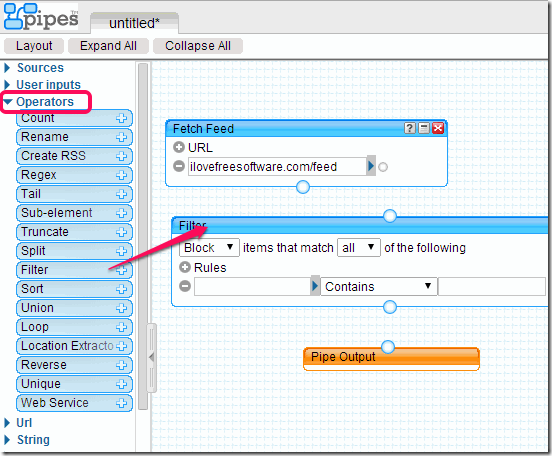
Next step is to add a Filter module that will be used to filter items from feed. For that, click on “Operators” in Library to expand that, and select “Filter” module from that and drag on to Canvas.
Note: you can move the modules around on Canvas to arrange them as you want.
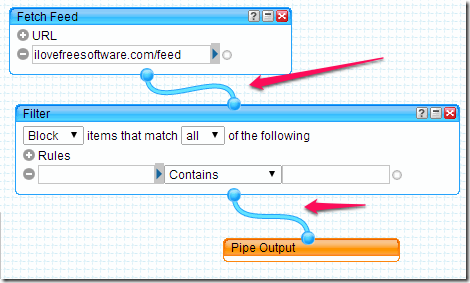
Next step is to link the modules together. For that, you will see a circle on either top, or bottom, or both sides on each module. This is where each module will be connected to each other. Start with the circle on Fetch Feed module. As soon as you take your mouse over that circle, mouse pointer will change to hand. Just click on that circle, keep left mouse key pressed and join the connector with the top dot on Filter module. Similarly, take the lower dot on the Filter module and connect to upper dot on Pipe Output module. Your pipe is fully connected now.
Now we’ll configure Filters. This will be done in Filter module.
First you need to select whether you want to Block certain items, or Permit certain items. And for those items, should all the filter rules that you specify should be met, or any filter rule could be true.
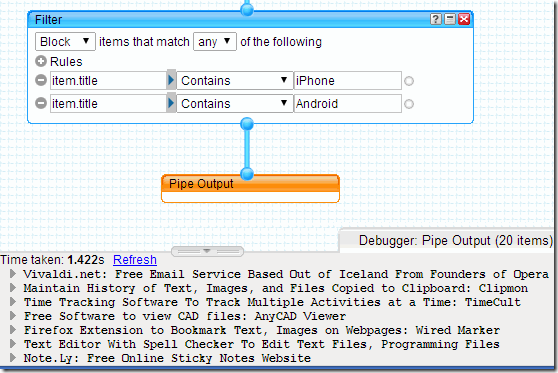
Below that, you will see “Rules” and an empty text box below that. There is a small arrow with that box. When you click on that, it shows various parts of each item in the feed. You can choose to apply filter on Author, Description, link, publish date, and Title. In addition to this, you can type any other filter field as well. For our purpose, I want to block the articles that have “iPhone” or Android in the title. So, my rules will look like following:
If I wanted to apply a rule on description, I would have chose item. description. In the same manner, you can apply as many rules as you want.
Now, how to test if everything is set properly? That’s where the built-in debugger comes handy. When you click on any module, the Debugger runs automatically y and shows output of that module in the Debugger window. So, start by clicking on Fetch Feed module to see that feed is being fetched properly. After that, click on Filter Feed module to see that the results that you don’t want are not included in the feed. Finally, click on Publish feed module to see that final output of Yahoo Pipes is coming fine (the module that you select will be highlighted in Orange).
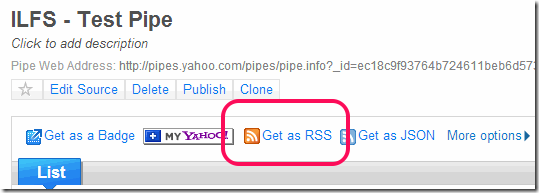
Once everything looks fine, click on “Save” button at the top. It will ask you to give a name for the pipe. Provide a name and again click on Save. Now you will see an option of “Run Pipe..” at top. Click on that, and it will open a new page which will show output of the pipe. In this page, you will see option of “Get as RSS”. Click on that. This is the final RSS feed of your Pipe. You can use it with any feed reader to see the output of your pipe.
So, you saw how easily we were able to filter feed using Yahoo Pipes. All the pipes that you create will be visible on your Yahoo Pipes page.
Note: Advanced users will know that FeedRinse is another service that is specifically for filtering feeds. In fact, that service is even easier to use, and if you want to do just simple filtering (like the one we did in example above), you are better off going with that. However, I have been facing problems with FeedRinse since quite some time now and the filtering hasn’t been working as desired. More importantly, if you want to do any advanced filtering, then FeedRinse is not the best option, and Yahoo Pipes would be the better choice.
Now, let’s see another interesting example of Yahoo Pipes. In this, we will filter the feed to show feed items of a particular author only (or, remove articles of a particular author from a feed).
How to See Feed Items of a Particular Author Only:
Some of the blogging platforms inherently provide separate RSS feeds for each author, but in case the one that you want to follow doesn’t, then you can use Yahoo Pipes to block or allow feed items of a particular author.
For that, steps are almost similar as mentioned above. Only changes would be in Filter module. Now, a natural tendency would be to apply filter on “item.author” field.and specify name of the author whom you want to block or allow. However, that doesn’t works for WordPress blogs. In case of WordPress blogs, you need to type filter field as “item.dc:creator” and then type author name in value field.
That’s it. Now your feed will have articles of that author only (or, all authors except that; depending on what you did).
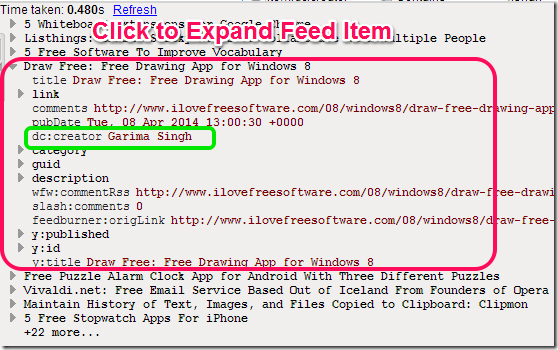
A side note: How do you find what is the name of the field on which you need to apply filter (like, in the example above, how did I know that the filter has to be on item.dc:creator and not item.author)? To know answer to this, you need to look at the structure of the feed in Debugger. When you have put the feed URL in Fetch Feed block, click on the block to see all the feed items in Debugger. Click on any item to expand it.
In the above screenshot, I have encircled all the details of one feed item. Within that, I have encircled the author name part in Green. You will notice that author name is preceded by dc:creator, so that is our filter field.
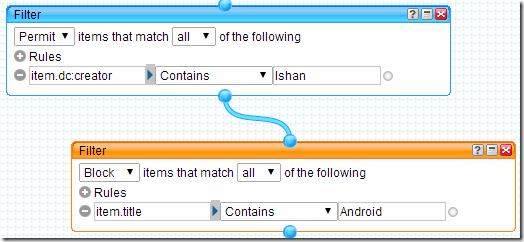
Note that you can apply multiple Filter modules as well. So, if you want to include items that meet a particular criteria, but do not meet another, you can put filters one after others, like this:
In the screenshot above, I am allowing all posts by myself, but from those posts, I am blocking all the posts of Android.
Conclusion:
Above were a few simple examples of how to filter RSS feeds using Yahoo Pipes. Yahoo Pipes is quite powerful and as you start exploring it, you will be more amazed. You can add multiple feeds together, split them, remove specific items, remove specific content from specific items, and lot more. I wanted to focus this tutorial on Filter part only, so that you can get started with Yahoo Pipes easily.
Do you use Yahoo Pipes? What other purposes to you use it for? Let me know in comments below.
