We all know very well that Windows 10 has brought the feature to capture as well as save screenshots automatically, which was not possible in earlier versions. The screenshots are saved to the default location (C:\Users\PC Name\Pictures\Screenshots). However, it is also possible to change the default location to save screenshots in Windows 10. The folder will remain the same (Screenshots), but new location can be provided to that folder.
This tutorial covers those simple steps using which you can change the location to save screenshots in Windows 10.
Below screenshot shows new location set by me to save the screenshots in my Windows 10 PC.
How To Change The Default Folder To Save Screenshots In Windows 10?
These are the steps:
Step 1: First, go to the location/folder where your screenshots are saved by default.
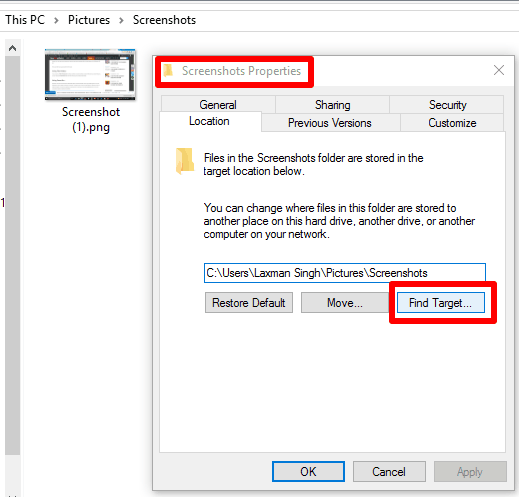
Step 2: Open the screenshots folder and access Properties. In Screenshots Properties window, you need to access Location tab.
Step 3: Use Find Target.. button to select the new output location to save the screenshots. When you have chosen the new location, copy the path, and paste it in the associated box.
Apply the changes. Before saving the changes, it will prompt you if you want to move previous screenshots to the new location or not. Press Yes or No button as per your need.
That’s it! The new location is saved to store the captured screenshots.
If you want, you can also check these free screenshot capture software for Windows 10.


