8 Best Free Process Mapping Software For Windows
Here is a list of best free process mapping software for Windows. Process mapping is used to visually describe the flow of work in the form of a process flowchart. To describe the flow of work, these software provides various symbols like Decision Boxes, Oval (to show start and end of the process), Process symbol (rectangle), Connecting Lines (to show the direction of workflow), etc. By using symbols to show the process and elements of the process, you can create a process map. Not just process map but diagrams like Block Diagram, Class Diagram, UML Diagrams, etc. can also be created through these.
The procedure for creating a process map is pretty simple and similar in all software. The procedure includes dropping required elements to canvas through mouse, connecting elements using connectors, and naming each element. To further customize the process map, you can use additional tools like change text font, align elements, color, etc. After creating a process map, you can export or save it as PDF, XML, HTML, SVG, PNG, etc. formats.
My Favorite Process Mapping Software For Windows:
yEd Graph Editor is my favorite software because it lets you can create as well as analyze process maps. The tools present in this software are pretty easy to use which make the process map making simpler. Plus, it also enables you to work on multiple projects at a time due to its multi-tab interface.
You can also check out lists of best free Flowchart, Use Case Diagram, and ER Diagram software for Windows.
yEd Graph Editor

yEd Graph Editor is a free process mapping software for Windows. Using it, you can create various types of diagrams and flowcharts. You can find all essential symbols to map a process in it like Oval (to represent start/end of a process), Rectangle (to represent tasks), Diamond (to represent decision points), Arrows (to show the process flow), etc. Plus, its multi-tab interface is another handy feature to work on multiple diagrams at a time.
To create a process map, first, drag and drop required symbols from the Shape Nodes menu to the canvas. After placing symbols on canvas, join them using directional arrows by clicking and dragging the cursor from one block to another. At last, name or add a label to each symbol to complete your process map.
Apart from creating the process map, you can also analyze the map using tools like Analyze Graph (to analyze graph structure in terms of node count, visual, topology, etc.), Centrality Measure (determining importance of a node in map), Structure View (to view process map in a structural view), Neighborhood View, etc. After the analysis, you can save the process map as SWF, SVG, PDF, HTML, PNG, etc. file formats.
Dia

Dia is another free process mapping software for Windows. It is mainly used as a diagram editor software through which you can create and edit diagrams like Entity Relationship diagrams, UML diagrams, Flowcharts, Network diagrams, etc. For each diagram type, it has a specific section like Assorted, Flowchart, UML, etc. containing multiple dedicated shapes and elements to make a specific type of diagram. Although it does not provide a dedicated process mapping section, still all symbols required to make a process map are present in its Flowchart section. It also comes with a multitab interface that allows you to work on multiple process maps at a time.
To create a process map, place all necessary symbols to the canvas like Oval, Rectangle, Decision Box, etc. After placing the symbols, select line tools (line, arc, etc.) to join symbols to show process flow and relationship between symbols. Lastly, label each symbol using the Text tool and save or export the process map as SVG, PS, PNG, JPG, GIF, etc. file formats.
Diagram Designer
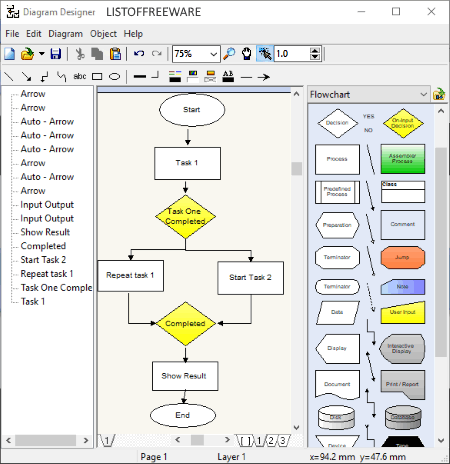
Diagram Designer is the next free process mapping software through which you can also create Diagrams, Flowcharts, Illustrations, Slideshows, etc. This software actually does not have any separate process mapping section, but you can use elements of its Flowchart section as process mapping symbols. In its flowchart section, you also get various types of connecting arrows that you can use to show the process flow.
The process of making the process map is quite simple in it, but it lacks grid lines and scale which are its biggest drawbacks. Now, to make the process map, drag all the required flowchart symbols from the Flowchart section and drop them on the main canvas. After that, drop all connectors (directional lines) to the canvas and join all symbols to show the direction of the process. Lastly, name each symbol to represent the function of each symbol. If you want to further make enhancements on the process map, then you can use tools like Text and Gradient color (to highlight boxes or text by filling them with different colors), Draw tools (to manually draw shapes), etc. After completion, you can export the process map diagram in GIF, JPG, PNG, EMF, ICO, etc. formats.
Pencil

Pencil is a free open source process mapping software for Windows. Using it, you can also create prototypes of apps for both iOS and Android platforms. In it, you get a large collection of shapes/ symbols which are necessary to create a process map such as Directional Arrows, Decision Box Symbol, Oval symbol (to represent the start and end of a process). etc. There are a total of 10 shape categories present in it, and in every shape category, you get a large number of shapes. Using the available shapes, you can easily create process maps, flowcharts, etc.
To create the process map, first, drop required symbols to the canvas. After that, connect symbols using the connectors to define the relation. Lastly, label each box and specify different colors to symbols using the color tools of the top toolbar. In the toolbar, you get many other tools which may be useful for you like Alignment, Text Style, Line Style, Size, Rotation, etc. After making the process map, you can export it as PNG, PDF, SVG, and ODT files.
ClickCharts
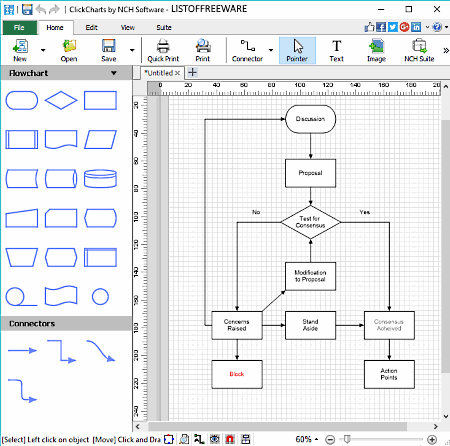
ClickCharts is another free diagram and flowchart maker software through which you can also create process maps. In it, you get all essential symbols like arrows, oval, rectangle, decision boxes, etc. which you need to create a process map. There are many dedicated sections containing elements to draw a specific type of diagram (flowchart, UML, ER, etc. diagrams). In its Flowchart and General Shapes Section, you can find all process mapping symbols.
In order to create the process map, go to the flowchart and general shapes section and drop all required symbols to the canvas. After that, join symbols using arrow connectors to show the direction of the process. Now, to complete the diagram, label each element through its text tool. After making the process map, you can save it as ClickCharts Diagram file or export it in PNG, PDF, GIF, JPEG, BMP, SVG, etc. formats.
This software has more useful tools that may also come in handy like Canvas Scale (to help you make accurate diagrams), Multi-tab support (create multiple use case diagrams at once), Auto-Connect (to connect two symbols automatically), Lock (to prevent diagram from accidental changes), etc.
Note: This software is free for only non-commercial use. To use it commercially, you need to purchase its license.
Software Ideas Modeler
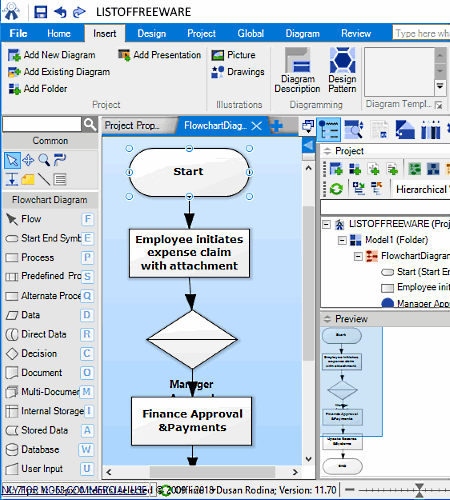
Software Ideas Modeler is a free and portable process mapping software for Windows. Using it, you can express your ideas in the form of diagrams. It is also an ideal software to show the flow of process in an organization, software, machine, etc. Along with the process map, you can also create various types of diagrams like ER diagram, Flowchart Diagram, Requirement Diagram, Mixed Diagram, etc. Although, you can notice that there is no process mapping section in it, still, basic elements required to create a process map are available in its Flowchart Section.
Now, to create a process map, go to the Project Menu and select the Flowchart Section. As soon as you do that, you will be able to see Symbols (Decision, Blocks, Oval, Directional Arrows, etc.) at the left side of the interface. Plus, project view (to show the overview of the diagram), and preview windows are also available. To assign names of process map symbols, select add text option from the right-click menu and type the name of the process. After that, join symbols according to the relationship between them using the directional arrows. After completion, you can export the process map as EMF, WMF, PNG, JPG, GIF, BMP, PDF, etc. formats.
Note: This software is only free for non-commercial use and some of its features are also locked. To remove all the limitations, you need to purchase the paid version of this software.
LibreOffice Draw
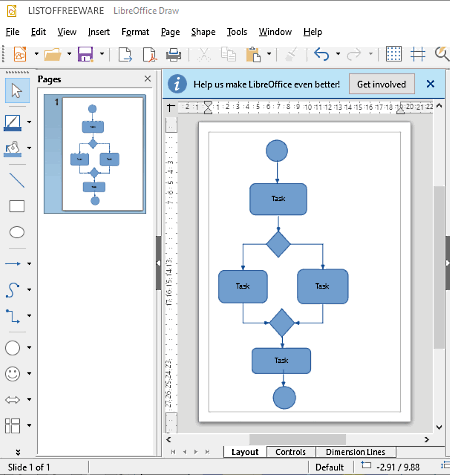
LibreOffice Draw is a free open source diagram creation software for Windows. In it, you can create various types of diagrams like Block Diagram, Flowchart, UML Diagram, Object Diagram, etc. including the process map diagram. In it, you get a very handy side toolbar that contains all essential symbols or elements to create a process map like Oval, Rectangle, Decision Box, Connectors, etc. Apart from essential tools, you also get useful tools like Fill color (to change colors of elements), Text (to name elements), Fontwork (to change text font), Insert (to add tables, images, etc.), etc.
Now, to draw the process map, first, drop all the important symbols to the canvas. Then position each symbol in the right order through the mouse. After that, connect each symbol using connectors to show the relationship between elements. Lastly, name each element using the text tool to finish the process map. The finished process map can easily be exported in formats like PDF, HTML, TIFF, SWF, GIF, etc.
This software comes as a part of the LibreOffice Suite in which you can find more handy software like LibreOffice Writer, Presentation, Spreadsheet, etc. Overall, it is another good software to create a process map.
Diagram Ring

Diagram Ring is a free open source process mapping software for Windows. Using this software, you can create many types of diagrams like DFD, Flowcharts, UML, ERD, etc. including the process map. For different diagram types, it provides different sections containing diagram elements and connectors. However, it does not come with any process mapping section. So, to create the process map, you need to use elements of other available sections which are similar to symbols of the process map.
To create the process map, just add required symbols and connectors to the canvas. After that, you can resize as well as join symbols and connectors to create the structure of the process map. Now, to name each symbol use its Functions section that also provides additional features like background color changer, font remover, symbol remover, duplicate nodes, etc. Once the process map gets completed, you can export it as JPG and save it as a local project file.
Note: Many features along with some part of the interface is not working properly which is its main drawback.
Naveen Kushwaha
Passionate about tech and science, always look for new tech solutions that can help me and others.
About Us
We are the team behind some of the most popular tech blogs, like: I LoveFree Software and Windows 8 Freeware.
More About UsArchives
- May 2024
- April 2024
- March 2024
- February 2024
- January 2024
- December 2023
- November 2023
- October 2023
- September 2023
- August 2023
- July 2023
- June 2023
- May 2023
- April 2023
- March 2023
- February 2023
- January 2023
- December 2022
- November 2022
- October 2022
- September 2022
- August 2022
- July 2022
- June 2022
- May 2022
- April 2022
- March 2022
- February 2022
- January 2022
- December 2021
- November 2021
- October 2021
- September 2021
- August 2021
- July 2021
- June 2021
- May 2021
- April 2021
- March 2021
- February 2021
- January 2021
- December 2020
- November 2020
- October 2020
- September 2020
- August 2020
- July 2020
- June 2020
- May 2020
- April 2020
- March 2020
- February 2020
- January 2020
- December 2019
- November 2019
- October 2019
- September 2019
- August 2019
- July 2019
- June 2019
- May 2019
- April 2019
- March 2019
- February 2019
- January 2019
- December 2018
- November 2018
- October 2018
- September 2018
- August 2018
- July 2018
- June 2018
- May 2018
- April 2018
- March 2018
- February 2018
- January 2018
- December 2017
- November 2017
- October 2017
- September 2017
- August 2017
- July 2017
- June 2017
- May 2017
- April 2017
- March 2017
- February 2017
- January 2017
- December 2016
- November 2016
- October 2016
- September 2016
- August 2016
- July 2016
- June 2016
- May 2016
- April 2016
- March 2016
- February 2016
- January 2016
- December 2015
- November 2015
- October 2015
- September 2015
- August 2015
- July 2015
- June 2015
- May 2015
- April 2015
- March 2015
- February 2015
- January 2015
- December 2014
- November 2014
- October 2014
- September 2014
- August 2014
- July 2014
- June 2014
- May 2014
- April 2014
- March 2014
