9 Best Free Local WordPress Development Software For Windows
Here is a list of best free local WordPress development software for Windows. These software provide all services which are necessary to run WordPress. Some of the important services supported in these software are PHP, MySQL, Apache, Tomcat, PHPMyAdmin, etc. In most of these, you can easily start and stop all or specific services according to your need. Plus, some software also let you select different environments consisting of a different set of services to give you a greater level of flexibility.
In order to properly run WordPress, you need to configure these WordPress development software. The configuration process broadly consists of running different services, downloading the WordPress setup, creating database, establishing a connection with database, and WordPress installation. After the successful WordPress installation, you can start developing websites, blogs, and more on your local server. A few software come with inbuilt WordPress, hence they do not require external WordPress setup. The process of configuration is slightly complex, so I included all the configuration steps with the description of each software. In general, all of these are very capable WordPress development software. Go through the list to find your favorite software.
My Favorite Local WordPress Development Software For Windows:
Local By Flywheel is my favorite software because it can run multiple websites at once. It is also quite good for collaborative website development as it lets you share live links. Plus, it comes with WordPress unlike many other similar software.
You can also check out lists of best free Responsive Website Designer, Web Filtering Software, and Database Schema Designer software for Windows.
Local By Flywheel
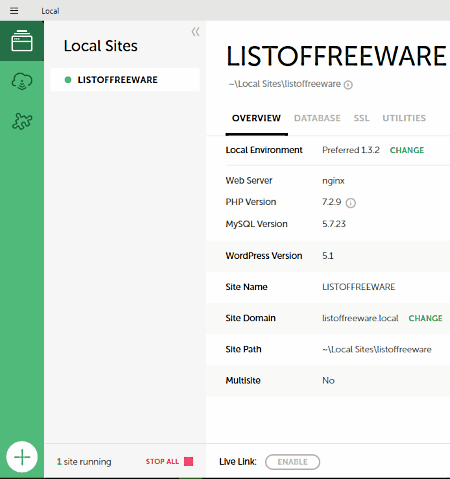
Local By Flywheel is a free WordPress development software for Windows. It is one of the simplest software through which you can quickly setup WordPress and create a new website with just a few clicks. At the time of setup, you can also select Nginx Server or Apache Server and different versions of the PHP (PHP 5 or PHP 7). Plus, it also lets you create live links which you can share with others for local WordPress development.
How to set up WordPress and create and new developmental website using Local By Flywheel:
- Launch this software and provide the name of your website, local site domain, local site path, and press the Continue button to complete the Site Setup.
- The Second step is to set up an Environment for which you need to select Web Server (Apache or Nginx), MySQL, and PHP version (5 or 7). After selecting the desired environment, press the Continue button.
- Now, set up WordPress by creating WordPress Username, WordPress Password, WordPress Email, and specify whether it is a WordPress multisite or not.
- After that, press the Add Site button to move to local website setup page from where you can start the site development by pressing the Start Site button and start website development.
Key Features of this Software:
- It can run multiple local websites at one.
- You can stop all websites in one click.
- You can monitor all your websites from its simple and intuitive interface.
- It lets you create and share live links of your websites with other users.
Final Thoughts:
It is a simple software through which you can quickly setup WordPress and new websites. However, the community version (free version) of this software also lacks some advanced features like Staging Deployment, Workspaces, Ticket Support, etc. You can purchase its other versions in order to utilize additional features. Check here for pricing comparison.
DesktopServer
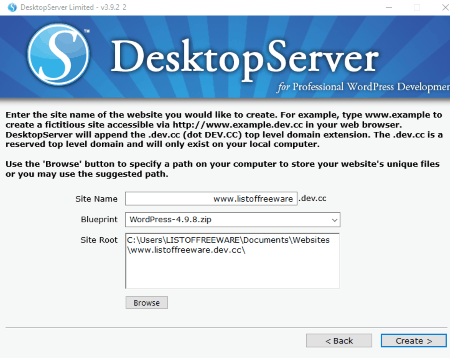
DesktopServer is another free local WordPress development software for Windows. This software makes the installation of WordPress quite easy because it automatically installs WordPress and all other essential software to provide a stable WordPress development environment. After installing this software, you can create multiple local WordPress websites by performing a simple setup process.
How to create local WordPress websites using DesktopServer:
- After the successful installation, you get the option to create a new website. Select this option and press the Next button.
- Now, provide the Site Name, WordPress Version, etc., to build the Website and Site Root.
- After that, press the Create Button to automatically create a source folder, virtual host, database, server name entries, etc.
- Once you setup configurations, you get a link using which you can start the WordPress environment to start building the newly created website.
Important Features of DesktopServer:
- It allows you to create and delete duplicate websites at any time.
- This free version can be used to manage up to 3 websites.
- It supports Apache, MySQL, and PHP 5.5.
Limitations:
- Does not support multiple environments.
- You cannot start or stop the website at will.
Final Thoughts:
It is one of the easiest software to setup WordPress and to create WordPress websites. Plus, it also automatically installs all other software like Apache, MySQL, etc. However, its free version has various limitations. So, if you want, you can purchase its premium version and enjoy more features.
AMPPS
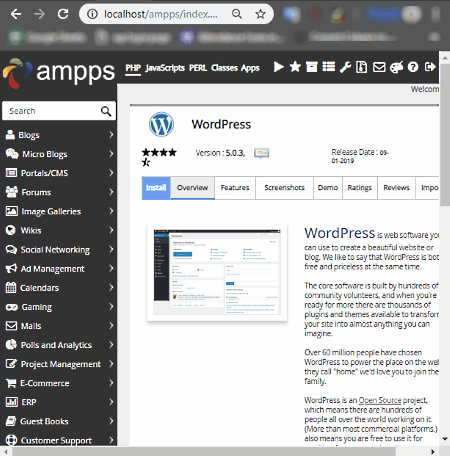
AMPPS is yet another free local WordPress development software for Windows. It is a suite of multiple web development software like MySQL, SQLite, WAMP, MAMP, APACHE, MongoDB, Pear, Python, etc. According to your need, you can select a group of development software and services of this software to start WordPress development.
By default, this software does not install WordPress. To install the WordPress, go to its Blogs section and select WordPress to install it. During the installation, you need to set up some parameters like WordPress Version, Protocol Type, Domain, Developmental Site Name, Database Name, etc. After providing all the parameters, press the Next button to open up the WordPress Interface. After the installation, a default WordPress site gets created that you can open by using its link provided by this software.
Apart from WordPress, you can also install many other website publishing software like Pubvana, Dotclear, Pixie, Nucleus, Chyrp, and more to this software. In general, this software allows you to select any combination of tools and software which you need for local WordPress Development.
Key Features:
- It lets you create and manage domains on localhost.
- It helps you deploy apps in the desktop server.
- Using it, you can manage, install, and restore different scripts like WordPress, Drupal, Joomla, etc.
- Lets you select different versions of WordPress before installation.
Conclusion:
It is one of the most feature-rich local WordPress development software through which you can quickly set up and create websites. The presence of various powerful apps and software tools makes it a useful and versatile local WordPress development software.
XAMPP
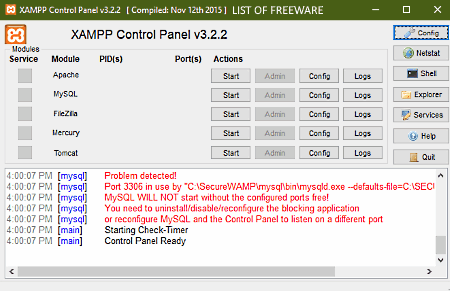
XAMPP is a popular free open source local WordPress development software for Windows. This software is a package of all essential software which you need to run WordPress namely Apache, MariaDB, PHP, and Perl. This software automatically installs and configures all the inbuilt software. However, it does not install or setup WordPress like some other similar software. Hence, you need to manually download, install, and setup WordPress in your computer. To do that, first, download WordPress setup. After that, extract the downloaded WordPress setup and paste it to the C: >xampp > htdocs folder. Now, you can start the setup process.
How to setup WordPress using XAMPP:
- Launch XAMPP and start Apache and MySQL from its interface and open the web browser.
- After that, search for localhost/wordpress on your browser. You will immediately get a WordPress setup screen that asks you to set up the database by providing Database Name, Database User Name, Database Host, Database Password, etc. To do that, just type and search for localhost/phpmydamin on your web browser to open up the PHPMyAdmin page.
- From the PHPMyAdmin page, create a new database by pressing the New button and by providing the database name.
- After that, again open the initial WordPress setup screen and press the Let’s Go button to move to the website setup page.
- In this page, you need to provide information like Site Title, Username, Password, and Email Address.
- Lastly, click on the Install WordPress button to start the installation process.
After the WordPress installation, you can visit the WordPress Development page just be entering the localhost/wordpress in your web browser.
This software is not very user-friendly, but it offers much more control over its every component. For example- you can easily start or stop individual services of XAMPP at any time, like Apache Server, MySQL, Tomcat, etc. To run a single WordPress site, it is quite good, but to run multiple WordPress sites, you need to setup quite a lot of configurations.
Final Thoughts:
It is a very flexible WordPress development software that provides a lot of control over its services. Still, it is more suitable for advanced users as it leaves room for tweaking many parameters to get the desired result.
MAMP
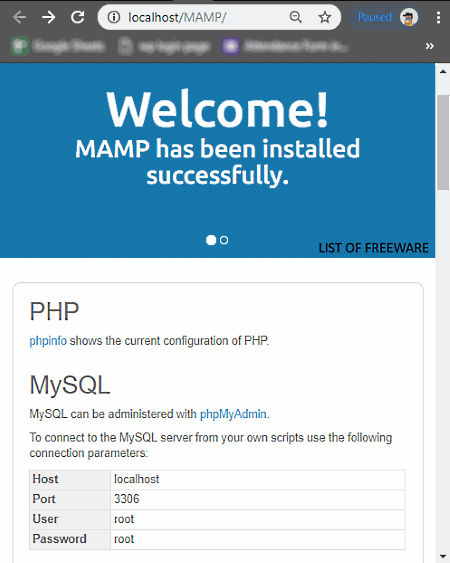
MAMP is the next free local WordPress development software for Windows. MAMP is an acronym for My Apache, MySQL, and PHP. It is similar to XAMPP, that also comes with multiple services which are necessary to perform WordPress development and to create WordPress websites. It does not come with WordPress just like XAMPP, hence you need to manually download and install WordPress to this software. Before performing the setup process, you need to install MAMP and download WordPress setup. After that, extract the WordPress folder and paste it to C:/ MAMP/ htdocs folder. You can now begin setting up WordPress with this software.
How to set up WordPress using MAMP:
- Launch MAMP and start the Apache Server and MySQL Server.
- After that, click on the Open WebStart Page to view the dashboard of MAMP in your default browser.
- Now, click on the PhpMyAdmin link present in its welcome page and configure the database by providing the database name.
- Lastly, enter Localhost/wordpress on the search bar of the browser and press Enter to view the WordPress authentication page. The default username and password are given on the Welcome page of the MAMP.
- After submitting the correct login credentials, you can view the WordPress Development Page.
Key Features Of MAMP:
- It lets you run WordPress development sites on different versions of PHP.
- It supports two additional languages namely Pearl and Python.
- You can setup custom local WordPress websites.
- It allows you to set up PHP, Apache, and MySQL based environment.
- It comes with its own dashboard to check a summary and general information like server status, active services, etc.
Limitations:
This free version of MAMP has various limitations like only two available PHP versions, can host only one website at a time, lack of Dynamic DNS, etc. To remove all its limitations, you need to purchase the paid version of this software.
Conclusion:
It is another decent software with essential features which supports local WordPress development. Plus, it also offers flexibility like start/ stop website, enable/disable Apache Server, etc.
SecureWAMP
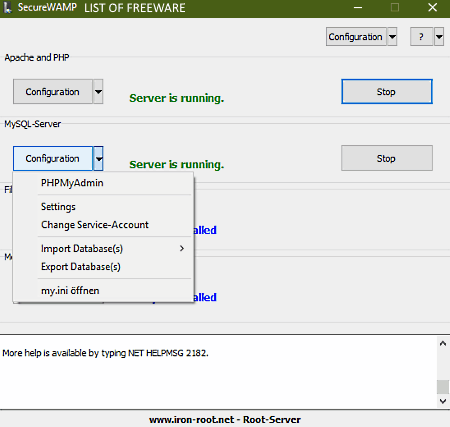
SecureWAMP is yet another free local WordPress development software for Windows. It is primarily a very secure web hosting software that can also be used as a WordPress development software. This software consists of five different services namely Apache, PHP, MySQL Server, Filezilla FTP Server, and Mercury/ 32 Mail-Server. To work with WordPress, you only need its Apache, PHP, and MySQL Server services. From its interface, you can easily start or stop any service at any time, which provides a great level of flexibility to its users. However, before using these services to run setup, you need to configure various settings and install WordPress to this software.
How to configure SecureWAMP to start WordPress development:
- The first step is to install SecureWAMP to your system.
- After the installation, open its interface and start Apache, PHP, and MySQL Server.
- Now, click on the MySQL server configuration button and select PHPMyAdmin option to open up the PHPMyAdmin page in your default web browser.
- From the PHPMyAdmin page, create a new database and set database name and password.
- Now, download WordPress, extract the downloaded ZIP folder, and copy and paste it to the htdocs folder. You can quickly access the htdocs folder by going to Apache and PHP Configuration > Open htdocs-folder.
- After that, open a web browser and type localhost/wordpress and press Enter to open WordPress configuration page.
- To establish a connection with the database, you need to provide the database name and password.
- After configuring all the settings, press the Let’s Go button to start the WordPress Installation.
- Once the installation gets successfully completed, you will be able to access WordPress by typing the localhost/WordPress in your web browser and start the website or blog development process.
Final Thoughts:
It is another completely free WordPress development software through which you can easily run WordPress in your local machine and develop websites, blogs, etc.
UwAmp

UwAmp is the next free local WordPress development software for Windows. This software also comes in a portable version that you can directly use from a flash drive without installation. Like other similar software, it also comes with various services or software which are required to run WordPress such as Apache, MySQL, PHP, SQLite, etc. Plus, it gives you choice to use different versions of PHP for your WordPress. However, the main advantage of this software is its ability to run multiple WordPress setups and websites at a time. Some other important features of this software include its Easy Interface and CPU Monitoring feature (it lets you monitor Apache and MySQL process in real time). To run WordPress using this software, you need to configure various settings.
How to configure this local WordPress development software to run WordPress:
- Launch this software and select a version of PHP (5.6 and 7.0) that you want to use and start the local server by pressing the Start button.
- After that, click on PHPMyAdmin button to open PHPMyAdmin on your default web browser and create a new database and name it.
- Now, download WordPress, extract downloaded folder, and copy & paste it to the www folder. You get a direct option named www folder button to open up this folder.
- After that, launch your web browser and search for localhost/wordpress to open up the WordPress Configuration panel. In this panel, you need to provide the database name and password to establish a connection with the database.
- After setting up required configurations, press the Run Installation button to start the installation process.
- Once WordPress gets successfully installed, again search for localhost/wordpress to open the WordPress interface and to start website development.
Conclusion:
Overall, it is a balanced localhost WordPress development software that provides the right amount of flexibility and user-friendly environment for WordPress development. Plus, its ability to run multiple WordPress instances and websites is also very useful.
WinNMP

WinNMP is one more free localhost WordPress development software for Windows. It is a complete stack of developmental services like Nginx, MariaDB, Redis, PHP, etc. You can start or stop any of its services from its interface. From its interface, you can also create new projects, switch between PHP versions (5.6, 7.3, 7.6), view number of running process of all services, etc. The good thing about this software is that it lets you run multiple projects and WordPress instances at a time. Plus, it also gives you complete freedom to start or stop individual services of this software according to your need. Before starting the website development, you need to set up this software, WordPress, and database. You can check out below steps to properly set up this software.
How to set up this localhost WordPress development Software:
- Launch this software to automatically start all of its servers like Nginx, MariaDB, Redis, PHP-Cgi, etc.
- After that, create a new project by clicking on the New Project option and naming it.
- Now, download WordPress and extract it to C: > WinNMP > WWW folder.
- Again, open the main interface of WinNMP and click on the home button of MariaDB Server to open up the database configuration page on your default web browser.
- From the configuration page, create a new database and give it a name.
- Open the WinNMP’s main interface and click on the home button of the newly created project to open the WordPress Configuration page.
- From the configuration page, you can set language and create a WordPress website by providing site name, username, password, etc.
- Lastly, press the Install WordPress button to start the installation process.
After installing WordPress, search for localhost/wordpress in a web browser to open the WordPress interface and start making blogs, websites, etc.
Conclusion:
It is another very good local WordPress development software because it lets you run multiple websites at a time, start/ stop servers, and also lets you choose different versions of PHP.
VertrigoServ
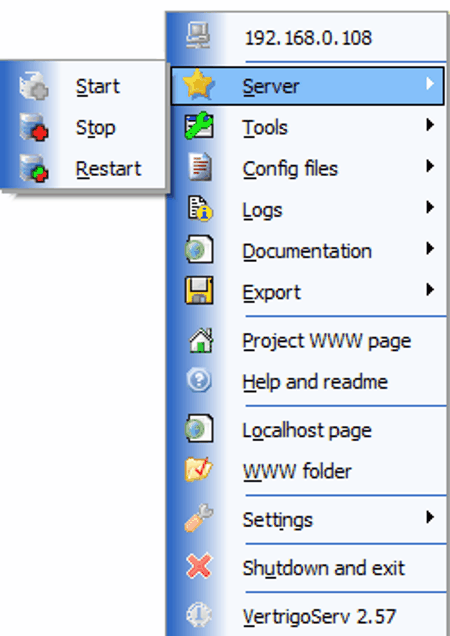
VertrigoServ is another one of free local WordPress development software for Windows. It is basically a package of software and services such as Apache Server, PHP, MySQL, SQLite, PhpMyAdmin, Zend Optimizer, etc. Some of these services are essential for WordPress to run properly. When you install this software, all the supported services are installed automatically. However, you need manually configure WordPress with this software, as it does not come with it.
This software also offers some handy features for local WordPress development such as start/stop server, dedicated buttons to access important pages (PhpMyAdmin page, SQLite Console, MySQL Console, etc.), export database files, etc. Before starting the WordPress development, you need to configure and set up this software. You can follow the below steps to properly set up this software for WordPress website development.
How to set up this local WordPress Development Software:
- Launch this software and start the Server from its Server menu.
- After that, download WordPress and extract it to WWW Folder. You can directly access this folder by clicking on WWW folder option.
- Now, search for localhost/WordPress in your web browser.
- A WordPress page will open up, in which you need to provide database name, database password, etc., to establish a connection with the database. All the details related to the database can be viewed from the readme file which comes with this software.
- After establishing the connection, press the Lets Go button to start the WordPress installation process.
- Lastly, enter the localhost/wordpress on your browser to launch main WordPress interface and start developing sites, blogs, etc.
Conclusion:
It is another standard local WordPress development software through which you can run WordPress smoothly. Plus, it can also host multiple local websites with ease.
Naveen Kushwaha
Passionate about tech and science, always look for new tech solutions that can help me and others.
About Us
We are the team behind some of the most popular tech blogs, like: I LoveFree Software and Windows 8 Freeware.
More About UsArchives
- May 2024
- April 2024
- March 2024
- February 2024
- January 2024
- December 2023
- November 2023
- October 2023
- September 2023
- August 2023
- July 2023
- June 2023
- May 2023
- April 2023
- March 2023
- February 2023
- January 2023
- December 2022
- November 2022
- October 2022
- September 2022
- August 2022
- July 2022
- June 2022
- May 2022
- April 2022
- March 2022
- February 2022
- January 2022
- December 2021
- November 2021
- October 2021
- September 2021
- August 2021
- July 2021
- June 2021
- May 2021
- April 2021
- March 2021
- February 2021
- January 2021
- December 2020
- November 2020
- October 2020
- September 2020
- August 2020
- July 2020
- June 2020
- May 2020
- April 2020
- March 2020
- February 2020
- January 2020
- December 2019
- November 2019
- October 2019
- September 2019
- August 2019
- July 2019
- June 2019
- May 2019
- April 2019
- March 2019
- February 2019
- January 2019
- December 2018
- November 2018
- October 2018
- September 2018
- August 2018
- July 2018
- June 2018
- May 2018
- April 2018
- March 2018
- February 2018
- January 2018
- December 2017
- November 2017
- October 2017
- September 2017
- August 2017
- July 2017
- June 2017
- May 2017
- April 2017
- March 2017
- February 2017
- January 2017
- December 2016
- November 2016
- October 2016
- September 2016
- August 2016
- July 2016
- June 2016
- May 2016
- April 2016
- March 2016
- February 2016
- January 2016
- December 2015
- November 2015
- October 2015
- September 2015
- August 2015
- July 2015
- June 2015
- May 2015
- April 2015
- March 2015
- February 2015
- January 2015
- December 2014
- November 2014
- October 2014
- September 2014
- August 2014
- July 2014
- June 2014
- May 2014
- April 2014
- March 2014
