11 Best Free MAC Screen Recorder Software
Here is a list of the best free MAC Screen Recorder Software. These let you record screen, audio from microphone, or audio playing in the device. You can also use it to record full screen or a part of the screen. The recorded screen can be thus saved in different format for different devices, like: Xbox, iPad, iPod, iPhone, Playstation, Android, and many more such devices. The recorded screen can also be directly uploaded, and shared with friends via YouTube, Facebook, Twitter, and many more such options. You can also stream your videos directly over Twitch, Youtube, and various other websites.
My Favourite MAC Screen Recorder:
Out of the software enlisted here, I like OBS (Open Broadcaster Software) Studio the most. This screen recorder for MAC is quite feature rich, and supports close platform feature. It can be used to video capture MAC, and save it in various formats. It can also be used to capture Webcam, and Capture cards. The screen can be directly streamed over Twitch, YouTube, YouTube Gaming, Hitbox.tv, beam.pro, daily motion, and Livecoding.tv. You can also use it to personalise a number of options to successfully record the screen of Mac.
Also check out Software to Screen Capture MAC, Screen Recorder Software for Windows, and Webcam Recorder Software.
OBS Studio
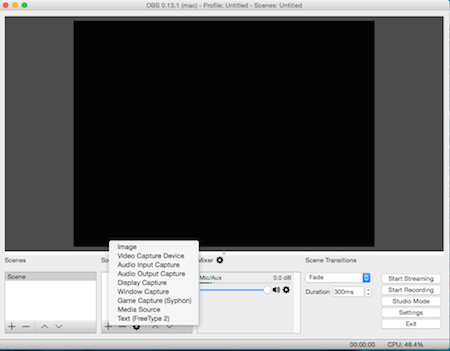
OBS Studio or Open Broadcaster Software is a simple screen recorder for mac which lets you screen capture mac for free. It can also be used to capture webcam, and capture cards. This free screen recorder for mac offers multi platform support on Windows, MAC, and Linux. It is a powerful software with a lot of features. The recorded file can be saved as FLV, MP4, MOV, MKV, TS, and M3U8. The recording can also be streamed on Twitch, YouTube, YouTube Gaming, Hitbox.tv, beam.pro, daily motion, and Livecoding.tv. You can also stream it on custom streaming server. Here you can create different scenes, and automatically switch between scenes. You can choose different sources, like: image, video capture MAC, audio input capture, display capture, window capture MAC, game capture on MAC (Syphon), Media Source, and Text. You can also choose the scene transitions effects, and scene transition duration. Multiple stream previewing, and scene previewing feature is also available. The recordings can be rotated, flipped, and fitted to screen. The region can also be moved up / down. It is available for OS X Mountain Lion, OS X Mavericks, OS X Yosemite, and OS X El Capitan.
Different output formats can be selected, like Video bitrate, audio bitrate, encoder preset, and custom encoder settings. Different recording quality can be set, like: same as stream, high quality, indistinguishable quality, and lossless quality. Different audio and video recording options can also be selected, like sample rate, channels, desktop audio device, mic / auxiliary audio device, base resolution, output resolution, downscale filter, and FPS values. You can also set your own hotkeys for different options to start recording, stop recording, studio mode, transition, switch to scene, mute, unmute, push to mute, and push to talk options. Options can be set for the color format, YUV color space, YUV color range, stream display settings, and automatically reconnect.
How to record Mac screen using OBS Studio:
- Open OBS Studio.
- Add the scenes, and provide them a name. Choose the display capture option, or window capture option. Then you can also choose the display option, and the crop option. The crop option can be set to None, Manual, To Window, and to window and manual. You can also choose to display cursor or not.
- Click on the start recording button to activate the mac screen recorder, and perform the actions that you want to record. Finally on clicking the Stop recording button the recording stops, and you can view the output file in the specified folder location. Using Studio Mode you can choose to add different transitions, like cut, fade, duplicate scene, duplicate sources, and Swap preview / output scenes after transitioning.
- It can also be used to stream desktop gaming, coding, and many more such options.
QuickTime Player
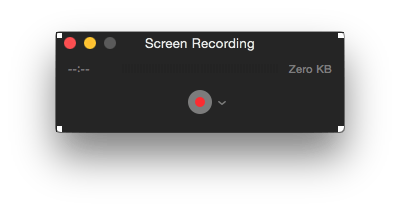
QuickTime Player is a popular media player software that comes bundled with MAC. It is a feature rich media player, and can also be used as MAC screen recorder. It can also be used to record movies, and audio. You can choose the option to either video capture the full screen on MAC, or a part of the screen. The MAC screen captured can then be saved as MOV. The screen thus recorded can be exported as 1080p, 720p, and 480p. It can also be optimized to export to iPod touch, iPhone 3GS, iPad, iPhone 4, iPad 2, and iPhone 5. The captured MAC screen thus recorded can also be sent to iTunes. The recording can also be shared on Mail, Message, Vimeo, Facebook, Flickr, and YouTube. You can also rotate, and flip the recorded video. The option can also be set to split clip, and add clip to the end. You can also choose the option to Trim the recording. You need QuickTime Player 10 or later to record screen on MAC. On OS X Yosemite, and OS X El Capitan you can also record screens of iOS device (iPhone, iPad, iPod touch) with the help of Lightning port.
How to record Mac Screen using QuickTime Player:
- Open QuickTime Player.
- Go to File and choose the option of New Screen Recording. You can also use the hotkey Command + Control + N to do so. Then specify the microphone to be used, and whether to show the mouse clicks in recording or not, by clicking the drop down menu right next to the Record button. You can choose the option to record either the full screen, or a part of the screen. Simply click after the information is showed to record the full screen.
- But in case you choose the option to record a part of the screen, drag and select a part of the MAC screen, and then perfectly resize the portion of the screen that you want to resize. Then click on the Start Recording button to record the part of the screen.
- After you are done recording, click on the Stop button, in the status bar to stop recording. Add the effects that you want to add to the recording, and choose the output resolution. Then you can also choose to share the recording via Facebook, Mail, Message, Vimeo, Flickr, and YouTube. Finally you can save the recording. In case you choose the option New Movie Recording, you can choose the option to record video and audio via camera, and Microphone.
In case of New Audio Recording you can choose the option to record the audio via microphone. You can also make use of volume slider to manage the volume while recording.
Debut
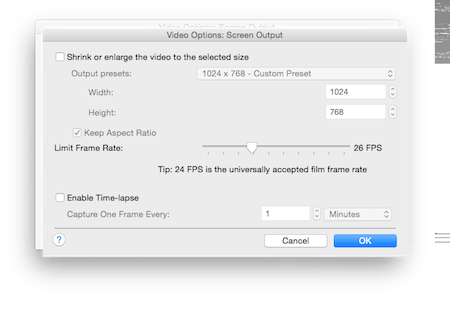
Debut is a good free MAC screen recorder software. It can be used to video capture MAC screen, webcam, network, screen, and some other devices like VHS recorder. It can be used to record a part of the selection, or a full screen. The MAC screen captured can be saved in various formats, like: 3GP, MOV, ASF, AVI, DV, FLV, MKV, MP4, MPG, OGV, WEBM, and WMV. It can also be used to run the captured screenshot on iPod, PSP, iPhone, Xbox 360, PlayStation 3, and Fast Capture. Here you can also set the encoder options and the video options, and can set average bitrate of audio and video, video size, frame rate, and elapse time lapse. The mouse is highlighted to annotate the video, and you can also add captions and create time stamps to the video. It can also be used to video capture MAC from microphone, and the device. Different color settings and video effects can be applied before recording. You can choose to capture the screen in either 4:3 or 16:9. It can also be used to take screen capture MAC. It is available for OS X Tiger, OS X Leopard, OS X Snow Leopard, OS X Lion, OS X Mountain Lion, OS X Mavericks, OS X Yosemite, and OS X El Capitan.
How to record screen on MAC using Debut:
- Open Debut.
- Choose the screen option, and choose the option that you want to record based on your screen choice. Select from the options to adjust caption video effects, adjust color and apply video effects, and adjust watermark video effects. Then you are provided the option to either choose the option of Fast Capture mode, or Normal Mode. The MAC screen is captured, and you can choose to stop the recording afterwards.
- You can also change different audio, video, and output options. You can also modify the hotkeys, and set the maximum recording time. Scheduler option can be used to automatically record screen at a specified time. You can also use it to automate webcam recording, capture device, or network.
LICEcap
LICEcap is a lightweight free screen recorder for mac. The recorded screen can be saved as GIF, or LCF. In case you save it as LIF it can be used to convert to another video format using REAPER, which is a paid software. You can also move the screen frame while recording the screen. The text messages can also be inserted. The frame rates can also be adjusted. The basic title frames with or without text can also be inserted. It can also be used to record mouse button presses, and display elapsed time in recording.
How to record screen using LICEcap:
- Open LICEcap.
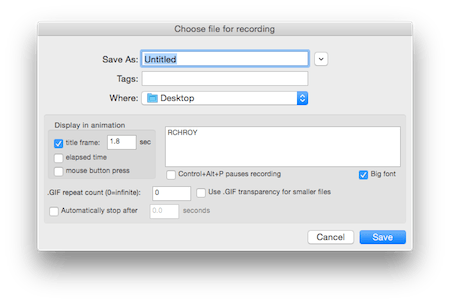
- Resize the area that you want to record by moving the Window. The size is displayed in the lowermost part. You can also set the FPS of the recording. On clicking the Record button, you have to enter the file name, and choose different options. The options can be set to display title frame, elapsed time, and mouse button press in animation. Set the GIF repeat count, use GIF transparency for smaller files, specify the time duration after which it automatically stops playing the GIF. The Control + Alt + P button can be activated to pause recording. After confirming the settings, the screen is recorded.
- Then you can pause the screen capture and insert text frame, and specify the duration and alpha. On clicking the stop button the recording is stopped, and the file is saved to the specified location.
It’s full feature support is available on OS X Snow Leopard, OS X Lion, OS X Mountain Lion, OS X Mavericks, OS X Yosemite, and OS X El Capitan, but can also be used on OS X Tiger, and OS X Leopard.
Monosnap
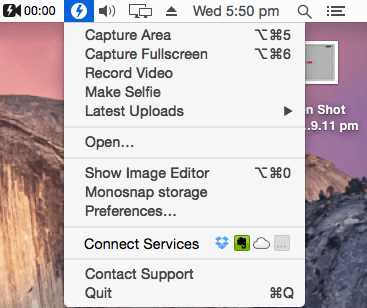
Monosnap is a good software that acts as screen recorder for MAC. You can use it to record either full screen, or the option to record a specific area of the screen. Different options are available to set the frames per second, recording quality, webcam, and audio options. It can be used to record images and videos from webcam, and audio from microphones. You can pause the recording at any time. The recorded screen can be saved as MP4, or GIF. It is available for OS X Mavericks, OS X Yosemite, and OS X El Capitan.
How to record screen on MAC using Monosnap:
- Go to the status bar, and choose the option to capture area. Click on the option key, choose the settings of the frames per second, recording quality, option to capture mouse cursor, and mouse clicks or not, web camera options, and audio input options. You can also resize the screen to the size you require, and can also switch to full screen mode, if so desired. Click the record button, and perform the tasks that you want. You can also pause the recording in between, and also choose the option to stop recording.
- It can also be used to screen capture MAC. You can use it to capture area, capture full screen, record video, and make selfie.
- After taking the screenshot and recording the screenshot, you can choose the option to upload it to FTP, SFTP, WebDAV, Amazon S3, Evernote, Dropbox, Yandex.disk, Box.com, and CloudApp. You can also specify the hotkeys on your own to record the screen on MAC.
Any Screen Recorder
Any Screen Recorder is a free software that can be used to record your screen for free. Using free version you can record the screen for only 30 seconds. You can use it to capture full screen or part of the screen. It can be used to record screenshots in different formats, different screen sizes, different resolution, and for different devices. It can be used to record screen for iPhone, iPad, and Android. It can also record the audio playing on the desktop or from the microphone. You can also customize the frame rate of the video. The timer can be set to stop recording automatically after a specified time duration. You can use it on OS X Mavericks, OS X Yosemite, and OS X El Capitan.
How to record Mac screen using Any Screen Recorder:
- Open Any Screen Recorder.
- Choose the option to record either the custom area, or the full screen. In case you choose the custom area, you have to select the area to be recorded. Then enter the frame rate, and choose different options like to show cursor and click in recording, specify recording time, and play recorded file after the completion of recording.
- Select the format from the options like MP3 Audio, Android, iPad, iPhone, XviD AVI, MKV, MPEG4, 640×480, 1280×720, Medium, and High.
- Then click on the Start Record button in the system tray. After the screen is recorded, click on the Stop Record button to stop recording. Then the recorded file is stored in the specified location.
Apowersoft Screen Recorder
Apowersoft Screen Recorder is a simple freeware application which can work as a screen recorder for MAC. It can be used to record the full screen, or a part of the screen, and from the webcam. In order to record the Audio playing on MAC, you have to install ApowersoftAudioDeviceInstall. Right and left clicks can be animated to highlight the location where it is clicked. It is available for OS X Mountain Lion, OS X Mavericks, OS X Yosemite, and OS X El Capitan.
How To MAC video capture using Apowersoft Screen Recorder:
- Open Apowersoft Screen Recorder.
- Click on the Record button, and choose whether you want to record a selected region, full screen, or from the webcam. In case you choose to record a selected region, you have to select the region that you want to record. Then in both the cases the countdown starts. After the countdown, the actions performed in the desired region are recorded, and you can save it as MOV.
- Different option can be set to minimize to tray during recording, show countdown before recording, beep on start / stop recording, show recording boundary, show recording toolbar, and record mouse cursor.
- The left click and right clicks can be animated using different colors. You can also choose the mouse hot spot size.
- The frame rate and the video quality can be changed to achieve desired results.
- You can also specify your own set of hotkeys to Start Recording, Stop Recording, and Pause / Resume recording.
QuickCast
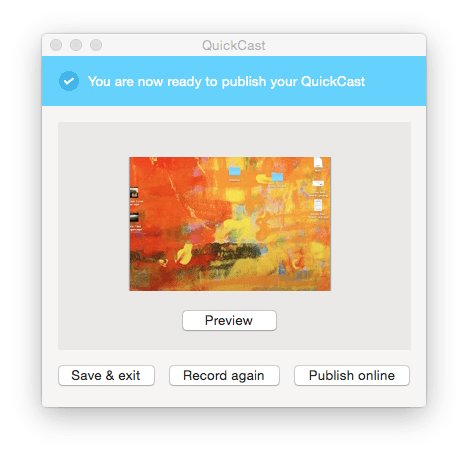
QuickCast is a simple lightweight software that can be used to record screen on MAC. It can be used to record video of a maximum 5 minute duration. You can record the screen either after logging in or without logging in to the software. The recorded video is uploaded online, and can be shared on Facebook, Twitter, Email, and saved locally as MP4. QuickCast is available for OS X Mountain Lion, OS X Mavericks, OS X Yosemite, and OS X El Capitan.
How to use MAC screen recorder feature of QuickCast:
- Go to the toolbar, and click on the QuickCast logo.
- Then you are provided with two options, i.e. Quick Record, and Advanced Record.
- In the Quick Record you have to be registered to record the screen on MAC.
- In the advanced record you can choose different options, like: screen, record area, camera, display mouse clicks or not, record time of either 3 minutes, or 5 minutes, and microphone.
- After you click on the Start Recording button, you are provided with a 5 second count in, after which MAC video capture starts. The remaining time is displayed in the system tray. Then you can use the hotkey to stop MAC screen capture, or click on the button to stop recording.
- In case you have already logged in the software, the video is uploaded to QuickCast website, and you can share the video on Facebook, and Twitter. You can also save the recording locally as MP4.
Screencast-O-Matic
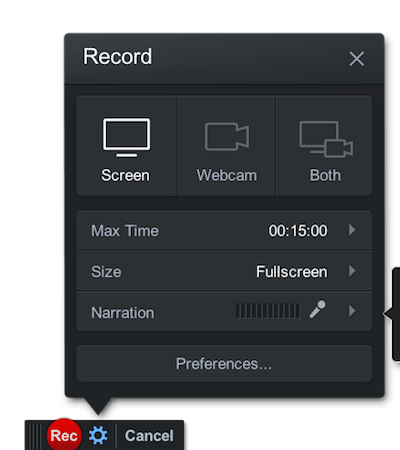
Screencast-O-Matic is a free software that lets you record screen on Mac. Using this freeware you can choose to record either the screen, Webcam, or both. You can also record audio via microphone in it. The recorded video can be either saved as MP4 or uploaded to Screencast-O-Matic or Youtube. The free version lets you record only 15 minutes in one go. Screencast-O-Matic records screen on OS X Lion, OS X Mountain Lion, OS X Mavericks, OS X Yosemite, and OS X El Capitan.
How to record screen on Mac and upload to Youtube:
- Open Screencast-O-Matic website. Click on the Start Recording button, which downloads Screencast-O-Matic software. You can also choose to download the full app install, so that you don’t have to browse to the website.
- Then you can choose to record from screen, webcam, or both. Choose the area that you want to record, or choose the option to record full screen. Then click on Rec button, and record the screen. You can also choose to pause the screen while recording. Finally after the screen is recorded you can choose the option to save as MP4, upload to Screencast-O-Matic, and YouTube.
- You can also change the pause hotkey, or the Webcam Hotkey. Different options, like: countdown, control bar, webcam preview, and fullscreen Rec Controls can also be set.
Recordit
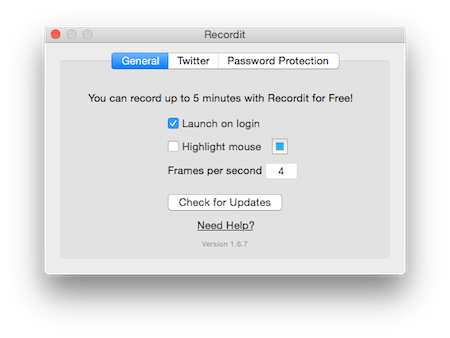
Recordit is a simple software that lets you video capture MAC screen for free. The free version lets you record screen on MAC for upto 5 minutes. The mouse clicks can be highlighted using different color. The Frames per second option can also be set. After the video is recorded, it is automatically uploaded on Recordit website. The video can then be downloaded as MP4 or GIF. The video address can be copied and shared within your network, and can also be shared on Twitter.
How to use Recordit as MAC Screen Recorder:
- Go to System Tray, and click on the record button.
- Select the recording area, and then click over the same location in the system tray to start recording.
- Perform the tasks that you want to record.
- After you are done recording on MAC, click on the STOP button in the system tray to stop recording.
- Finally the MAC video captured is uploaded to Recordit, and then you can save it as MP4 or GIF on your MAC. You can also choose the option to share it on Twitter, and copy the link to share it amongst friends.
Iris
Iris is a simple software that lets you video screen capture MAC. It can also be used to record audio from the device, or the microphone. In order to record audio from MAC you have to install Sound Siphon (but it’s a paid software). It records retina quality videos, and the files are named automatically. Any image or color can be enabled to hide the desktop while recording. Mouse highlight option can be chosen from different mouse highlights. Different options can be set to show countdown before Screen recording on MAC, hide other applications before recording, include Iris promotion at end of MAC screen recording, and use hardware acceleration if possible. A timer can also be scheduled to start and stop the recording. The recordings can be shared via Email, Messages, or AirDrop. You can also include your face by using iSight or webcam. It can be used on OS X Mavericks, OS X Yosemite, and OS X El Capitan.
How to record videos using Iris:
- Open Iris and choose New Recording button. Change any settings in the Preferences.
- Then you can choose different audio, video, and annotations options. Here you can set the FPS, size, watermark, and presets options. Audio settings can also be changed, along with the annotation option. Clicking on the Record button, lets you record the screen. Then you can choose the option to pause recording or stop recording. You can also choose the option to mute microphone, talking head, follow cursor, and capture cursor.
- After you stop recording, the file is saved as IRISRECORDING. Then you can choose the option to export the format of the video file as h.264, Pro Res 4444, Pro Res 422, and Motion JPEG. You can also choose to save directly as h.264, Pro Res 4444, Pro Res 422, and Motion JPEG.
The free version adds watermark and outro to the recordings.
About Us
We are the team behind some of the most popular tech blogs, like: I LoveFree Software and Windows 8 Freeware.
More About UsArchives
- May 2024
- April 2024
- March 2024
- February 2024
- January 2024
- December 2023
- November 2023
- October 2023
- September 2023
- August 2023
- July 2023
- June 2023
- May 2023
- April 2023
- March 2023
- February 2023
- January 2023
- December 2022
- November 2022
- October 2022
- September 2022
- August 2022
- July 2022
- June 2022
- May 2022
- April 2022
- March 2022
- February 2022
- January 2022
- December 2021
- November 2021
- October 2021
- September 2021
- August 2021
- July 2021
- June 2021
- May 2021
- April 2021
- March 2021
- February 2021
- January 2021
- December 2020
- November 2020
- October 2020
- September 2020
- August 2020
- July 2020
- June 2020
- May 2020
- April 2020
- March 2020
- February 2020
- January 2020
- December 2019
- November 2019
- October 2019
- September 2019
- August 2019
- July 2019
- June 2019
- May 2019
- April 2019
- March 2019
- February 2019
- January 2019
- December 2018
- November 2018
- October 2018
- September 2018
- August 2018
- July 2018
- June 2018
- May 2018
- April 2018
- March 2018
- February 2018
- January 2018
- December 2017
- November 2017
- October 2017
- September 2017
- August 2017
- July 2017
- June 2017
- May 2017
- April 2017
- March 2017
- February 2017
- January 2017
- December 2016
- November 2016
- October 2016
- September 2016
- August 2016
- July 2016
- June 2016
- May 2016
- April 2016
- March 2016
- February 2016
- January 2016
- December 2015
- November 2015
- October 2015
- September 2015
- August 2015
- July 2015
- June 2015
- May 2015
- April 2015
- March 2015
- February 2015
- January 2015
- December 2014
- November 2014
- October 2014
- September 2014
- August 2014
- July 2014
- June 2014
- May 2014
- April 2014
- March 2014
