This tutorial explains how to password protect a folder in Windows 10 without using any 3rd party tool.
Although, there are many free software available to protect folders in Windows 10, but if you don’t want to use a third-party application, then you can manually create a password protected folder in Windows 10. After this, you can add multiple other folders and files inside that password protected folder to secure your important stuff.
This tutorial covers all the steps that will help you how you can password protect a folder in Windows 10 without any external application.
How To Password Protect a Folder In Windows 10 Without Using a Software?
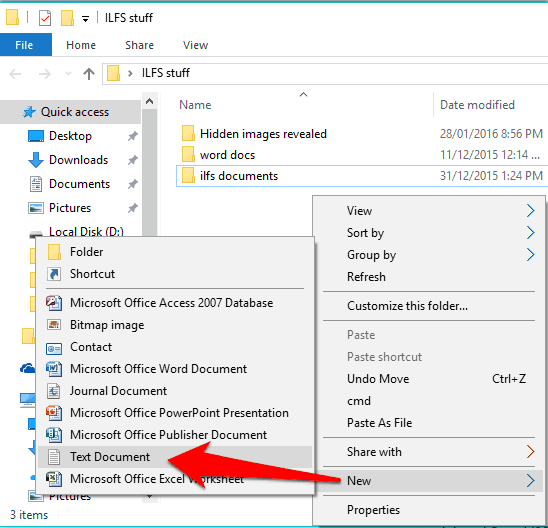
Step 1: First of all, open the folder which contains your important folder(s). After this, create a new text file by right-clicking on the empty area → New → Text Document.
Step 2: Open the newly created text file and paste the code mentioned below:
cls
@ECHO OFF
title Folder Locker
if EXIST "Control Panel.{21EC2020-3AEA-1069-A2DD-08002B30309D}" goto UNLOCK
if NOT EXIST Locker goto MDLOCKER
:CONFIRM
echo Are you sure u want to Lock the folder(Y/N)
set/p "cho=>"
if %cho%==Y goto LOCK
if %cho%==y goto LOCK
if %cho%==n goto END
if %cho%==N goto END
echo Invalid choice.
goto CONFIRM
:LOCK
ren Locker "Control Panel.{21EC2020-3AEA-1069-A2DD-08002B30309D}"
attrib +h +s "Control Panel.{21EC2020-3AEA-1069-A2DD-08002B30309D}"
echo Folder locked
goto End
:UNLOCK
echo Enter password to Unlock folder
set/p "pass=>"
if NOT %pass%==Enter-Your-Password-Here goto FAIL
attrib -h -s "Control Panel.{21EC2020-3AEA-1069-A2DD-08002B30309D}"
ren "Control Panel.{21EC2020-3AEA-1069-A2DD-08002B30309D}" Locker
echo Folder Unlocked successfully
goto End
:FAIL
echo Invalid password
goto end
:MDLOCKER
md Locker
echo Locker created successfully
goto End
:End
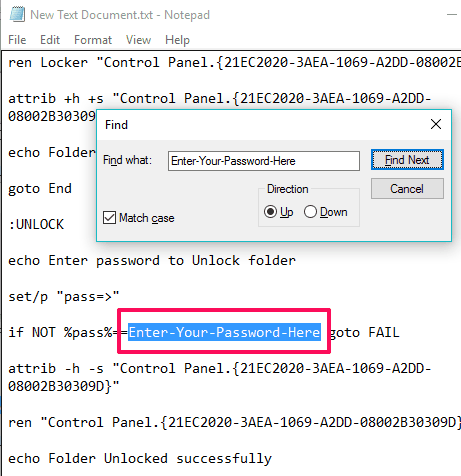
Step 3: After pasting the code in that text file, you need to search for “Enter-Your-Password-Here” text. Replace that text with a password of your choice.
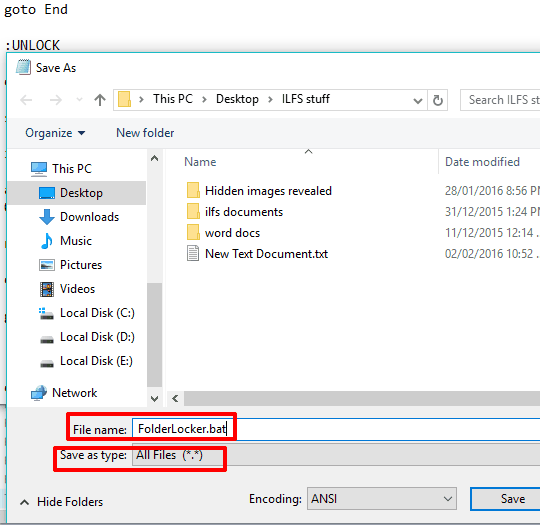
Step 4: Save the file as ‘FolderLocker.bat‘ within the same location. Select Save as type to ‘All Files (*.*)‘ and then enter file name as FolderLocker.bat.
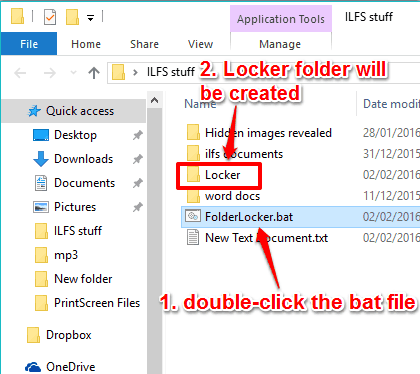
Step 5: Double click the bat file you just created and it will automatically create a “Locker” folder.
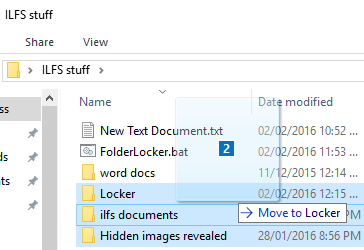
Step 6: Now drag n drop the folders and files that you want to protect in Locker folder. You can add folders of any drive in Locker folder.
Wait! Task is not done yet.
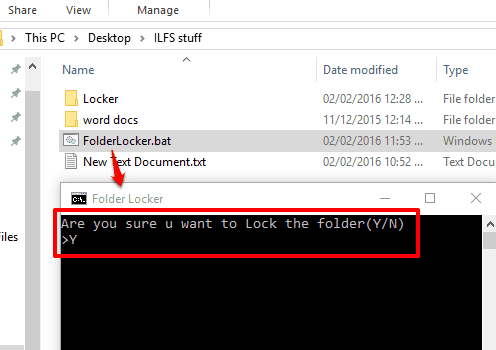
Step 7: Execute FolderLocker.bat file again. This time, it will open a Command Prompt window. It will prompt you whether you want to lock the folder. Press ‘Y‘ and then enter to confirm your action.
Now the task is done. It will lock the folder as well as hide it from its location. Your files and folders are safe now.
How To Unlock Password Protected Folder In Windows 10?
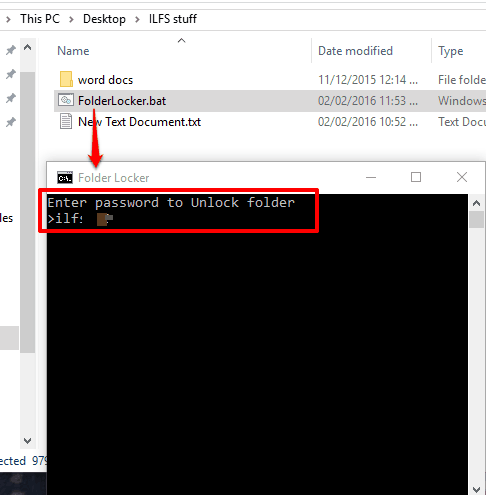
To get back your important folders and files stored in the password protected folder, you need to execute FolderLocker.bat file. After this, enter the password you have set, and press Enter.
That’s it! It will immediately unlock the folder as well as make it visible again in its location. You can double-click the folder to access all your folders and files.
The Verdict:
It’s a safe method to password protect a folder in Windows 10 without installing any third-party product. The method seems a bit lengthy but effective. Try it. I recommend that you first try this on an empty folder to see that you are able to successfully lock and unlock the password. In case something goes wrong and you are not able to unlock the folder, it will become difficult to retrieve the content.
Also check out some other Windows 10 tutorials:
